Failure only happens when you stop trying. Tenacity wins. 
-
Hi all and welcome to TheWoodHaven2 brought into the 21st Century, kicking and screaming! We all have Alasdair to thank for the vast bulk of the heavy lifting to get us here, no more so than me because he's taken away a huge burden of responsibility from my shoulders and brought us to this new shiny home, with all your previous content (hopefully) still intact! Please peruse and feed back. There is still plenty to do, like changing the colour scheme, adding the banner graphic, tweaking the odd setting here and there so I have added a new thread in the 'Technical Issues, Bugs and Feature Requests' forum for you to add any issues you find, any missing settings or just anything you'd like to see added/removed from the feature set that Xenforo offers. We will get to everything over the coming weeks so please be patient, but add anything at all to the thread I mention above and we promise to get to them over the next few days/weeks/months. In the meantime, please enjoy!
You are using an out of date browser. It may not display this or other websites correctly.
You should upgrade or use an alternative browser.
You should upgrade or use an alternative browser.
Dreadnought SS Guitar (In the absence of an arbor press...)
- Thread starter Malc2098
- Start date
Even when you're the pigeon, it still might mean that not everything will go 100%
This cutaway model has presented problems with getting the binding and purfling to fit exactly round the tighter curves. The Purpleheart is so hard, especially after it's been heated to bend, that it's a struggle to seat it in firmly into its rebate along with the purfling into its rebate at the same time.
This is how much tape I've used to try and get it to fit neatly.

I won't know till tomorrow how neatly, or otherwise, it has gone.
This cutaway model has presented problems with getting the binding and purfling to fit exactly round the tighter curves. The Purpleheart is so hard, especially after it's been heated to bend, that it's a struggle to seat it in firmly into its rebate along with the purfling into its rebate at the same time.
This is how much tape I've used to try and get it to fit neatly.

I won't know till tomorrow how neatly, or otherwise, it has gone.
AJB Temple
Sequoia
- Joined
- Apr 15, 2019
- Messages
- 5,777
- Reaction score
- 99
- Name
- Adrian
Wow, that looks a proper struggle. Was it not worth making a press template out of a piece of MDF to exactly fit the profile? Then you could have clamped it in effect at every point. Tape is such pot luck for breakaway on the glue line. Hope it goes well when you slip the tape off. Fingers crossed.
Well, it's not perfect, but for my first attempt with a guitar, it's not bad, I suppose.

Tape off and using that little 101 block plane to level the pufling.

There are all sorts of little gaps here and there, but too small to open up and fill.


It's not finished. I've just used cabinet scrapers to level the bindings to the front, back and rims.
I think it will look pretty when it's finished, and you won't see the blemishes from the audience.

Tape off and using that little 101 block plane to level the pufling.

There are all sorts of little gaps here and there, but too small to open up and fill.


It's not finished. I've just used cabinet scrapers to level the bindings to the front, back and rims.
I think it will look pretty when it's finished, and you won't see the blemishes from the audience.
NickM":1y8ft8l3 said:It looks great!
Agreed.
Andyp":2ajn2o00 said:NickM":2ajn2o00 said:It looks great!
Agreed.
Thank you, Gents.
thetyreman
Sapling
tidy!
Phil
Old Oak
Nice! 

duke
New Shoots
Looking good;I wish I had the resolve to build a musical instrument. Maybe some day.Well, it's not perfect, but for my first attempt with a guitar, it's not bad, I suppose.
View attachment 25639
Tape off and using that little 101 block plane to level the pufling.
View attachment 25640
There are all sorts of little gaps here and there, but too small to open up and fill.
View attachment 25641
View attachment 25642
View attachment 25643
It's not finished. I've just used cabinet scrapers to level the bindings to the front, back and rims.
I think it will look pretty when it's finished, and you won't see the blemishes from the audience.
I saved up and bought this jig some time ago. I've watched the videos, written down the transcripts, and still not sure I've got it right. So join me on this little journey.
First set up the jig for the length of the M&T.

Set up the practice piece with the jig and clamp everything to the bench.

Set up the router depths with a double bearing following cutter.

Gently nibble the waste away through to the finishing depth, and that looks quite nice so far.
Mortise routing after lunch.
First set up the jig for the length of the M&T.

Set up the practice piece with the jig and clamp everything to the bench.

Set up the router depths with a double bearing following cutter.

Gently nibble the waste away through to the finishing depth, and that looks quite nice so far.
Mortise routing after lunch.
Time to reset the jig to the mortise.

Note the neat little insert to align to the centre line. (Once the instrument components start coming together, everything is registered off the centreline.)

Ready to rout, not forgetting to set router depth so that bearings register to the jig, or you start routing aircraft grade aluminium. (DAMHIK )
)

They look the same size and shape.
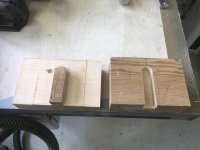
But the jig manufacturer does say it will be a snug fit that might need adjusting.

So after not much fettling, it fits snugly.

Except as this is a manky old bit of nondescript pine, some of it gave way. So, next practice will be with a bit of hardwood.

Note the neat little insert to align to the centre line. (Once the instrument components start coming together, everything is registered off the centreline.)

Ready to rout, not forgetting to set router depth so that bearings register to the jig, or you start routing aircraft grade aluminium. (DAMHIK

They look the same size and shape.

But the jig manufacturer does say it will be a snug fit that might need adjusting.

So after not much fettling, it fits snugly.

Except as this is a manky old bit of nondescript pine, some of it gave way. So, next practice will be with a bit of hardwood.
Found a piece of oak to try the jig out.

The mortise went well.

So did the tenon.

The fit was not only really snug, it was tight.

But, only a couple of light passes with the sanding block either side of the tenon and either side of the mortise, and it slid together smoothly, but still with a little resistance.
Next I've got to consider the angles of the neck to body joint. The design I'm following employs a 90degree joint (other designs have a slight angle). I seem to have acquired an angle of 91.2 degrees on the join area of the body, and I can't remove any material from there. So, I'll be looking to remove 1 degree from the neck's join area before I rout the tenon. Hopefully, the Kapex can do that.

The mortise went well.

So did the tenon.

The fit was not only really snug, it was tight.

But, only a couple of light passes with the sanding block either side of the tenon and either side of the mortise, and it slid together smoothly, but still with a little resistance.
Next I've got to consider the angles of the neck to body joint. The design I'm following employs a 90degree joint (other designs have a slight angle). I seem to have acquired an angle of 91.2 degrees on the join area of the body, and I can't remove any material from there. So, I'll be looking to remove 1 degree from the neck's join area before I rout the tenon. Hopefully, the Kapex can do that.
I've been prevented from getting to the workshop while the landscapers have been in, but I can from today.
I always struggle to remember the sequence when shaping the neck to maintain as many flat faces for reference.
But….

…first I shape the neck side of the volute using rasps and getting the same curve with the oscillating bobbin sander.

Then I mark out the side elevation shape with the template previously made on the CNC Router.

Then bandsaw close to the line.

I will then temporarily stick the template to the side of the neck and route the shape smooth on the router table.
But not just now. Tomorrow, my wife and I are hosting an Open Workshop morning for a charity we are both beneficiaries of as well as supporters of.
I always struggle to remember the sequence when shaping the neck to maintain as many flat faces for reference.
But….

…first I shape the neck side of the volute using rasps and getting the same curve with the oscillating bobbin sander.

Then I mark out the side elevation shape with the template previously made on the CNC Router.

Then bandsaw close to the line.

I will then temporarily stick the template to the side of the neck and route the shape smooth on the router table.
But not just now. Tomorrow, my wife and I are hosting an Open Workshop morning for a charity we are both beneficiaries of as well as supporters of.
Open workshop was a success this morning. They liked my coffee. 
I thought about using the router table, but the Triton is a beast and the 1/2" shaft 35mm bearing guided cutter is big. So I decided to work out a way of using the battery operated router.

I clamped the template to the work and cut to depth in three passes. As you can see, that didn't even get to the middle of the work.
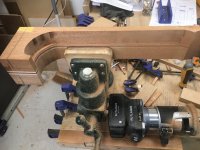
Turn it over and do the other side…..

…leaving a ridge down the middle.

Using rasps to remove the ridge, with tape either side to see when I leaned too far one way or the other. Then finishing with the rolling pin sander to smooth out from the volute to the middle of the neck.
Heel end tomorrow.
I thought about using the router table, but the Triton is a beast and the 1/2" shaft 35mm bearing guided cutter is big. So I decided to work out a way of using the battery operated router.

I clamped the template to the work and cut to depth in three passes. As you can see, that didn't even get to the middle of the work.

Turn it over and do the other side…..

…leaving a ridge down the middle.

Using rasps to remove the ridge, with tape either side to see when I leaned too far one way or the other. Then finishing with the rolling pin sander to smooth out from the volute to the middle of the neck.
Heel end tomorrow.
duke
New Shoots
Constructing the neck looks to be a labour of love or hate. Progress is good Malc. What part of the guitar construction / assembly have you found most difficult.
Constructing the neck looks to be a labour of love or hate. Progress is good Malc. What part of the guitar construction / assembly have you found most difficult.
Thanks, Duke. Two things I find difficult. This is my hobby, so I don't spend regular hours in the workshop. This results in my brain not knowing quite where I should be each time I return to the workshop, for example after a holiday break.
The second is without doubt the binding and purfling rebates, because they don't follow a level plane around the back especially, which is why I had to go to the trouble of building the binding router tower jig thingy.
But I do get a a weird sense of satisfaction solving problems to all the issues. A professional shop would have all the machines, tools and expertise, of course, I have to make my own. Occasionally I splash out to buy a specialist tool, but it's difficult to financially justify at two instruments a year. That means they only get used once a year.
“Rolling Pin Sander”??
Is this just a sanding drum by a different name?
Is this just a sanding drum by a different name?
Sort of, Andy. It has a handle at one end and connects to your cordless drill at the other, with a sanding drum or bobbin, in between. The one I have can fit any of the bobbins on my Triton oscillating belt and bobbin sander. So I can use a number of different diameter bobbins with it. So you hold it with two hands and can 'steer' it along the work to be sanded. A bit like when you roll your pastry, but powered by a drill.“Rolling Pin Sander”??
Is this just a sanding drum by a different name?
AJB Temple
Sequoia
- Joined
- Apr 15, 2019
- Messages
- 5,777
- Reaction score
- 99
- Name
- Adrian
Looks like a very shallow D profile Malc. Presumably this is per the plan?
Edit: obvs not seen the profile but the thickness suggests it.
Edit: obvs not seen the profile but the thickness suggests it.
It's similar to a Martin heel profile. About 19mm will come off the bottom of that heel blank.Looks like a very shallow D profile Malc. Presumably this is per the plan?
Edit: obvs not seen the profile but the thickness suggests it.
AJB Temple
Sequoia
- Joined
- Apr 15, 2019
- Messages
- 5,777
- Reaction score
- 99
- Name
- Adrian
Sorry Malc, I was talking about along the length of the neck.It's similar to a Martin heel profile. About 19mm will come off the bottom of that heel blank.
Sorry, I misunderstood. Plus the thickness of the fretboard.Sorry Malc, I was talking about along the length of the neck.
Accurate alignment of the fretboard to the neck.

Using the fretboard template, I drill two 1.0mm holes in the template where the first and 12th fret slots are.
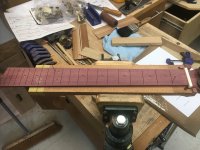
I transfer the location of the holes to the neck and to the fretboard and use1.0mm pins to locate in those holes. The fretboard will fit to the neck in the same place everytime, and especially when I come to glue them together.
Time to superglue the Mother of Pearl dot markers in to the fretboard….

…and sand them flush. Tricky stuff shell powder; frequent hoovering and mask needed.

Sanded level, then rinse and repeat.

Ready for side markers and then fitting the frets.
Admins, as suggested, I inserted images as thumbnails. However, when clicking on them in preview mode, they open in a new tab in my browser. this doesn't seem to have happened to me before. Have I done something wrong?

Using the fretboard template, I drill two 1.0mm holes in the template where the first and 12th fret slots are.

I transfer the location of the holes to the neck and to the fretboard and use1.0mm pins to locate in those holes. The fretboard will fit to the neck in the same place everytime, and especially when I come to glue them together.
Time to superglue the Mother of Pearl dot markers in to the fretboard….

…and sand them flush. Tricky stuff shell powder; frequent hoovering and mask needed.

Sanded level, then rinse and repeat.

Ready for side markers and then fitting the frets.
Admins, as suggested, I inserted images as thumbnails. However, when clicking on them in preview mode, they open in a new tab in my browser. this doesn't seem to have happened to me before. Have I done something wrong?
The forum software doesn’t load the code to show images as a gallery into the preview mode… it assumes that in preview you know your images and can see they are the right images in the right place without enlarging them…Admins, as suggested, I inserted images as thumbnails. However, when clicking on them in preview mode, they open in a new tab in my browser. this doesn't seem to have happened to me before. Have I done something wrong?
Once you post it adds in the gallery software so that the reader can click to see them enlarged…
i.e. don’t worry - that is how it is meant to work!
Having fitted the dot markers, it's now time to fit the side dot markers.
First I run a line of tape along the face of the fretboard. And using a bevel gauge because the sides are tapered, I run a pencil line parallel to the fret slots to the edge.

I then made a little jig so that I could drill a 1.5mm hole halfway across the fretboard edge.

I clamp it in place, and mark the drill depth onto the edge of the fretboard with tape.

I drill to depth and dry fit the dot material.

Remove, place a small blob of CA glue in the hole and press fit the material.

Rinse and repeat along the line.

The use a chisel and sanding stick to clean up.

Twice.

Ready to think about fitting the frets.
First I run a line of tape along the face of the fretboard. And using a bevel gauge because the sides are tapered, I run a pencil line parallel to the fret slots to the edge.

I then made a little jig so that I could drill a 1.5mm hole halfway across the fretboard edge.

I clamp it in place, and mark the drill depth onto the edge of the fretboard with tape.

I drill to depth and dry fit the dot material.

Remove, place a small blob of CA glue in the hole and press fit the material.

Rinse and repeat along the line.

The use a chisel and sanding stick to clean up.

Twice.

Ready to think about fitting the frets.
Lons
Old Oak
I'm really enjoying your build Malc and will read it whatever and however you post your images. 
The work looks perfect to me but if we weren't self critical we may as well not bother. Your skills are miles ahead of mine.
The work looks perfect to me but if we weren't self critical we may as well not bother. Your skills are miles ahead of mine.
I've just filed the tangs off the ends of 20 frets, that's 40 filings, and another 40 to go for the other instrument.
It's my choice to do this because I stopped the fret slots, and I think the edge of the fretboard looks much better without the tangs showing.

But I just can't justify the cost of the US supplied tool plus shipping plus import duty and VAT. Even the Spanish supplier's tool is in three figures.
How about the recycling of the practice piece for the bindings and purflings?
It's my choice to do this because I stopped the fret slots, and I think the edge of the fretboard looks much better without the tangs showing.

But I just can't justify the cost of the US supplied tool plus shipping plus import duty and VAT. Even the Spanish supplier's tool is in three figures.
How about the recycling of the practice piece for the bindings and purflings?
AJB Temple
Sequoia
- Joined
- Apr 15, 2019
- Messages
- 5,777
- Reaction score
- 99
- Name
- Adrian
Lengthy job but absolutely the right decision for a proper job. What fret width are you using?
2 and a bit mm.Lengthy job but absolutely the right decision for a proper job. What fret width are you using?
I might defer the fret fitting for a while.
So let's start on shaping the heel and the tenon.
First I mark out the tenon, the heel and the oversize cut.

Then I cut away most of the waste of the shape of the heel where it faces against the guitar body.

Next I double masking tape and CA glue the heel shape template to the workpiece.

The router would be so unstable on just that template so I fashion a pair of supporting 'wings'…..

…that support the router.

I then route the heel shape, just a little further than the depth of the tenon. You can see the saw mark at tenon depth.

The tenon routing will remove material all the way down to that mark. That will later be my guide when I start carving the heel by hand.
Both sides routed.
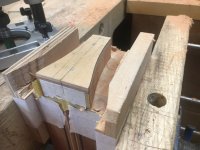
Plan view of the end elevation.

A clear view of what the heel shape will be, and also the shape of the tenon.

Tomorrow's job will be to rout the tenon shape with the hugely expensive aluminium jig.
So let's start on shaping the heel and the tenon.
First I mark out the tenon, the heel and the oversize cut.

Then I cut away most of the waste of the shape of the heel where it faces against the guitar body.

Next I double masking tape and CA glue the heel shape template to the workpiece.

The router would be so unstable on just that template so I fashion a pair of supporting 'wings'…..

…that support the router.

I then route the heel shape, just a little further than the depth of the tenon. You can see the saw mark at tenon depth.

The tenon routing will remove material all the way down to that mark. That will later be my guide when I start carving the heel by hand.
Both sides routed.

Plan view of the end elevation.

A clear view of what the heel shape will be, and also the shape of the tenon.

Tomorrow's job will be to rout the tenon shape with the hugely expensive aluminium jig.
In cabinetry, by and large, you can reference a mortise or tenon from a face side or a face edge. In luthiery, you can't after you've started to shape the components. You have to reference from a centre line.
This jig, for both the mortise and tenon, uses the centre line for its reference.
I clamp the jig onto the heel end of the neck using the centre line of the heel and the neck to align the jig.

And rout around at a shallow depth.

The I rout down to full depth of the tenon.
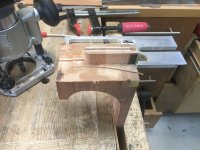
This leaves the heel shape at the body join visible for when I carve the heel.
Next I move over to the instrument body.
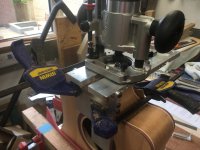
Again, the design of the jig facilitates easy locating to the centre lines on the body.

First a shallow pass.

Looks OK.
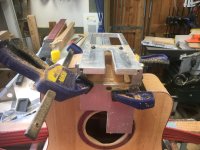
The full depth of the tenon, pus a bit more. It's the sides of the tenon in the joint and the heel joint at the body that are critical.
The upside down L shape of the soundboard plate is the the centre line of the jig to align with the body. There's also a little thingy that comes with the jig that fits into the mortise slot so you can align up there, too.

The finished mortise looks ok.

And it fits a treat and it goes in with a little resistance.
Now I've got to do some hand work to close that gap and bring the heel joint down snug onto the rim.
This jig, for both the mortise and tenon, uses the centre line for its reference.
I clamp the jig onto the heel end of the neck using the centre line of the heel and the neck to align the jig.

And rout around at a shallow depth.

The I rout down to full depth of the tenon.

This leaves the heel shape at the body join visible for when I carve the heel.
Next I move over to the instrument body.

Again, the design of the jig facilitates easy locating to the centre lines on the body.

First a shallow pass.

Looks OK.

The full depth of the tenon, pus a bit more. It's the sides of the tenon in the joint and the heel joint at the body that are critical.
The upside down L shape of the soundboard plate is the the centre line of the jig to align with the body. There's also a little thingy that comes with the jig that fits into the mortise slot so you can align up there, too.

The finished mortise looks ok.

And it fits a treat and it goes in with a little resistance.
Now I've got to do some hand work to close that gap and bring the heel joint down snug onto the rim.
Last edited:
This sounds like an easy thing to do, but I had three or four attempts in offcuts of the neck and I made a hash of it.
These are brass M6 threaded inserts that will be bolted through from the guitar body to to secure the neck and body together. This seems to be the modern commercial method of making this joint and I'm told that it makes the job easier for a luthier down the line when the player wants an adjustment. I'm using brass inserts and stainless bolts so there shouldn't be any corrosion inside the instrument.
I'm using a 10mm Fisch brad point drill with a stop collar. I made pilot holes on the centre line to take the point. I found that drilling through the Padauk and Maple that I had to go slow with medium pressure to create a neat starter hole in the Maple. After that I applied more pressure and hovered the waste every couple of millimetres. I used the speed square to help me keep the drill vertically aligned, because I couldn't get the neck on my pillar drill.

First one turned out OK.

Second one turned out OK.

I tried using the drill to tap the insert into the wood, but there wasn't enough control.

So I got out my little insert jig I made last year.

And my dinky little ratchet handle and a 4mm hex. So much more control. I applied the principle of tapping a thread; forward am eighth, back a sixteenth. And coming back out every so often to remove cut waste.

One done.

Both done. Time for tea.
I've cut the side elevation of the neck shape, I've routed the end elevation of the heel shape. I'm blooming glad I haven't yet cut the plan shape of the fretboard, or I'd not have been able to clamp the neck in the vice, because of not having parallel sides.
I also think that on the second neck, I might fit the inserts in before I rout the shape of the tenon. I was concerned that the tapping might burst the tenon. But as it happened, it didn't.
These are brass M6 threaded inserts that will be bolted through from the guitar body to to secure the neck and body together. This seems to be the modern commercial method of making this joint and I'm told that it makes the job easier for a luthier down the line when the player wants an adjustment. I'm using brass inserts and stainless bolts so there shouldn't be any corrosion inside the instrument.
I'm using a 10mm Fisch brad point drill with a stop collar. I made pilot holes on the centre line to take the point. I found that drilling through the Padauk and Maple that I had to go slow with medium pressure to create a neat starter hole in the Maple. After that I applied more pressure and hovered the waste every couple of millimetres. I used the speed square to help me keep the drill vertically aligned, because I couldn't get the neck on my pillar drill.

First one turned out OK.

Second one turned out OK.

I tried using the drill to tap the insert into the wood, but there wasn't enough control.

So I got out my little insert jig I made last year.

And my dinky little ratchet handle and a 4mm hex. So much more control. I applied the principle of tapping a thread; forward am eighth, back a sixteenth. And coming back out every so often to remove cut waste.

One done.

Both done. Time for tea.
I've cut the side elevation of the neck shape, I've routed the end elevation of the heel shape. I'm blooming glad I haven't yet cut the plan shape of the fretboard, or I'd not have been able to clamp the neck in the vice, because of not having parallel sides.
I also think that on the second neck, I might fit the inserts in before I rout the shape of the tenon. I was concerned that the tapping might burst the tenon. But as it happened, it didn't.
The end and side elevations have been shaped, now it's time to shape the plan shape; basically the fretboard shape.
Time to remove as much waste as possible.

Starting with the heel wings.

Then the nut wings.

Then the neck waste.

Now I'm ready to set the fretboard template for routing the shape.
But first I have to make a bracket to hold the neck in the vice above the vice jaws. I use the double masking tape and CA glue method.

Holds it nicely.

The I have to do the same with the fretboard template. This was milled on the cnc at the same time as the fretboard, so they are both the same plan profile.

Remember those holes I made in the fretboard and the template to locate them. I'm ready to use them.

Perfectly located and fixed to the neck.

Router ready.
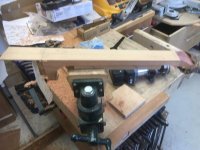
Routing finished. Sorry about the unsteady cam.

Routing finished.

View from the heel end showing the heel shape at the body join.

An idea now of how will look. Hand carving has to wait until the neck has the frets fitted and the fretboard and neck glued together.
Time to remove as much waste as possible.

Starting with the heel wings.

Then the nut wings.

Then the neck waste.

Now I'm ready to set the fretboard template for routing the shape.
But first I have to make a bracket to hold the neck in the vice above the vice jaws. I use the double masking tape and CA glue method.

Holds it nicely.

The I have to do the same with the fretboard template. This was milled on the cnc at the same time as the fretboard, so they are both the same plan profile.

Remember those holes I made in the fretboard and the template to locate them. I'm ready to use them.

Perfectly located and fixed to the neck.

Router ready.

Routing finished. Sorry about the unsteady cam.

Routing finished.

View from the heel end showing the heel shape at the body join.

An idea now of how will look. Hand carving has to wait until the neck has the frets fitted and the fretboard and neck glued together.
While setting up the mortise on the symmetrical model, I thought I'd show you the thingy that helps me make sure the jig is set up on the centre line.

It's that little insert with a point and a slot. The point is the centre of the jig and cos can be positioned with the centre lie of the work, as I have done here. The right hand side of the slot is also the centre line of the jig and can be used to align with the centre line of the workpiece.

It can be used either way up.

Just checking the jig lines up with the back, too, because it's didn't with the cutaway model.

The M&T fit nicely, so now the neck is ready to remove excessive waste before I rout the 'plan' or fretboard shape.

It's that little insert with a point and a slot. The point is the centre of the jig and cos can be positioned with the centre lie of the work, as I have done here. The right hand side of the slot is also the centre line of the jig and can be used to align with the centre line of the workpiece.

It can be used either way up.

Just checking the jig lines up with the back, too, because it's didn't with the cutaway model.

The M&T fit nicely, so now the neck is ready to remove excessive waste before I rout the 'plan' or fretboard shape.


