• Hi all and welcome to TheWoodHaven2 brought into the 21st Century, kicking and screaming! We all have Alasdair to thank for the vast bulk of the heavy lifting to get us here, no more so than me because he's taken away a huge burden of responsibility from my shoulders and brought us to this new shiny home, with all your previous content (hopefully) still intact! Please peruse and feed back. There is still plenty to do, like changing the colour scheme, adding the banner graphic, tweaking the odd setting here and there so I have added a new thread in the 'Technical Issues, Bugs and Feature Requests' forum for you to add any issues you find, any missing settings or just anything you'd like to see added/removed from the feature set that Xenforo offers. We will get to everything over the coming weeks so please be patient, but add anything at all to the thread I mention above and we promise to get to them over the next few days/weeks/months. In the meantime, please enjoy!

Three Prizes

kirkpoore1

Old Oak
Joined
Jul 21, 2014
Messages
1,164
Reaction score
225
Location
O'Fallon, Illinois
In the medieval group that my GF Lisa and I belong to we are sponsoring a competition to make an item with a team of at least three people using at least three different skill sets. Our group has the unfortunate inclination to "do it all yourself" when making things. This was frequently not the case--for example, in making a book, the parchment maker, scribe, and bookbinder were almost always different people. It is common for contests like this to give prizes to the winner, and so we have begun making items which could be entered if we weren't the sponsors. In our case, the three prizes will be a game box, board, and pieces; a pair of carved and painted light switch covers (yes, not medieval but certainly in that style), and an oak bench that will be carved and painted. Lisa will be doing most of the painting, so I had to get started on the woodworking and carving portions so that she had something to do.

We started off with material preparation. The box and switch covers will be covered in gesso before painting, and we determined to make "gesso sottile" for the final coats of gesso. Traditional gesso is made of hide glue and a powder like plaster of paris or whiting. Plaster of paris is somewhat coarse and is used for "gesso grosso", which builds the thick underlayer. The powder for gesso sottile is much finer, and we are making it by slaking plaster of paris in water and stirring regularly. Using the medieval artist Cennino Cennini's instructions, this takes 3 months. For our first batch, we let it soak for a week before drying it out and got a much, much finer powder to work with.
IMG_018569.JPGIMG_018572.JPGIMG_018573.JPGIMG_018575.JPGIMG_018577.JPG
The first picture shows jars of the slaking plaster after stirring. The particles are settling out. We're going to let these go the distance to see if make must difference. The second pic is the jar that we're using. After a week, we poured it into a collander covered in cloth and let it drain. Once the dripping had almost stopped Lisa squeezed and twisted the cloth to get as much water out as possible, forming a thick paste. We spread that out on a baking sheet as thinly as we could and put it in my bread proofer to dry out. It was about dry today, but will need to be broken up to make it into fine particles before we use it.
Next, I started on the switch covers. I carefully measured and cut holes for the switch itself and the screws to hold the cover in place. I had to route the backs out to make room for some protruding switch parts. Then I cut arch out of the tracery fronts and glued them in place. Saturday I was at one of our medieval events and spent the day carving one of the covers. Only the flat recessed area will get the gesso and paint--the rest will get home made boiled linseed oil (to be done in a few days).
IMG_018563.JPGIMG_018568.JPGIMG_018592.JPG

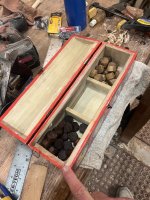
Finally, I went on to the game box. The original is 14th century and apparently German, and resides in the Metropolitan Museum of Art in New York. It's fairly small, a little over 10" long. Ours will be 13-1/2" long, giving more room for the cloth game board. I cut out and thicknessed the poplar parts, including cutting slots for interior dividers. Each piece is half an inch thick. I used a combination of hide glue and cut nails for the assembly. I started with hide glue, then temporarily used screws in place of nails to keep things solid while I nailed it together. Each nail head is covered in foil to prevent any rust from bleeding through the gesso. All the heads are countersunk so that the gesso will present a smooth surface for painting. The top is glued up from two boards, but I haven't done anything else on that yet.
MMA_box.jpgIMG_018578.JPGIMG_018579.JPGIMG_018580.JPGIMG_018581.JPGIMG_018583.JPG

Things need to progress rapidly, since the contest is at the end of February and Lisa will need time to paint. I'll start on the box lid tomorrow, then move to carving the other switch cover. After that I'll get to the bench. I also have to build a cart by the end of the month, so I'm kind of pressed for time.

Kirk
 
Very interesting work and methods.
Another school day for me, 'gesso' never heard of it.
Thought you pressing cheese. :)
 
Interesting, Kirk. As a linguistic aside, the Spanish for plaster is "yeso".
 
More work on the box today. If you look closely you’ll see that it has 3 curved channels cut into the top. To do these I mostly used hand planes. I beveled the top corners on the bandsaw, then cut a groove in each flat with the table saw. The groove served to guide the round bottom plane while I cut the channel. When I got deep enough to switch to my skew block plane to take off the resulting shoulders. The bottom also had an undercut curve in it. I again used the table saw to cut a groove, but then switched to a large gouge to chop out most of the waste. I used the round bottom plane to clean up.
IMG_6289.jpegIMG_6290.jpegIMG_6290.jpegIMG_6292.jpeg

After cutting the curves it was time to cut out the ends on the bandsaw. A little work in the spindle sander got the profiles I needed. To attach them I used yesterday’s method, hide glue and nails.
IMG_6293.jpeg IMG_6294.jpegIMG_6295.jpeg
 

Attachments

  • IMG_6291.jpeg
    IMG_6291.jpeg
    245.6 KB · Views: 4
Back on Tuesday I was carving the switch covers. Due to the anticipated drying times, on Wednesday I instead starting applying the base layers of gesso, or gesso grosso. I made this by making hide glue with a 12:1 water to glue ratio and adding small amounts of this to plaster of paris to a consistency of thinned latex paint. (Directions always say "cream" or "heavy cream", but I never use that so with the latex paint description.) I painted this on the background part of the covers and the outside of the game box and lid.
IMG_018604.JPGIMG_018606.JPG
With the game box and lid I added as much as I could to the countersunk nail heads to try to cover them up.

Lisa gave me her mortar and pestle, so I started to grind the now-dry slaked plaster of paris. This isn't the best method, but I gradually got faster by grinding less at a time. This stuff is noticeably finer than raw plaster of paris.
IMG_018607.JPG

By Thursday I'd added seven coats of gesso grosso and was ready to go to the gesso sottile the next. The box and lid had a number of really rough spots, so I figured to take the worst of them off first. I used sandpaper in a holder on the box, so that went very quickly. The lid, with it's curves, was more of a challenge. Here I used a curved card scraper instead. This went very well, and produced a very smooth surface in most areas.
IMG_018608.JPG IMG_018609.JPG IMG_018610.JPG
Friday I started on the gesso sottile, using the ground slaked plaster of paris and somewhat more hide glue. Again, this went well and I put the second coat (9th overall) onto the covers and box and then waited for them to dry. A little sanding and scraping a few hours later and these were done. On the switch covers, I scraped the gesso with a wide and then a narrow chisel, and also removed any gesso that I'd gotten on the applied carving.
IMG_018610.JPGIMG_018616.JPG
With the box and covers done it was time for an experiment. The switch covers will need a sealer over the paint to protect them from finger oils and make them easier to clean. The obvious choice to me is the very non-medieval water based polyurethane since it dries clear. But Lisa and I didn't know how it would behave with egg tempera paint, so we decided to experiment today. I'd gessoed several panels for a class earlier this month, so I gave it to Lisa to paint a small portion and then we'd check it with the poly.

Lisa got a little carried away. Instead of just a corner of the panel, she drew and painted a scene in the style of the Manesse Codex (https://en.wikipedia.org/wiki/Codex_Manesse):
IMG_018615.JPG
When we added the poly, it smeared just a tiny amount with repeated brush strokes, so Lisa was careful to just use long, even strokes. I think a second coat will go on better . You can see the smear in the lower right corner.

Lisa now has the switch covers and the box and will be painting them over the next couple of weeks. After that I'll add the hardware to the box and start oiling the covers.
IMG_018616.JPGIMG_018617.JPG
I think I did a decent job of hiding the nails. :)

More later. Tomorrow, on to the next project!

Kirk
 
Last edited:
That looks great. Did you consider a fixative before varnishing (as recommended by Jackson’s for example)?
No. My experience with egg tempera is that it's pretty tough once it sets up. Some pigment will rub off if you rub it hard, but it takes some work. My (limited) understanding is that fixative is for occasional contact The real issue is that we want more protection since this will be touched very frequently, hence the polyurethane. But we didn't know how water-based poly would interact with the tempera, especially tempera only a few hours old. So I wanted to try that out.

(Oh, and I don't know what "Jackson's" refers to in this context.)

Kirk
 
Last edited:
It’s egg tempera, basically slightly diluted egg yolk mixed with dry pigment. In this case the pigment is ultramarine blue. The yolk gives a hard shiny finish when fully dry, but you have a o keep it clear of the dog for a few months because he’ll lick it off.
 
Over the last few days I’ve been carving the legs and then adding gesso, gilding, and paint. The design is once again an acanthus pattern. I considered doing piercework but decided to keep and paint the solid background.
IMG_6468.jpeg
IMG_6474.jpeg
IMG_6479.jpeg
IMG_6482.jpeg
IMG_6483.jpeg
IMG_6485.jpeg
This afternoon I assembled the bench using wedged tenons for the legs and pegs to hold the rails in place. The initial finish coat on the wood is homemade boiled linseed oil, made by heating raw linseed oil up to about 500F. It goes on well and seems darker than the usual BLO with chemical driers. That was a couple days ago. Tonight I added a coat of Tried & True Varnish Oil.

I also used the homemade BLO on the switch covers. All painted areas on the covers and the stool will get water-based polyurethane since both will get lots of handling.
IMG_6486.jpeg

Kirk
 
Have you historical precedent for this work, Kirk? A boarded stool is quite a humble piece of furniture, so to see it gilded is something I would have thought would have been quite rare. Painted garish colours.....yes........but I'm not sure something like this would have been gilded historically.
 
Mike:

I have seen benches that have way fancier carving. I have seen other items of various sizes gilded. I haven't seen any benches with gilding, but that stuff does wear off of items that get used. Given the aesthetic of the time, and the fact that people put their money into showy stuff, I think it is quite reasonable to envision a bench with gilding.
 
Lisa has been spending serious hours painting the box.
IMG_8297.jpeg
If you look closely, the roundels have gold rings. Once painting is done I’ll add the hasp and hinges.
 
One problem with egg tempera paint it that it’s egg—which means dogs love it. Two year old Offa decided to check it out. Lisa can fix it and I don’t think it was enough to poison him (some cadmium red in the paint).

IMG_6490.jpeg
 
Prizes are now complete. Which is good, since we give them out tomorrow (Saturday).
IMG_018831.JPG IMG_018832.JPG
Details on the box:
IMG_018825.JPG IMG_018826.JPG IMG_018827.JPG IMG_018828.JPG

And a final shot of the switch covers. I put some composition leaf on the screws so they wouldn't look quite as out of place.
IMG_018830.JPG

I don't think I ever mentioned it, but the gilding on these is composition leaf, which is mostly copper. I've used real gold leaf before, but the last time was 3-4 years ago and it was about $60 for a book of 25 sheets. That same book is about $120 now. The composition leaf is about $11.

Kirk
 

Attachments

  • IMG_018829.JPG
    IMG_018829.JPG
    284.2 KB · Views: 6
We do not see many painted projects around here Kirk. I’ve no doubt that there will be 3 very happy competition winners.
 
The winning team for the prizes had created a medieval bestiary with hand drawn illustrations of mythical beasts and hand written text. The book has oak cover boards and an embroidered and appliqued cover featuring a unicorn. One entrant made the book, a second the decorated cover, and a third the calligraphy and illustrations.
IMG_018836.JPG
IMG_018837.JPG
IMG_018838.JPG

There were five other entrants, including song and performance about the battle of Maldon, a game board wood burned decoration, a Roman lamp stand with ceramic lamps and hand-pressed olive oil, a dress with hand made accessories, and a hand-engraved and painted conch shell with Aztec writing. (Heck, I didn't even know the Aztecs _had_ writing, though I was aware that the Mayans did.) I think the book was a worth victor.

Kirk
 
Well done in providing the beautiful prizes for this most unusual competition Kirk, I’ve missed the aim of the competition, but it certainly seems to dig into our Mythological past.

In my medieval group, people tend to make things all by themselves. The classic example is called "sheep to shawl", where somebody takes wool, makes thread, dyes it, weaves the cloth, and makes a garment. The thing is that doing it all yourself is really unusual for most things. The guy felling the tree isn't the guy building the cabinet who isn't the guy carving the panels who isn't the guy painting the panels. So this competition required at least three people teaming up to make something which required at least three different recognized skills with each person taking the lead in a different area.
 
Back
Top