I can get an edge mostly straight longways. But i seem to almost always put a slight bevel one direction. So then i get out my square and check along the length, then mark high spots with pencil and try to take off high spot, then either make a “crown” or inadvertently plane the opposite bevel and have to repeat a few times. Any solid tips?

-
Hi all and welcome to TheWoodHaven2 brought into the 21st Century, kicking and screaming! We all have Alasdair to thank for the vast bulk of the heavy lifting to get us here, no more so than me because he's taken away a huge burden of responsibility from my shoulders and brought us to this new shiny home, with all your previous content (hopefully) still intact! Please peruse and feed back. There is still plenty to do, like changing the colour scheme, adding the banner graphic, tweaking the odd setting here and there so I have added a new thread in the 'Technical Issues, Bugs and Feature Requests' forum for you to add any issues you find, any missing settings or just anything you'd like to see added/removed from the feature set that Xenforo offers. We will get to everything over the coming weeks so please be patient, but add anything at all to the thread I mention above and we promise to get to them over the next few days/weeks/months. In the meantime, please enjoy!
You are using an out of date browser. It may not display this or other websites correctly.
You should upgrade or use an alternative browser.
You should upgrade or use an alternative browser.
Hardest part of hand planing for me is planing edge square to face. Tips?
- Thread starter SteveMP
- Start date

Malc2098
Sequoia
For planing the edge, at school Woodwork lessons, 60+ years ago, I was taught not to hold the plane front knob, but to hold under the sole with the fore finger and the top of the sole with the thumb just in front of the mouth near the knob. The forefinger then 'feels' the workpiece as you push the plane along, and your wrist controls the the angle the plane is relative to the work edge, so with practice prevents the bevel from occurring.

Dr.Al
Old Oak
Do you have a camber on the blade (e.g. made by rubbing on the sharpening stone with extra pressure on each side in turn)? With a cambered blade, you can move the plane side to side rather than trying to tilt it. If you hold the plane body rather than front knob (as Malc described), your fingers act as a fence and keep the same part of the blade on the wood. Run it over to the right and it'll take more off on the right as the cambered blade will taper off to the left. Vice versa for the left or run it in the centre to maintain a square edge.
Dr.Al
Old Oak
Matt Estlea describes the technique quite well about a quarter of the way through this video:
I have seen Paul Sellers do this and tried it with no improvement. If I am understanding you correctly, with practice my fingers will learn to feel square between the plane sole and face of board? Maybe I just need to build the muscle memory?For planing the edge, at school Woodwork lessons, 60+ years ago, I was taught not to hold the plane front knob, but to hold under the sole with the fore finger and the top of the sole with the thumb just in front of the mouth near the knob. The forefinger then 'feels' the workpiece as you push the plane along, and your wrist controls the the angle the plane is relative to the work edge, so with practice prevents the bevel from occurring.
My 5 is cambered but my 4 is flat. All my Japanese planes are flat. I was trying a trick where Paul Sellers showed running the plane all the way to the edge on the low side so that the metal part of the sole on the side of the blade won't cut, thus only cutting the high side, but thats when I get sort of a crown on the board.Do you have a camber on the blade (e.g. made by rubbing on the sharpening stone with extra pressure on each side in turn)? With a cambered blade, you can move the plane side to side rather than trying to tilt it. If you hold the plane body rather than front knob (as Malc described), your fingers act as a fence and keep the same part of the blade on the wood. Run it over to the right and it'll take more off on the right as the cambered blade will taper off to the left. Vice versa for the left or run it in the centre to maintain a square edge.

I do not do enough edge planing to do this by feel. I found an uncambered iron and a fence clamped to the plane an acceptable solution. Something like this (not my image)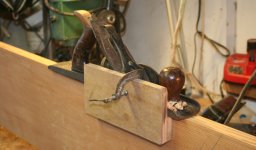
Dr.Al
Old Oak
I don't run it all the way to the side: the blade sits on the workpiece, not the metal side of the sole. The cambered blade means it doesn't cut at the extreme: you can think of it a bit like a V-shaped blade so if you slide the plane to the left, you're cutting on the right-hand side of the V and taking more off on the left than on the right. The last pass (or several passes) are down the centre & that's where the fact it's more U-shaped than V-shaped helps!My 5 is cambered but my 4 is flat. All my Japanese planes are flat. I was trying a trick where Paul Sellers showed running the plane all the way to the edge on the low side so that the metal part of the sole on the side of the blade won't cut, thus only cutting the high side, but thats when I get sort of a crown on the board.
Interesting, I had looked at the Veritas jointing fence or whatever its called, but this looks like a much cheaper solution. Never thought to clamp something to the side.I do not do enough edge planing to do this by feel. I found an uncambered iron and a fence clamped to the plane an acceptable solution. Something like this (not my image)View attachment 58262

Mike G
Petrified Pine
You've been told the basic technique by enough people above for me not to repeat that. The thing I would emphasise, though, is to slow down. I mean, really slow. I've just been doing it for an hour or so and if anyone were watching they'd think I was being unnecessarily pedestrian. Well, so bit it. It's all about control, not speed. Oh, and put a square on the edge every 2 or 3 passes of the plane.
Interesting. I watched the Matt Estlea video and his camber is much milder than what I was thinking. My 5 has a Chris Schwarz style camber, like this: https://blog.lostartpress.com/2019/11/25/grind-the-iron-fit-the-chipbreaker-part-3/I don't run it all the way to the side: the blade sits on the workpiece, not the metal side of the sole. The cambered blade means it doesn't cut at the extreme: you can think of it a bit like a V-shaped blade so if you slide the plane to the left, you're cutting on the right-hand side of the V and taking more off on the left than on the right. The last pass (or several passes) are down the centre & that's where the fact it's more U-shaped than V-shaped helps!
works well for hogging off a lot of material but probably too much for an edge.
I never purchased "Sharpen This", but looks like Chris has a similar way as Matt here for smoothing planes: https://blog.lostartpress.com/2022/09/27/how-to-hone-slightly-curved-blades/
Will have to try this on my 4.
Mike G
Petrified Pine
Check your planes for square, first. Many of them aren't!Interesting, I had looked at the Veritas jointing fence or whatever its called, but this looks like a much cheaper solution. Never thought to clamp something to the side.

Woodbloke
Sequoia
I would add to all the comments that your bench top should be dead flat in both planes; check with a spirit level and adjust accordingly with packers under the bench legs. The bench top is your main reference and if that's level and true it makes it easier to hand plane an edge, knowing that the broad side will be a true vertical - Rob
Dr.Al
Old Oak
Yeah, that's way more than I have on my planes. If I took a photo you wouldn't be able to tell there's a camber, it's just what comes from maybe five or ten strokes on each side on the last (finest grit) sharpening stone. It's enough that you can set the plane to take a very fine cut in the middle but nothing on the edges (and hence know it's aligned right) but when you extend the blade to take a deeper cut it starts cutting all or most of the way across.Interesting. I watched the Matt Estlea video and his camber is much milder than what I was thinking. My 5 has a Chris Schwarz style camber, like this: https://blog.lostartpress.com/2019/11/25/grind-the-iron-fit-the-chipbreaker-part-3/
I learned that the hard way using old vintage Stanley planes for my shooting board. Took me a while to figure out why it wasn't working.Check your planes for square, first. Many of them aren't!
When I first heard of this camber I was wondering why it didn't just plow a trough into the wood until I saw this. Its a good visual and a nice calculator to figure out the maths based on bed angle:Yeah, that's way more than I have on my planes. If I took a photo you wouldn't be able to tell there's a camber, it's just what comes from maybe five or ten strokes on each side on the last (finest grit) sharpening stone. It's enough that you can set the plane to take a very fine cut in the middle but nothing on the edges (and hence know it's aligned right) but when you extend the blade to take a deeper cut it starts cutting all or most of the way across.

Planes and Curves - Lost Art Press
I was flattening some panels by hand the other day (too wide for my machines), and that got me thinking about plane blade camber. If you search online for
 blog.lostartpress.com
Malc2098
Sequoia
Yes, plus everything else on this thread.I have seen Paul Sellers do this and tried it with no improvement. If I am understanding you correctly, with practice my fingers will learn to feel square between the plane sole and face of board? Maybe I just need to build the muscle memory?

Thanks. I’d been using power tools for decades. I got dependent on setting up my table saw and not thinking twice in having to square up sides etc. I am fairly new to hand tools so its like learning everything from scratch.Yes, plus everything else on this thread.
GaryR
Nordic Pine
This is what I do, too. In fact, I was doing this 5 minutes ago.You've been told the basic technique by enough people above for me not to repeat that. The thing I would emphasise, though, is to slow down. I mean, really slow. I've just been doing it for an hour or so and if anyone were watching they'd think I was being unnecessarily pedestrian. Well, so bit it. It's all about control, not speed. Oh, and put a square on the edge every 2 or 3 passes of the plane.
A straight blade and with a fence won’t help much. When planing you will weight one side of the plane more than the other. In other words the push effort will be biased to one side. This causes a slight chamfer to be created in the edge your planing. The solution when trying to use a straight blade is to slightly angle the blade which is a whole waste of time and effort.
You need a slightly curved blade to plane and particularly to edge. By using your fingers as a fence you can offset the blade on the board and therefore compensate by moving the plane slightly away from the biased edge. In effect you create a slight chamfer in the blade setting by doing so. Very quickly by making a pass and measuring you will get a feel how to naturally bias your fingers on the plane body. A slight concave cut on both pieces also helps to make a better looking joint. The outside edges are crushed slightly when it’s glued up making a neater joint that reduces the amount it might open as the moisture content if the stuff changes.
When jointing start out by making sure the piece is humped or convex in the middle along its length. If it’s concave it’s very difficult when learning to achieve a good result. Starting a plane consistently at an edge takes time to learn. A hump means you start planing in the centre and work your way to the edges. A beginner almost always planes stuff hollow or concave in the centre, so staring with a hump plays to a weakness.
You need a slightly curved blade to plane and particularly to edge. By using your fingers as a fence you can offset the blade on the board and therefore compensate by moving the plane slightly away from the biased edge. In effect you create a slight chamfer in the blade setting by doing so. Very quickly by making a pass and measuring you will get a feel how to naturally bias your fingers on the plane body. A slight concave cut on both pieces also helps to make a better looking joint. The outside edges are crushed slightly when it’s glued up making a neater joint that reduces the amount it might open as the moisture content if the stuff changes.
When jointing start out by making sure the piece is humped or convex in the middle along its length. If it’s concave it’s very difficult when learning to achieve a good result. Starting a plane consistently at an edge takes time to learn. A hump means you start planing in the centre and work your way to the edges. A beginner almost always planes stuff hollow or concave in the centre, so staring with a hump plays to a weakness.

thetyreman
Nordic Pine
if you are still having trouble try buying a no7 or no8, for me it transformed my hand planing, just keep practising jointing until you get it right with no gaps, I had the same problem of not quite getting it square, but with enough serious practise you'll get it spot on, it takes a lot of patience and constant checking but you'll get there, you want an airtight joint and it all starts with proper face/edge marking and removing any twist from the face.
@thetyreman makes a great point. A longer plane does make it easier to flatten along the stuff’s length. For me a number 8 or 7 was too long and large for most stuff, although they come into their own if you straightening and edging very long stuff. I find a no6 is a perfect compromise for most things. I have large hands and stand over 6’ and the longer planes are still a bit cumbersome.
I have to say, I only hand joint these days when it’s too thin to go though my thicknesser successfully.
I have to say, I only hand joint these days when it’s too thin to go though my thicknesser successfully.

Accipiter
Nordic Pine
- Joined
- Oct 16, 2025
- Messages
- 795
- Reaction score
- 611
- Location
- Frome, Somerset
- Name
- Frank
- LOCATION
- Somerset
@SteveMP ... great topic to make a posting on. Sadly I can't offer any advice as it's so long ago I used mine (I posted about having to clean mine up  ) BUT I'm finding the information and guidance posted here very interesting... so a big thanks from me. I rarely got it right when I did need to plane edges so now have a better understanding.
) BUT I'm finding the information and guidance posted here very interesting... so a big thanks from me. I rarely got it right when I did need to plane edges so now have a better understanding.
Malc2098
Sequoia
I have used a shooting setup to plane an edge with my No 6 occasionally.
Obviously you are restricted to length in this setup up, but if your plane side is 90 degrees to the sole and you have a flat board to shoot off, I use MDF, and the bench is flat, then with a fine cut I have found that it works for me.
Obviously you are restricted to length in this setup up, but if your plane side is 90 degrees to the sole and you have a flat board to shoot off, I use MDF, and the bench is flat, then with a fine cut I have found that it works for me.

Sheffield Tony
Nordic Pine
A cambered iron is the only way. A perfectly straight edge can only deliver a flat surface with perfect control, more likely a convex one. Cambered iron makes a flat surface possible, even in the presence of slight deviation of plane angle / pressure.
Yeah gonna try and put the camber on my #4 like Dr Al’s video from Matt Estlea and do some practice runsA cambered iron is the only way. A perfectly straight edge can only deliver a flat surface with perfect control, more likely a convex one. Cambered iron makes a flat surface possible, even in the presence of slight deviation of plane angle / pressure.

TomTrees
Sapling
- Joined
- Aug 19, 2014
- Messages
- 385
- Reaction score
- 102
You will effectively "disable" your smoother, if you emulate folks who intentionally won't show you how the tool
should work!.
Note the straight shaving, with no sign of any curling.
This is because the cap iron is actually working.
A noticeable camber at arms reach (for someone with very good eyesight) will surely be far, far too much...
which thereafter with subsequent sharpenings, would take quite a long while until the cap iron could get close enough again to work correctly,
as the corners of the cap iron would stick out otherwise.
If looking for videos, my advice is to notice the wheat from the chaff regarding the smoothing plane.
A smoother should be taking shavings which wont tear out the grain.
Don't see that, then their having you on, and they don't intend for you to progress.
A simple thing to note, proof that you won't see many demonstrate, as there's money to be made in that game.
All the best
Tom
should work!.
Note the straight shaving, with no sign of any curling.
This is because the cap iron is actually working.
A noticeable camber at arms reach (for someone with very good eyesight) will surely be far, far too much...
which thereafter with subsequent sharpenings, would take quite a long while until the cap iron could get close enough again to work correctly,
as the corners of the cap iron would stick out otherwise.
If looking for videos, my advice is to notice the wheat from the chaff regarding the smoothing plane.
A smoother should be taking shavings which wont tear out the grain.
Don't see that, then their having you on, and they don't intend for you to progress.
A simple thing to note, proof that you won't see many demonstrate, as there's money to be made in that game.
All the best
Tom