• Hi all and welcome to TheWoodHaven2 brought into the 21st Century, kicking and screaming! We all have Alasdair to thank for the vast bulk of the heavy lifting to get us here, no more so than me because he's taken away a huge burden of responsibility from my shoulders and brought us to this new shiny home, with all your previous content (hopefully) still intact! Please peruse and feed back. There is still plenty to do, like changing the colour scheme, adding the banner graphic, tweaking the odd setting here and there so I have added a new thread in the 'Technical Issues, Bugs and Feature Requests' forum for you to add any issues you find, any missing settings or just anything you'd like to see added/removed from the feature set that Xenforo offers. We will get to everything over the coming weeks so please be patient, but add anything at all to the thread I mention above and we promise to get to them over the next few days/weeks/months. In the meantime, please enjoy!

A stand(?) for a chest (with a bonus key cupboard)

NickM

Old Oak
Joined
Dec 8, 2020
Messages
1,543
Reaction score
852
Location
Near Basingstoke
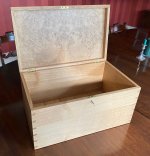
A while ago, I made a small oak chest/box which was my first foray into mitred dovetails:
IMG_0784.jpeg

I did a WIP http://www.thewoodhaven2.co.uk/viewtopic.php?f=19&t=7140&hilit=+mitred+dovetail.

I've discovered that I don't really have anywhere to put it. It's too small to go on the floor, and too big to go on any other furniture/surfaces we have. As an experiment, I thought I would have a go at making a little stand for it to sit on.

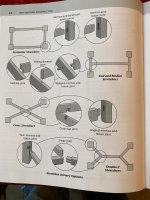
It's a very simple design - four legs with top rails. The only decision I really spent any time thinking about was the "stretcher" (is that an American term?) design. I found this helpful page in one of my books, and decided to go with the "double Y" construction:
IMG_1486.jpeg

I didn't take any photos of the components being made, but did take photos of each part before gluing up:

Four legs like this:

IMG_1478.jpeg

IMG_1479.jpeg

Four rails (2 long and 2 short). There is a very shallow rebate to roughly keep the chest in position (the bottom of the chest protrudes slightly and it's that which fits in the rebate rather than the sides of the chest):

IMG_1482.jpeg

And the components for the double Y stretcher:

IMG_1481.jpeg

IMG_1480.jpeg

I've put that all together with some glue and it's currently sitting in clamps:

IMG_1484.jpeg
 
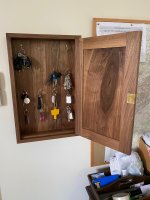
Another project I've recently completed is a small key cupboard made from American Black Walnut. I suspect the large knot on the door panel won't be to everyone's taste, but I quite like it:

IMG_1431.jpeg

IMG_1429.jpeg
 
Very nice indeed!
A key cupboard is something I could do with to replace the rather utilitarian “cash box” style metal one I have for the keys to our rental properties. But then again I don’t really want to have those on display should any one break in.

Afaik stretcher is an English term and a special case of a rail on this side of the pond.
The “double Y” is something I know as a “hay rake” as in “ a hay rake table” which believe to be an English design.
Maybe Carruthers will be along shortly to confirm or chastise the terminology :lol:

Bob
 
That's an impressive display of precision work - there's nowhere to hide with all those angled joints in the same plane. How did you size everything? Did you make a full size drawing and mark out from it?

And the knot's ok by me if you have managed to get it flat and stable in the panel. It looks stylish.
 
AndyT":1ulaiadc said:
That's an impressive display of precision work - there's nowhere to hide with all those angled joints in the same plane. How did you size everything? Did you make a full size drawing and mark out from it?

Yes, I did do a full size drawing. Unusually for me, I also drew it out in Sketch
Up as a double check of my measurements.
 
I like the hay-rake stretcher. That is nice. I'm never really sure about the furniture-on-a-stand look, so we'll see what it looks like when the whole thing is assembled.

The key cabinet is nice, too. I hope that big "knot" (it's not really, is it?) stays stable for you. They have a habit of moving differentially from the surrounding timber.

With both of them, the really big deal in their favour is the joinery. It's great to see actual joints being made, rather than just butt-jointed with a Domino which seems to be the modern way.
 
Mike G":20v1am93 said:
I like the hay-rake stretcher. That is nice. I'm never really sure about the furniture-on-a-stand look, so we'll see what it looks like when the whole thing is assembled.

I’m not sure about it either!
 
The Hay-Rake joint is a delight - it looks really difficult to cut accurately. As said above, a full size drawing is the way to go. The angled tenons into the legs remind me of the joints on the side rails of a set of dining chairs I made a while ago - I made a full size drawing for those.
John
 
johnward":3n2a3amj said:
The Hay-Rake joint is a delight - it looks really difficult to cut accurately. As said above, a full size drawing is the way to go. The angled tenons into the legs remind me of the joints on the side rails of a set of dining chairs I made a while ago - I made a full size drawing for those.
John

I chamfered the inside of the legs at 45 deg so the mortises were perpendicular to that surface and the tenons were straight. The mortises were a bit difficult to lay out though as I couldn’t use a mortise gauge as there was no surface to use as a reference.
 
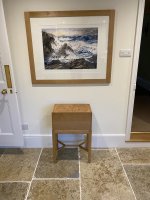
Thanks for the positive comments. Here’s the finished stand with chest on it. I think it looks alright. I’ll live with it for a while to decide!

2DA9FE70-9CFB-412A-8F4A-895CB315E320.jpeg

IMG_1492.jpeg
 
Mike G":16pikl9b said:
It's great to see actual joints being made, rather than just butt-jointed with a Domino which seems to be the modern way.
Nowt wrong with the Domino system; it's just another way of doing a m/t joint but much, much quicker. I tend to take the 'trade' approach and always ask myself the same question...'what's the easiest and quickest way to do a process?' and 9 out of 10 times it'll be to use a machine of some sort. For me, standing at the bench interminably marking out and cutting joints for hours on end is a complete faff when I can get exactly the same result in 30 seconds with a Domino. Time is everything in the trade and woodwork comes a long way second!

A couple of weeks ago I popped into see Dick & Dom (two makers I used to work with) at Wardour Workshops and what were they using to make joints? Two words; each begins with 'b' and 'j' :lol: - Rob
 
So, Rob, if you had a machine where you could feed rough sawn timber in at one end and a finished piece of furniture would pop out at the other end, untouched by human hand, that would be good for a tradesman, right? Everyone would do it, rub on a bit of finish, and present their finished works to the world.

What would then be the point of our hobby? It's the very fact that it isn't easy, that it takes time and patience, and some little skill, which keeps me coming back for more.
 
I think it depends on whether you get more satisfaction out of the outcome or the process.

I think everyone draws the line between machines and hand tools in different places. I currently draw the line at thicknessing (and to some extent) dimensioning rough timber. Beyond that, I try to do most joinery by hand because that’s what enjoy.
 
Mike G":2pvwkvdz said:
So, Rob, if you had a machine where you could feed rough sawn timber in at one end and a finished piece of furniture would pop out at the other end, untouched by human hand, that would be good for a tradesman, right? Everyone would do it, rub on a bit of finish, and present their finished works to the world.

What would then be the point of our hobby? It's the very fact that it isn't easy, that it takes time and patience, and some little skill, which keeps me coming back for more.
It's a difference in approach Mike. Your first sentence is a gross over simplification and you know it! :lol: The 'trade' approach is about time which is paramount and whatever you can do to get the job out the door and at the same time be built to the highest standards needs to be done; end of story.

It's of course still a 'hobby' for me, but I don't want to see a job going on interminably with a finishing point a very distant light at the end of a long tunnel, so I use whatever machines and associated techniques to move things along.

Andy P will testify to the difficulty and challenges of my current project which is one of the most complicated and difficult things I've ever tried. There's no way on earth that machinery of any sort could be used in the final stages, except for producing veneered panels and there's no way I'm going to do that by hand :lol: - Rob
 
You miss my point, Rob. It was the argument in support of your method which I was taking aim at......not the method itself. If anyone wants to do it like that, then fine. But don't claim to do it like that because that is what a tradesman would do, because if a tradesman could chuck some sticks in one end of a machine and extract the finish article from the other, he would. Or if he could buy the pieces in ready-made and just assemble them, he would. So your argument is the thing at fault, not your approach.

As for the thing about not wanting a job to drag on forever......you of all people are the one who lets wood settle. Admirably, you store it for months to get it acclimatised. So you DO have the time to do things differently, if you so chose. The fact is, it's just a choice to do it the way you do it, as it is just a choice for me to do it the way I do, or Bob to do things his way. I don't argue with anyone's choice of method. Not for a second. But I do see holes in some of the arguments put forward in support of those choices. If you'd just said "I do it the way I do because that's the way I prefer" I'd have just said "Fine, each to their own". The problem was you started justifying it with reference to tradesmen, and to time.
 
We've had this utterly pointless discussion time and again Mike, no more please. I have worked in the trade, albeit for a limited time (I wasn't fast enough :cry:) and that's what's coloured my approach to a certain extent; in the trade, time is everything - Rob
 
I think the "trade" difference is also about cost. Customers mostly want things that have their preferred price and aesthetic. They usually want it yesterday.

I probably have enough skill to do the joints Mike is doing with his current extension. But I would not take such a complex approach because I usually am in a hurry to get a building finished, possibly under wife pressure! But I do admire Mike's attention to detail, whilst recognising that if it was being done for a customer it would probably be too costly.

Last year I had to make a lot of very large kitchen drawers. In an ideal world and with an unlimited budget I would like to have made all the cases out of dovetailed oak. But cost was a factor and so was time, hence I used top quality ply and all the rebates were cut on a router table and all of the joints were done with dominos. I'm not proud of that but it was a practical solution working on my own and needing the job done. The domino machine and the track saw give repeatable total accuracy, without taking long.

However, if I were to make a nice display box say, then I would do it by hand, with mainly hand tools and take pride in doing it to the best of my ability. We underestimate pride in our workmanship at times - but we all know when we have done a good job and when we have cut corners.

If I look at my favourite wooden things, they pretty much all were made largely by hand.
 
Rob didn't read my post properly. Oh well. And yes, Adrian, if I was (still) earning a living woodworking I would be using a domino constantly.
 
NickM":3r0388al said:
johnward":3r0388al said:
The Hay-Rake joint is a delight - it looks really difficult to cut accurately. As said above, a full size drawing is the way to go. The angled tenons into the legs remind me of the joints on the side rails of a set of dining chairs I made a while ago - I made a full size drawing for those.
John

I chamfered the inside of the legs at 45 deg so the mortises were perpendicular to that surface and the tenons were straight. The mortises were a bit difficult to lay out though as I couldn’t use a mortise gauge as there was no surface to use as a reference.

Ah, my mistake, I didn't look closely enough at your photo. Even so it's a tricky joint and well executed.
John
 
Back
Top