

RogerM
Nordic Pine
I've been wanting to build a circular table for our kitchen breakfast area for some time in a sunburst pattern in two contrasting veneers. I had no idea whether this was going to be within my capabilities, or even which types of wood to use. The finished table will be about 140cms in diameter, so I decided that I would build some smaller test pieces 1/4 size i.e 35cm diameter, and try different ideas for contrasting timber species. In the end I settled on American Cherry and Maple, Birds-eye Maple and American Black Walnut, and finally Maple and Bubinga. As an added challenge I decided to cut my own veneers (which I have done before) and separate the two veneers with a maple and ebony string inlay.
As this was intended to be a learning exercise rather than building a finished project, photos are a bit sparse, particularly in the early stages.
I have used a 40cm x 40cm square of 18mm ply as my base material. I cut all the veneers to just under 3mm to get the best use of the wood, and then "thicknessed" them down to 2mm using my drum sander. This was all done in one batch to ensure consistency in veneer thickness. I cut a pie shaped template with a centre angle of 30 deg+ and cut the individual elements of the central sunburst from the template using a veneer saw. Then the sides were shot using my trusty Steve Maskery veneer shooting board.
The sunburst is made of 12 pieces of pie, and I suspect that the full size version will be either 16, 20 or even 24 pieces, depending on the stock I can get hold of. Alternate pieces of veneer were reversed to obtain book matches, and these were glued together in pairs. When dry, I would re-shoot the edges as necessary to get the tips coinciding as accurately as possible. Then additional pieces of pie were glued together so that I ended up eventually with 2 semicircles of veneer. My template had been deliberately cut slightly wide angled - i.e around 30.5 deg, so that when I had glued 6 pieces of veneer together they came to slightly more than a semi circle - i.e. about 183 degrees. Then I placed each semi-circle in the veneer shooting board and shot the long edge straight before glueing the 2 sides of the semi circle together to complete the top.
These were then glued to the substrate using TB1 and a vacuum bag. The first photo is jumping ahead a bit, but shows the central sunburst and the surround.

The veneer was trimmed circular after gluing using a trim router and a home made trammel, rotating around a block attached to the centre of the table using double sided carpet tape. Once in place, this will stay put until all circular cuts of the table have been completed. Once the inner sunburst has been trimmed circular, the radius of the trammel is reduced by the thickness of the cutter so that the outer edge of the cutter coincides with the edge of the veneer. Then the trammel is attached to a piece of 9mm mdf and a template of the edge is made. I cut 2 of these so that I can sandwich veneer between them and cut the curve on the router table using a bearing guided cutter.
The outer veneers are put in place one at a time and the edges trimmed along the radius using a spare plane blade along the radius. Then these are glued in place 2 or 3 at a time using the cutting jig as a caul. This is the stage I've reached in this photo.
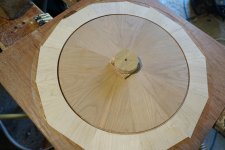
Next thing to do is cut the slot for the inlay. I use a 3mm down spiral cutter in the router and adjust the trammel radius so that the cutter is over the join for the entire circumference. As the pivot point for the trammel has not been moved, this is simple stuff. I then cut a groove about 5mm deep. Here is the American Cherry and Maple table with the inlay groove cut and showing the trammel base securely taped to the centre. I have made several of these so that I can attach the trammel to any workpiece I want without disturbing the set up.
Having tried a Trend straight 2 flute cutter, a Wealden spiral cutter leaves a much cleaner finish.
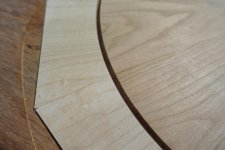
I don't fit the inlay yet as I want to leave a smooth surface for the next 2 router cuts. Next task is to cut the final table to size using the trammel. Here you can see on the Maple and Bubinga table how I have first cut a groove down to a depth of about 8mm with a small cutter, then reset the trammel about 10mm further out and cut 16mm into the 18mm ply with an 18mm cutter. I then complete the cut on the bandsaw and use the edge of the first cut as a reference face to complete the operation with a bearing guided cutter on the router table.

Now, how am I going to finish the edges? My first idea was to veneer the edges and then have a circular inlay where the edge meets the table top. Here is a photo of how it looked on the Maple and Black Walnut table before I kicked that idea into touch.

The veneering was quite easy, but attaching a string to the edge on a fairly tight radius was a nightmare. I ended up taking it back down with a block plane and trimming the edge veneer off using the router and trammel. Fortunately I hadn't moved the central pivot block so that was fairly painless.
Next idea was to attach a strip around the edge for the full thickness of the table, having first steamed it. I was using kiln dried maple and it was a b***** to bend even after 30 mins in the steamer. I think this idea would work on a full size table where the bend is less acute, but not on a smaller one. Maybe cut the edges out of the solid?
I reset the trammel so that the outer edge of the cutter coincided with the edge of the table. I then used this to cut segments from a solid piece of wood of the same species as the central sunburst of each table. With each table being 20mm thick (18mm ply + 2mm veneer) I made the edge pieces 22mm deep to allow for the upper and lower edges to be rounded over and leave a 2mm flat. Although the outer radius will be greater than the inner one, no attempt was made to allow for this as that'll all be sorted when the finished table is trimmed circular. Here are some of the edge pieces being cut in Maple. I think it's a 12mm cutter. I've cut 3/4 of the way through with the router and then finished the cut on the bandsaw and trimmed the excess off with a bearing guided cutter on the router table.

I complete the circle with 5 pieces, glueing on 2 at a time. Next job is to remove any overhang of the edges on the underside of the table using a block plane, finally finishing off with a card scraper. The same was done for the top, just leaving the last fraction of 1mm to be taken off in the drum sander later.
At this stage it was time to insert the stringing. This was simply a thin strip of ebony, glued back to back with a similar strip of Maple ( I didn't have any holly), each about 2mm thick, and then when dry, running it through the drum sander, with alternate sides presented to the drum with each pass, to ensure that the 2 contrasting woods stayed the same thickness until it was thin enough to be a tight fit in the previously routed 3mm groove.

Then I cut it into 6mm wide strips and glued it into the groove previously routed, leaving it about 1mm proud of the surface. This was taken down initially with the block plane until it was nearly, but not quite, flush with the surface.
Attach the router for the last time and set the trammel so that the inside edge of the cutter tracks in the right place inside all the joints in the edging pieces, using a largish cutter. Cut half way through, remove the centre pivot and finish off with the bandsaw and a bearing guided cutter on the router table. Round the edge over with a round over bit on the router table. To finish, I ran the whole table through the drum sander with 160 grit abranet, and then went up through the grades with the random orbital sander.

At this point SWMBO observed that they would make useful side tables for the lounge as we had guests staying over Xmas and we didn't have enough. With only a day to spare I added some pedestals which are absolutely hideous, but there was no time to design anything more elegant. Sometime I'll design something a little more delicate and finish the job. If I had known we were going to use them this way I'd have added a balancing veneer to the underside as well. The finish is 4 coats of Rustins Plastic Coating applied with a foam mini roller, cut back with 0000 grade steel wool and polished with Chestnut Oils Microcrystalline Wax to give a deep satin finish which will hopefully be bomb proof. Here are the 3 finished tables, Cherry and Maple on the left, Maple and Bubinga at the back, and Birds Eye Maple and American Black Walnut on the right.

Cherry and Maple

Birds Eye Maple and American Black Walnut
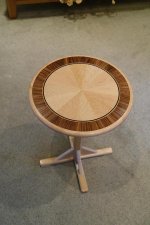
Maple and Bubinga

[ attachment=1]DSC04949.JPG[/attachment]
The eagle eyed amongst you may have noticed that the ebony string on the B/E Maple and ABW table appears to be wider than on the others. That is because it is. That was the first one I made, and the ebony is 2.5mm thick, which with 2.5mm of maple fits in a 5mm groove. I judged this to be too heavy, and the other 2 tables have a 1.5mm pair of strings to fit in a 3mm groove which I think looks better.
Overall, I'm sufficiently encouraged to attempt a larger version. At the moment the cherry and maple is our favourite, but we also love the birdseye maple on the one with the American Black Walnut outer, so will probably use that as an outer with a cherry inner. To whet your appetite, I have a gorgeous piece of birdseye maple to cut into veneers that I picked up from the back of the stack at Yandles.

I will do a full WIP but that won't start for a few weeks yet. We're off to Tenerife for 2 weeks on Sunday and when we get back SWMBO wants our bedroom decorated. I've already done it once 26 years ago, but apparently I have to do it again whether it needs it or not!
As this was intended to be a learning exercise rather than building a finished project, photos are a bit sparse, particularly in the early stages.
I have used a 40cm x 40cm square of 18mm ply as my base material. I cut all the veneers to just under 3mm to get the best use of the wood, and then "thicknessed" them down to 2mm using my drum sander. This was all done in one batch to ensure consistency in veneer thickness. I cut a pie shaped template with a centre angle of 30 deg+ and cut the individual elements of the central sunburst from the template using a veneer saw. Then the sides were shot using my trusty Steve Maskery veneer shooting board.
The sunburst is made of 12 pieces of pie, and I suspect that the full size version will be either 16, 20 or even 24 pieces, depending on the stock I can get hold of. Alternate pieces of veneer were reversed to obtain book matches, and these were glued together in pairs. When dry, I would re-shoot the edges as necessary to get the tips coinciding as accurately as possible. Then additional pieces of pie were glued together so that I ended up eventually with 2 semicircles of veneer. My template had been deliberately cut slightly wide angled - i.e around 30.5 deg, so that when I had glued 6 pieces of veneer together they came to slightly more than a semi circle - i.e. about 183 degrees. Then I placed each semi-circle in the veneer shooting board and shot the long edge straight before glueing the 2 sides of the semi circle together to complete the top.
These were then glued to the substrate using TB1 and a vacuum bag. The first photo is jumping ahead a bit, but shows the central sunburst and the surround.
The veneer was trimmed circular after gluing using a trim router and a home made trammel, rotating around a block attached to the centre of the table using double sided carpet tape. Once in place, this will stay put until all circular cuts of the table have been completed. Once the inner sunburst has been trimmed circular, the radius of the trammel is reduced by the thickness of the cutter so that the outer edge of the cutter coincides with the edge of the veneer. Then the trammel is attached to a piece of 9mm mdf and a template of the edge is made. I cut 2 of these so that I can sandwich veneer between them and cut the curve on the router table using a bearing guided cutter.
The outer veneers are put in place one at a time and the edges trimmed along the radius using a spare plane blade along the radius. Then these are glued in place 2 or 3 at a time using the cutting jig as a caul. This is the stage I've reached in this photo.
Next thing to do is cut the slot for the inlay. I use a 3mm down spiral cutter in the router and adjust the trammel radius so that the cutter is over the join for the entire circumference. As the pivot point for the trammel has not been moved, this is simple stuff. I then cut a groove about 5mm deep. Here is the American Cherry and Maple table with the inlay groove cut and showing the trammel base securely taped to the centre. I have made several of these so that I can attach the trammel to any workpiece I want without disturbing the set up.
Having tried a Trend straight 2 flute cutter, a Wealden spiral cutter leaves a much cleaner finish.
I don't fit the inlay yet as I want to leave a smooth surface for the next 2 router cuts. Next task is to cut the final table to size using the trammel. Here you can see on the Maple and Bubinga table how I have first cut a groove down to a depth of about 8mm with a small cutter, then reset the trammel about 10mm further out and cut 16mm into the 18mm ply with an 18mm cutter. I then complete the cut on the bandsaw and use the edge of the first cut as a reference face to complete the operation with a bearing guided cutter on the router table.
Now, how am I going to finish the edges? My first idea was to veneer the edges and then have a circular inlay where the edge meets the table top. Here is a photo of how it looked on the Maple and Black Walnut table before I kicked that idea into touch.
The veneering was quite easy, but attaching a string to the edge on a fairly tight radius was a nightmare. I ended up taking it back down with a block plane and trimming the edge veneer off using the router and trammel. Fortunately I hadn't moved the central pivot block so that was fairly painless.
Next idea was to attach a strip around the edge for the full thickness of the table, having first steamed it. I was using kiln dried maple and it was a b***** to bend even after 30 mins in the steamer. I think this idea would work on a full size table where the bend is less acute, but not on a smaller one. Maybe cut the edges out of the solid?
I reset the trammel so that the outer edge of the cutter coincided with the edge of the table. I then used this to cut segments from a solid piece of wood of the same species as the central sunburst of each table. With each table being 20mm thick (18mm ply + 2mm veneer) I made the edge pieces 22mm deep to allow for the upper and lower edges to be rounded over and leave a 2mm flat. Although the outer radius will be greater than the inner one, no attempt was made to allow for this as that'll all be sorted when the finished table is trimmed circular. Here are some of the edge pieces being cut in Maple. I think it's a 12mm cutter. I've cut 3/4 of the way through with the router and then finished the cut on the bandsaw and trimmed the excess off with a bearing guided cutter on the router table.
I complete the circle with 5 pieces, glueing on 2 at a time. Next job is to remove any overhang of the edges on the underside of the table using a block plane, finally finishing off with a card scraper. The same was done for the top, just leaving the last fraction of 1mm to be taken off in the drum sander later.
At this stage it was time to insert the stringing. This was simply a thin strip of ebony, glued back to back with a similar strip of Maple ( I didn't have any holly), each about 2mm thick, and then when dry, running it through the drum sander, with alternate sides presented to the drum with each pass, to ensure that the 2 contrasting woods stayed the same thickness until it was thin enough to be a tight fit in the previously routed 3mm groove.
Then I cut it into 6mm wide strips and glued it into the groove previously routed, leaving it about 1mm proud of the surface. This was taken down initially with the block plane until it was nearly, but not quite, flush with the surface.
Attach the router for the last time and set the trammel so that the inside edge of the cutter tracks in the right place inside all the joints in the edging pieces, using a largish cutter. Cut half way through, remove the centre pivot and finish off with the bandsaw and a bearing guided cutter on the router table. Round the edge over with a round over bit on the router table. To finish, I ran the whole table through the drum sander with 160 grit abranet, and then went up through the grades with the random orbital sander.
At this point SWMBO observed that they would make useful side tables for the lounge as we had guests staying over Xmas and we didn't have enough. With only a day to spare I added some pedestals which are absolutely hideous, but there was no time to design anything more elegant. Sometime I'll design something a little more delicate and finish the job. If I had known we were going to use them this way I'd have added a balancing veneer to the underside as well. The finish is 4 coats of Rustins Plastic Coating applied with a foam mini roller, cut back with 0000 grade steel wool and polished with Chestnut Oils Microcrystalline Wax to give a deep satin finish which will hopefully be bomb proof. Here are the 3 finished tables, Cherry and Maple on the left, Maple and Bubinga at the back, and Birds Eye Maple and American Black Walnut on the right.
Cherry and Maple
Birds Eye Maple and American Black Walnut
Maple and Bubinga
[ attachment=1]DSC04949.JPG[/attachment]
The eagle eyed amongst you may have noticed that the ebony string on the B/E Maple and ABW table appears to be wider than on the others. That is because it is. That was the first one I made, and the ebony is 2.5mm thick, which with 2.5mm of maple fits in a 5mm groove. I judged this to be too heavy, and the other 2 tables have a 1.5mm pair of strings to fit in a 3mm groove which I think looks better.
Overall, I'm sufficiently encouraged to attempt a larger version. At the moment the cherry and maple is our favourite, but we also love the birdseye maple on the one with the American Black Walnut outer, so will probably use that as an outer with a cherry inner. To whet your appetite, I have a gorgeous piece of birdseye maple to cut into veneers that I picked up from the back of the stack at Yandles.
I will do a full WIP but that won't start for a few weeks yet. We're off to Tenerife for 2 weeks on Sunday and when we get back SWMBO wants our bedroom decorated. I've already done it once 26 years ago, but apparently I have to do it again whether it needs it or not!


