• Hi all and welcome to TheWoodHaven2 brought into the 21st Century, kicking and screaming! We all have Alasdair to thank for the vast bulk of the heavy lifting to get us here, no more so than me because he's taken away a huge burden of responsibility from my shoulders and brought us to this new shiny home, with all your previous content (hopefully) still intact! Please peruse and feed back. There is still plenty to do, like changing the colour scheme, adding the banner graphic, tweaking the odd setting here and there so I have added a new thread in the 'Technical Issues, Bugs and Feature Requests' forum for you to add any issues you find, any missing settings or just anything you'd like to see added/removed from the feature set that Xenforo offers. We will get to everything over the coming weeks so please be patient, but add anything at all to the thread I mention above and we promise to get to them over the next few days/weeks/months. In the meantime, please enjoy!

Clamp Repair

9fingers

Moderator
Staff member
Joined
Jul 21, 2014
Messages
10,414
Reaction score
165
Location
Romsey Hampshire between Southampton and the New F
In my recent lamination/veneering project I used all my decent F clamps and still needed a bit more pressure on the longest piece. A few Aldi one-handed clamps were used but one did not stand up to the job even though they have been pretty good for the money (2 for £1.99 to clear).
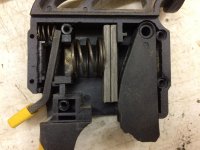
IMG_2847.JPG

First step to the repir was to clue the pieces back together. Not as a repair you understand as it would not last one squeeze but to make a pattern for a new part.

re-glued part
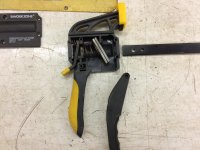
IMG_2850.JPG

Re-guled part fitted to see key features/positions needed for the new part.
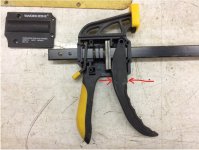
Broken here.jpg

The lever has an opening so that the clamp bar can pass through. This is longer on one side that the other to allow the lever to move about the the pivot point.
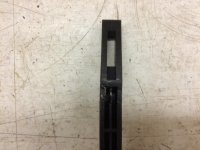
IMG_2851.JPG

I drew round the pattern onto a piece of aluminum plate and cut it out roughly on the bandsaw with extra between the red lines to allow machining a parallel section so I could grip it flat in the milling machine.

rough cut blank.jpg

Then the opening was machined in and after trimming to close to final shape, a trial fit in the clamp body.
(forgot to photo)
All seems to work so back out to the linisher to smooth out the bandsaw marks and blend the edges to be kind to the hands in use.
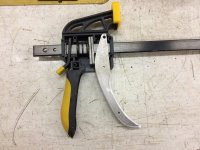
IMG_2853.JPG

All back together, lubricated and ready for work.
A totally disproportionate amount of time spent fixing a cheap clamp but very satisfying!
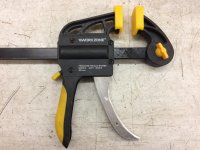
IMG_2854.JPG

I have a bit of a reputation amongst the family (where I'm known by my nickname "Minch" as bourne out by one of my Christmas gifts!
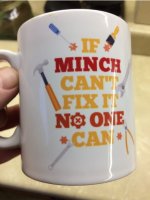
mug.jpg

Bob
 
The next point of failure is that plastic lug it rotates around. The 4 of these damn clamps I've owned all failed at the pivot point before they had the chance to break across the handle.
 
Nice Bob. I also like to fix things.

How did you 'machine' the aluminium? Do you have specific metal working tools or you worked by hand?

Sent from my SM-G973F using Tapatalk
 
Fixing the pivot point should be fairly easy - certainly on the design my clamps use.


@Sammy, mechanical engineering has been a long term hobby and sideline business when I was working in electronics research so I have a small workshop dedicated to that with lathe, vertical mill etc.
Woodwork is a relatively new hobby say for the last 15 years most of which has been in retirement.
My engineering background is the reason for my somewhat unconventional approach to woodwork and needing no use of hand cutting tools.

Bob
 
9fingers":35r67y2x said:
Fixing the pivot point should be fairly easy - certainly on the design my clamps use........

Bob

It is. Unfortunately though with plastic stuff this just moves the weak point elsewhere. You know it is going to fail exactly when it is most inconvenient.
 
Mike G":2u46rfux said:
I've found these utterly bomb proof. OK, they can't act as a spreader, but they do the clamping job much better:

https://www.its.co.uk/pd/SOL100-Solo-One-Handed-Clamp-100mm-_SOL100.htm

I had discounted that style thinking they would apply side thrust. A nightmare with glue ups.
My experience of that type of mechanism in mastic guns always ends up pushing the cartridge sideways.

How do they perform for your glue-ups Mike?

Bob
 
Brilliant. They don't twist at all. They're generally the first clamp I use in a glue up when stuff maybe moving around a bit and you need three hands. Once you've tamed everything with the solo clamps, swap over to the beefier F clamps. They're also great when using sash cramps and you maybe need to hold a packer in place. Honestly, I reckon they are utterly indispensable.

My 4 bar clamps like your repaired one sit gathering dust, not used from one year to the next, but the solo clamps are in use most days.
 
Mike G":d1fmmvov said:
Brilliant. They don't twist at all. They're generally the first clamp I use in a glue up when stuff maybe moving around a bit and you need three hands. Once you've tamed everything with the solo clamps, swap over to the beefier F clamps. They're also great when using sash cramps and you maybe need to hold a packer in place. Honestly, I reckon they are utterly indispensable.

My 4 bar clamps like your repaired one sit gathering dust, not used from one year to the next, but the solo clamps are in use most days.

They do sound good then. According to the link you gave they are not available now. Maybe there are still some about elsewhere. Toolsatan list some with a similar mechanism. I wonder if they are any good? they are the sort of place to take them back if they are not good.

Bob
 
Plus one for Solo clamps. I have 10 and the oldest was bought nearly two decades ago. They are especially nifty around router jigs, and, as MikeG says, holding summat in register until you can get some 'F' or 'G' cramps onto the job. I had 8 simultaneously on the go in the summer, fitting a kitchen worktop. Custard thinks they are the spawn of...and believes they will slip at JUST the wrong moment. I have only one that is suspect in that respect and I think restoring 'roughness' to the spindle with a few passes of a file held at 45° will knock that out of it.

Sam
 
Edit/Addenda:

DON'T BUY ANY BRAND SAVE SOLO!! :eusa-shhh:

There are black ones out there, which are heavily 'ribbed' on the 'top' surface of the 'spindle'. They make sh1te look good. They don't hold, they bend, the foot falls off the spindle...Bee and Poo used to have offers on them. The two I bought as a trial run nearly got forcefully returned c/o my local paramilitaries in BT4....

Sam
 
I too have some of those clamps that feature in the repair. They were a gift. They are definitely a clamp shaped object, but have no actual use whatsoever for clamping stuff. As soon as any pressure is applied, they let go.
 
I've got a couple of Roughneck "Solo" style clamps and they're OK, they do clamp pretty hard and seem to be built pretty well but my only niggle is that the clamping faces are very concave and made from a hard plastic which will bite into and mark softer timbers very easily.

[youtube]hoYIjOmfBIw[/youtube]

I personally prefer the Irwin Quick-Grip or Bessey Duo-Klamp clamps for lighter clamping, G-Clamps for anything that needs extraordinary pressure.
 
AJB Temple":1yjyhdlf said:
I too have some of those clamps that feature in the repair. They were a gift. They are definitely a clamp shaped object, but have no actual use whatsoever for clamping stuff. As soon as any pressure is applied, they let go.

Surprising as mine , apart from the failure, grip very well. Even when the trigger broke they stayed gripping until released so they completed the task in hand.

Bob
 
In my, somewhat limited, experience, the cheap ones have the clamping squeeze bit facing in one direction, and the good ones, e.g. Irwin, the squeeze handle faces the other way. I believe the cheap ones save a component... I had four of the cheap ones a few years back, and they all failed. The seven Irwins I own have been abused and left out in all weather, securing temporary shed doors and the like, but still scrub up well with a squirt of 3 in 1 and a caress with Scotchbrite.
 
Back
Top