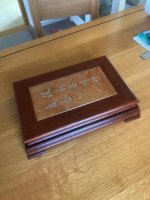
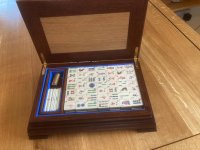
Long lead in to this one. My wife was born in Hong Kong to a military family in the early 60’s and her father commissioned several items of furniture whilst there. Following her mums death nobody wanted the furniture so I took it with a view to reusing what was apparently good quality rosewood. The timber has been sat in my shed for quite some time now waiting for a decent project.
Also purchased in Hong Kong was a decent quality mahjong set. The box was badly water damaged as has been sat in a drawer for more years than I care to remember with me saying ‘one day I’ll do something with that’.
Well one day arrived a while ago and I’ve been slowly pulling this together. This isn’t strictly a WIP as the box is finished but there were several moments when the kindling container looked likely to have some additions.
The original mahjong box was in very poor condition and whilst a repair was considered there wasn’t room for the additional playing pieces (don’t ask me I don’t even know how to play the game!) so a bigger box was required to keep it all in one place.

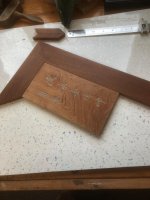
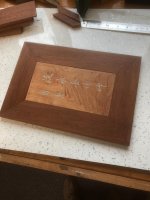
It wasn’t possible to draw out the design as we were going to use mouldings from the original furniture but we did need to increase the height with some planted on material (all from the furniture). With something like 152 tiles there were a number of options for size and the permutations ended up confusing me. We finally decided on 3 high and by stretching the dimensions slightly ended up with something very close to the golden ratio. We also wanted an oriental feel and most importantly retain the old lid that had an inscription in Chinese characters.
Malcolm has very kindly provided a translation and the intention is to attach an engraved plaque on the inside of the lid.
The old lid was badly warped and closer inspection revealed it was actually two pieces laminated together. Judicious prising lead to separation and removal of old glue.


The panel was still a bit thick to laminate onto a new backing and Bob (Rt Hon 9 Fingers Esq. of this parish) kindly offered his drum sander to reduce this. He also supplied a decent bit of 6mm mdf and some oak veneer for balancing.
Straightforward pva and clamps resulted in a reasonable panel around which the design centred.


I was extremely disappointed a couple of days later to discover that the panel, having been left on my bench, had warped agin although not as severe as the original bow. Given that moisture was the likely culprit and period of time indoors saw it go the other way! I had to monitor quite closely the optimum flatness and then machine to size and apply a few thin coats of shellac which seemed to stabilise it.
The old mouldings and lid edge all need to be thoroughly scraped of the old finish. I was assured (several times!) that it was an oil finish but there was no way that what I scraped off was oil in any way shape or form. My money was on lacquer particularly given what appeared to be added colour. Arguing with an ex Lieutenant Colonel that it was potentially not all oiled rosewood was fun! Anyhow, a good scrap and sand left me with plenty of material for the box sides and lid.
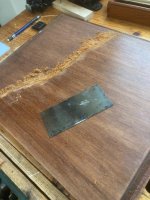

An extra piece of moulding added to the bottom to provide the height required clearly showed that further work with stain would be required to finish off.
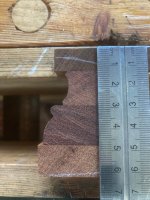
It became apparent when trying to match up mitred corners that there were several millimetres difference between the lengths of moulding showing, I think, that they were hand formed as opposed to the the regularity of machined. Hong Kong in the early 60’s and my FiL’s stories of visiting the factory where the furniture was made bears this out.
Glue up was reasonably straightforward as I decided to do 2 ‘L’ shapes rather than a single glue up. Clearly room for a CUF visit but I got away with it.
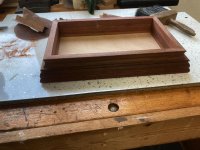
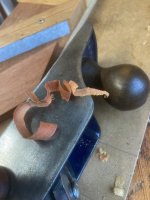
Lid dimensions dictated by the engraved panel and the amount of overhang required on the box. Settled on ‘about’ 6mm with a bit of wriggle room. It was ‘simply’ a case of cutting to length on the mitre saw set to 45 degrees then out with the trusty old shooting board and the T5 with a hock blade (something strangely satisfying about end grain shavings!) And slowly creep up on the right length. No actually that bad a job even if I say so myself!

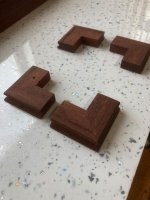
Feet were required to provide some balance to what was otherwise a bit of a ‘flat’, rather bulky looking box. Cutting some moulding down in thickness and having a play with what looked and felt right feels like it works and balances it out better.
Hinges weren’t an easy choice given the thickness of the lid (11 and a bit mm) but I ended up with smart hinges and Andrew Crawford suggested using 8BA machine screws. My gosh they’re a nice hinge! Routing hinge recesses was yet more ‘fun’ given that box base and lid were very different dimensionally so there was much measuring, trial cutting (and just a few curse words) and offering up but again the final result is quite pleasing. I’ve never used smart hinges before but I certainly will again, - worth every penny.


Finishing was about finding a stain to try and match everything without going too dark. I think we got there and with a few coats of shellac and some teak wax achieved a decent finish.
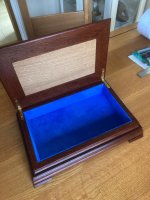
A decent lining was a must and we’re fortunate to have a leather factory not that far away that sells skin offcuts. I think the blue sets off the wood beautifully an the overall appearance pleases both of us.


It’s very unfortunate as I type this that FiL has entered end of life care so he’ll never see it. Knowing him I think he’d approve.
Also purchased in Hong Kong was a decent quality mahjong set. The box was badly water damaged as has been sat in a drawer for more years than I care to remember with me saying ‘one day I’ll do something with that’.
Well one day arrived a while ago and I’ve been slowly pulling this together. This isn’t strictly a WIP as the box is finished but there were several moments when the kindling container looked likely to have some additions.
The original mahjong box was in very poor condition and whilst a repair was considered there wasn’t room for the additional playing pieces (don’t ask me I don’t even know how to play the game!) so a bigger box was required to keep it all in one place.
It wasn’t possible to draw out the design as we were going to use mouldings from the original furniture but we did need to increase the height with some planted on material (all from the furniture). With something like 152 tiles there were a number of options for size and the permutations ended up confusing me. We finally decided on 3 high and by stretching the dimensions slightly ended up with something very close to the golden ratio. We also wanted an oriental feel and most importantly retain the old lid that had an inscription in Chinese characters.
Malcolm has very kindly provided a translation and the intention is to attach an engraved plaque on the inside of the lid.
The old lid was badly warped and closer inspection revealed it was actually two pieces laminated together. Judicious prising lead to separation and removal of old glue.
The panel was still a bit thick to laminate onto a new backing and Bob (Rt Hon 9 Fingers Esq. of this parish) kindly offered his drum sander to reduce this. He also supplied a decent bit of 6mm mdf and some oak veneer for balancing.
Straightforward pva and clamps resulted in a reasonable panel around which the design centred.
I was extremely disappointed a couple of days later to discover that the panel, having been left on my bench, had warped agin although not as severe as the original bow. Given that moisture was the likely culprit and period of time indoors saw it go the other way! I had to monitor quite closely the optimum flatness and then machine to size and apply a few thin coats of shellac which seemed to stabilise it.
The old mouldings and lid edge all need to be thoroughly scraped of the old finish. I was assured (several times!) that it was an oil finish but there was no way that what I scraped off was oil in any way shape or form. My money was on lacquer particularly given what appeared to be added colour. Arguing with an ex Lieutenant Colonel that it was potentially not all oiled rosewood was fun! Anyhow, a good scrap and sand left me with plenty of material for the box sides and lid.
An extra piece of moulding added to the bottom to provide the height required clearly showed that further work with stain would be required to finish off.
It became apparent when trying to match up mitred corners that there were several millimetres difference between the lengths of moulding showing, I think, that they were hand formed as opposed to the the regularity of machined. Hong Kong in the early 60’s and my FiL’s stories of visiting the factory where the furniture was made bears this out.
Glue up was reasonably straightforward as I decided to do 2 ‘L’ shapes rather than a single glue up. Clearly room for a CUF visit but I got away with it.
Lid dimensions dictated by the engraved panel and the amount of overhang required on the box. Settled on ‘about’ 6mm with a bit of wriggle room. It was ‘simply’ a case of cutting to length on the mitre saw set to 45 degrees then out with the trusty old shooting board and the T5 with a hock blade (something strangely satisfying about end grain shavings!) And slowly creep up on the right length. No actually that bad a job even if I say so myself!
Feet were required to provide some balance to what was otherwise a bit of a ‘flat’, rather bulky looking box. Cutting some moulding down in thickness and having a play with what looked and felt right feels like it works and balances it out better.
Hinges weren’t an easy choice given the thickness of the lid (11 and a bit mm) but I ended up with smart hinges and Andrew Crawford suggested using 8BA machine screws. My gosh they’re a nice hinge! Routing hinge recesses was yet more ‘fun’ given that box base and lid were very different dimensionally so there was much measuring, trial cutting (and just a few curse words) and offering up but again the final result is quite pleasing. I’ve never used smart hinges before but I certainly will again, - worth every penny.
Finishing was about finding a stain to try and match everything without going too dark. I think we got there and with a few coats of shellac and some teak wax achieved a decent finish.
A decent lining was a must and we’re fortunate to have a leather factory not that far away that sells skin offcuts. I think the blue sets off the wood beautifully an the overall appearance pleases both of us.
It’s very unfortunate as I type this that FiL has entered end of life care so he’ll never see it. Knowing him I think he’d approve.