• Hi all and welcome to TheWoodHaven2 brought into the 21st Century, kicking and screaming! We all have Alasdair to thank for the vast bulk of the heavy lifting to get us here, no more so than me because he's taken away a huge burden of responsibility from my shoulders and brought us to this new shiny home, with all your previous content (hopefully) still intact! Please peruse and feed back. There is still plenty to do, like changing the colour scheme, adding the banner graphic, tweaking the odd setting here and there so I have added a new thread in the 'Technical Issues, Bugs and Feature Requests' forum for you to add any issues you find, any missing settings or just anything you'd like to see added/removed from the feature set that Xenforo offers. We will get to everything over the coming weeks so please be patient, but add anything at all to the thread I mention above and we promise to get to them over the next few days/weeks/months. In the meantime, please enjoy!

Help me design a cabinet thing

Dr.Al

Old Oak
Joined
Dec 31, 2020
Messages
3,883
Reaction score
2,801
Location
Dursley, Gloucestershire
Name
Al
I'm really struggling with getting my head round designing wooden things. I can cope with engineery things with gears, screws, tapers and incredibly tight tolerances with no real problems, but when it comes down to things that have to look nice in a house, I seem to immediately come a cropper.

So far my only furniture-y project has been a side table and I had a lot of really helpful design advice over on the other place (mostly from people who have migrated to this place: thank you all!)

I'm now trying to think about something a bit more ambitious: a floor standing cabinet thing (I don't know the terminology) with a large top section with a windowed door, a something-or-other bottom section and then some feet sticking out the bottom. The something-or-other will either be another non-windowed door or a couple of drawers.

I've started doodling some ideas in CAD, but I quickly get confused about design aspects, both in terms of what will look good and also how the various bits will fit together.

Here's how far I've got so far:
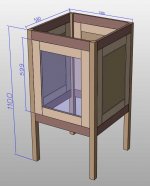
printer_enclosure_design_002.jpg

Don't ask me why that dimension came out as 599 mm rather than 600 mm - I've honestly no idea! :oops:

The different colours are just to visually distinguish between the different pieces of wood, not to imply that the wood pieces will be different colours - I'm expecting it to be all made out of oak (if I've got enough already) or either sweet chestnut or cherry (if I haven't). I'm open to suggestions though...

You'll note that the cabinet currently is missing:

  1. A top
  2. An inside base
  3. Anything in the "something-or-other" bottom section
  4. Any style?!
  5. Someone who knows what they're doing designing it!

In case anyone's interested, the cabinet will house a 3D printer (and the paving slab that the printer sits on). Most designs I've seen on the web for printer enclosures are acrylic sheets, 3D-printed brackets and a couple of £7 Ikea tables, but I thought it would be nice to make something a bit prettier. Hopefully I won't come too quickly to the conclusion that this is going to be too difficult.

Please Help! Any and all suggestions welcome! I'm very much at the playing-around-in-CAD stage so it's nice and easy to change anything (or start from scratch) if necessary.
 
Initial thoughts are that the proportions are about right, it isn’t really necessary to have the horizontal rails around the sides and the back as you would use the frames around the panels to do that job, unless it’s how you want it to look of course. Ian
 
I usually try and design stuff around the Golden Mean (1.618) proportion or variations thereof. It doesn't always work out like that but more often than not, I can get reasonably close, bearing in mind that design compromises (ie; to fit stuff and spaces etc) always need to be made.
For example, if the height of the cabinet is 600mm, the overall height ought to be around 970mm. There are lots of different permutations that you can play around with though, but's it a bit of minefield to get something that looks 'right'...and sometimes it works and sometimes it don't :cry: - Rob
 
That looks fine, Dr Al, but you made yourself a heap of unnecessary work. Your side and back panels are redundant. Well, no, the panels aren't, but their frames are. You just put a slot in the rails and stiles (legs), and the board sits directly in there.

A top overhangs all around except the back, and just fixes in places with buttons. The base can sit loose on bearers inside the bottom stiles if you want it to, or you can add secondary "show" timbers with a groove to capture the edges.

Dinner time........I'll come back to this later.
 
How accessible does the 3D printer need to be? Will you be able to reach in through the door and do all that needs to be done?
 
Thank you so much everyone, this sort of help is really useful and really appreciated.

Cabinetman":1vmbkcf6 said:
Initial thoughts are that the proportions are about right, it isn’t really necessary to have the horizontal rails around the sides and the back as you would use the frames around the panels to do that job, unless it’s how you want it to look of course. Ian

That's useful and that definitely hadn't occurred to me, so thank you. In response to "unless it's how you want it to look", I really don't know how I want it to look: that's part of the problem!

Woodbloke":1vmbkcf6 said:
I usually try and design stuff around the Golden Mean (1.618) proportion or variations thereof. It doesn't always work out like that but more often than not, I can get reasonably close, bearing in mind that design compromises (ie; to fit stuff and spaces etc) always need to be made.
For example, if the height of the cabinet is 600mm, the overall height ought to be around 970mm. There are lots of different permutations that you can play around with though, but's it a bit of minefield to get something that looks 'right'...and sometimes it works and sometimes it don't :cry: - Rob

I didn't occur to me to consider things like that, so thanks. I've tweaked the leg lengths now so the height is 970 mm, but I suspect that's something that's going to be tweaked a lot more before I start cutting wood.

Mike G":1vmbkcf6 said:
That looks fine, Dr Al, but you made yourself a heap of unnecessary work. Your side and back panels are redundant. Well, no, the panels aren't, but their frames are. You just put a slot in the rails and stiles (legs), and the board sits directly in there.

Thanks, I've updated the design to be like that.

Mike G":1vmbkcf6 said:
A top overhangs all around except the back, and just fixes in places with buttons.

That makes sense (although see below...)

Mike G":1vmbkcf6 said:
The base can sit loose on bearers inside the bottom stiles if you want it to, or you can add secondary "show" timbers with a groove to capture the edges.

I'm not sure whether I've completely understood that bit, but I've updated the drawing as best I can: please do shout if I've misunderstood!


Andyp":1vmbkcf6 said:
How accessible does the 3D printer need to be? Will you be able to reach in through the door and do all that needs to be done?

It's a good point that I hadn't particularly considered yet. Generally, getting in the front door should be fine: the "table" that the print is made on moves forward quite a long way at the end of the print so it's easy to lift the plate off. Getting reels in and out should also be okay. At the moment, I've got tools mounted on the back of the printer, so they'll have to move, but that's not a problem.

Now that I've thought about it more though, I think it would be a good idea for the top to be hinged so I can gain access from above when required (if only for an easier way to lift the printer out of the cabinet: straight up rather than lift it up and pull it forward).

I've modified the drawing with the new panel layout and with some shelves for the inner base thing to sit on. I haven't done anything about the top yet...

printer_enclosure_design_003.jpg

Cross-section attempting to show what's going on inside:

printer_enclosure_design_004.jpg

Does that look better to everyone?
 
Dr.Al":1ibf93qz said:
Mike G":1ibf93qz said:
The base can sit loose on bearers inside the bottom stiles if you want it to, or you can add secondary "show" timbers with a groove to capture the edges.

I'm not sure whether I've completely understood that bit, but I've updated the drawing as best I can: please do shout if I've misunderstood!......

That's fine in the drawing. That's the "sitting on bearers" version. The alternative is to encapsulated the edge of the board in a groove in secondary timbers (instead of sitting on top of them).
 
Just an aesthetic point, but if you are going to have a broad bottom rail below the drawer/ opening thingy, then you've not got a lot of room underneath, leaving the gap below just for spiders etc. I would A/ have a narrow rail there instead, raising the side panels up to match, or B/ leave the rail as drawn and put a skirting around the whole thing, closing off the gap. That gives it a quite substantial sort of look.
 
there is a bit of a no no for using combustible materials for printer enclosures, which is why you see lots of plastic panels used instead of wooden boxes. with that in mind, I'd suggest you might want to make it a far bit bigger than the printer (50-80mm all round).

not being able to get to the back of the bed is going to make bed levelling a bit of a pig, so if you can design it with at least 1 removable side then that might help some.

is the PSU inside with the printer or seperate? if inside, can you get enough cooling?

will you have to remove it from the box to run different materials? some PLA+ don't like being run in enclosures apparantly (although I feel like this is more to do with lack of engineering knowledge and how to adjust a print to suit rather than the actual enclosure).

lastly, don't forget to leave room for when you decide to install a camera and octopi so you can remotely monitor your prints. :)
 
Now you've got the proportions about right and have opted for a square top which is going to 'work' aesthetically. However, the lower rail(s) just above the ground and the extended side panel look strange; provided you make the construction sufficiently robust, that bottom rail as shown on the front is superfluous, unless it's a bearer for a shelf, which it doesn't appear to be - Rob
 
Mike G":29nbj0e1 said:
Just an aesthetic point, but if you are going to have a broad bottom rail below the drawer/ opening thingy, then you've not got a lot of room underneath, leaving the gap below just for spiders etc. I would A/ have a narrow rail there instead, raising the side panels up to match, or B/ leave the rail as drawn and put a skirting around the whole thing, closing off the gap. That gives it a quite substantial sort of look.

Thanks for that. I'll have a play with the drawing and see what looks right to me and then I'll probably post another image and seek more advice! It's the aesthetics I struggle with the most (I'm very much an engineer, not an artist!). I agree that the bottom rail looks odd though.

I want there to be some sort of storage down there (a drawer or a non-windowed cupboard), but I haven't worked out what it needs to look like. I was trying to avoid it looking too substantial (ref: the feedback everyone gave me on my original side table design :D ), although it is bound to be a fairly substantial thing given the size of it...
Woodbloke":29nbj0e1 said:
Now you've got the proportions about right and have opted for a square top which is going to 'work' aesthetically. However, the lower rail(s) just above the ground and the extended side panel look strange; provided you make the construction sufficiently robust, that bottom rail as shown on the front is superfluous, unless it's a bearer for a shelf, which it doesn't appear to be - Rob

That makes sense. I'll try to scheme up some sort of drawer for the bottom and then see what needs to change with the side panels and bottom rail thing.

novocaine":29nbj0e1 said:
there is a bit of a no no for using combustible materials for printer enclosures, which is why you see lots of plastic panels used instead of wooden boxes. with that in mind, I'd suggest you might want to make it a far bit bigger than the printer (50-80mm all round).

That had already occurred to me, although I'm not convinced it's that much of a problem. The hottest bit of the printer is the nozzle and heater, which occupy a very small area. They get to 250°C, which is around/above the ignition temperature of wood but with relatively little energy available given the size of the heater. Of course that doesn't account for fault conditions, but I'm not too concerned about it given all the thermostats/thermocouples on the printer.

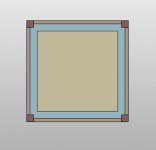
Regarding the space around the printer, there's quite a lot already. This is the top view of the design:

printer_enclosure_design_005.jpg

That beige-coloured thing in the middle is a 450 mm square paving slab (to help reduce noise by having a heavy thing under the printer). The printer fits within that envelope (with a bit of space all around) and the edges of the paving slab are 45 mm from the wood.

novocaine":29nbj0e1 said:
not being able to get to the back of the bed is going to make bed levelling a bit of a pig, so if you can design it with at least 1 removable side then that might help some.

That's an interesting thought. I've never had to do any bed levelling with it (apart from the automatic routine that runs after you move it and the quick calibration routine that runs at the start of every print). I would expect that if I have to do anything more significant, I'd just lift the whole thing out and work on it on my desk.

novocaine":29nbj0e1 said:
is the PSU inside with the printer or seperate? if inside, can you get enough cooling?

At the moment it's mounted on the frame. I'll probably move it outside (underneath the shelf) as that seems to be what most people do when they put printers in enclosures from what I've read. It's debatable whether it's necessary given the typical enclosure ambient temperatures are only 35–40°C. Obviously the components in the power supply are a lot hotter than that.

novocaine":29nbj0e1 said:
will you have to remove it from the box to run different materials? some PLA+ don't like being run in enclosures apparantly (although I feel like this is more to do with lack of engineering knowledge and how to adjust a print to suit rather than the actual enclosure).

I don't really like/use PLA, so I'm not too concerned about that. PLA is very brittle and from what I can tell is most popular for "pretty models of things", whereas PETG is good for tools and suchlike. Somewhere just shy of 100% of what I print at the moment is PETG (without an enclosure). If that needs to be cooler then I'll run it with the door(s) open, although I'm hoping not to have to do that. The reason for wanting the enclosure is I'd like to be able to print ASA as well.

novocaine":29nbj0e1 said:
lastly, don't forget to leave room for when you decide to install a camera and octopi so you can remotely monitor your prints. :)

That's one I'm definitely taking into account: I've already got octopi set up with TWO cameras (and an endoscope on order to be #3), plus a USB-relay-controlled LED light so I can connect to octopi remotely, turn the light on and see what's going on with the webcam:

3dprinter_on_slab.jpg
 
My son has got octopi working on his printer. He has it at (boarding) school with him at the moment, but there was a time when start it printing remotely from school. He has also done some great time lapse films with it.
 
Back
Top