• Hi all and welcome to TheWoodHaven2 brought into the 21st Century, kicking and screaming! We all have Alasdair to thank for the vast bulk of the heavy lifting to get us here, no more so than me because he's taken away a huge burden of responsibility from my shoulders and brought us to this new shiny home, with all your previous content (hopefully) still intact! Please peruse and feed back. There is still plenty to do, like changing the colour scheme, adding the banner graphic, tweaking the odd setting here and there so I have added a new thread in the 'Technical Issues, Bugs and Feature Requests' forum for you to add any issues you find, any missing settings or just anything you'd like to see added/removed from the feature set that Xenforo offers. We will get to everything over the coming weeks so please be patient, but add anything at all to the thread I mention above and we promise to get to them over the next few days/weeks/months. In the meantime, please enjoy!

New Workshop / Garage renovation.

bulla

Seedling
Joined
Aug 7, 2019
Messages
16
Reaction score
0
Hi everyone,

I thought I'd start a thread to document my new Shed/Workshop/Cave, and of course try and draw upon the knowledge in this forum to make sure I don't cock it up !

In true ass about face fashion, I've had my plans approved before actually working out the fine details but I'm hoping with a lot of reading and advice they will soon become clear.

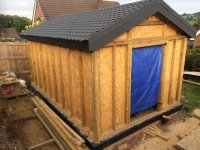
The approved plans are to build a Shed/Workshop to the rear of my existing double garage (As below). Dwarf wall (3 courses) with timber frame on top, insulated, clad in feathedge stained black and slate roof.

Once built, grinder out to cut in a door to the rear of the garage, lintel, frame and door to lead into the garage which will be partitioned off with stud work. Sounds easy ? :D
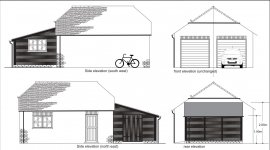
plan.jpg

plan2.jpg

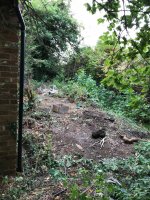
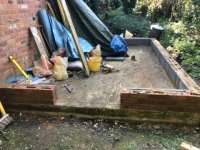
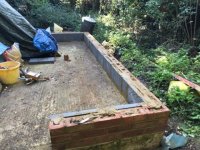
The site !
file1-2.jpg

Clearing
file3-1.jpg

9 inch base with DPM
file5-1.jpg

To give some context this clearance and slab work had all been done last year, and well before I found this forum.

Having read MikeG's and others threads I'm inspired to get my ass in gear and this leads me to my first question.

You'll see in the photo below that the DPM is only just large enough on 3 sides to lap up over the slab (about an inch over the top). So my first question is what now ? Do I just leave the DPM under the slab, then DPC on top of the slab, brickwork, DPC, then soleplate ? Or should I try and connect the DPM to some DPC before I start laying the brickwork so it laps up the side of the concrete like in the picture ?

I'm conscious I need get this part right before I start laying bricks !

Thanks for any help you feel like providing !

2.jpg
 
Welcome Bulla,

Cracking project and you look to have made a great start!

Regarding the DPM question, my understanding has always been that it is best to trim the DPM where it emerges from underneath the slab rather than lap it up the side. By lapping up the side you would force any moisture directly down and under the slab. It is better to leave the side of the slab exposed to allow any moisture than may get on it to evaporate naturally.

The DPC should not be under the bricks, they should be directly down on the top of the slab. Your DPC would be between the brickwork and the sole plate of the timber potion of your superstructure.

It is usual to roll the DPC out on a bed of wet mortar immediately before fitting your sole plate, this will account for any irregularities in your brickwork or timber and provide full support along it's length. Use wedges under the DPC to get the sole plate perfectly level until the mortar has gone off. Once cured remove and point up where your wedges were.

Obviously both these details rely upon the surrounding ground level being low enough to prevent any damage caused by wicking or splashing. I think 150mm is the accepted minimum.

Good luck with your project and I'm looking forward to seeing more progress!

Will
 
Thanks for the reply Will, much appreciated.

That makes total sense. I suppose my idea of building the earth back up around the plinth afterwards is a bad idea then ? I just thought aesthetically 9 inches of concrete isn't the nicest thing to look at ! :lol:

I assume I can still use a DPM internally on top of the concrete to then lap up the inside of the brickwork as per MikeG diagram ?
 
Nice.

You could always dig a small trench around the base and backfill with pea shingle. Worked for me.IMG_1272.JPG
 
Malc2098":1x5ijnff said:
Nice.

You could always dig a small trench around the base and backfill with pea shingle. Worked for me.

Thanks Malc, and no damp issues for you I assume ?
 
None. The shingle sits on the top of the excess of the concrete footings. I think they’d encourage drainage rather than earth / soil.
 
bulla":1dg4mahj said:
........ I suppose my idea of building the earth back up around the plinth afterwards is a bad idea then ?.......

Will has it about spot on. It is imperative that you keep the top of the concrete slab exposed above finished ground level. I recommend 50mm, but treat that as a minimum. Soil levels have a tendency to creep up over the years, especially where there is planting involved.
 
Mike G":2pzv8mfi said:
bulla":2pzv8mfi said:
........ I suppose my idea of building the earth back up around the plinth afterwards is a bad idea then ?.......

Will has it about spot on. It is imperative that you keep the top of the concrete slab exposed above finished ground level. I recommend 50mm, but treat that as a minimum. Soil levels have a tendency to creep up over the years, especially where there is planting involved.

Thanks Mike (Will and Malc too), I think I'm right in thinking Job Order is as follows

1. Trim back DPM to edge of concrete slab.
2. 3 courses of brickwork (minimum)
3. DPC
4. Soleplate

Next question then. If my slab is already down, can I anchor the soleplate into the brick with appropriate fixings, or should I look to use the steel strap method but use some concrete bolt type fixings , something like these ?

https://www.screwfix.com/p/dewalt-hex-head-blue-tip-concrete-screwbolt-6-x-60mm-50-pack/14044

If I bolt down to the concrete does my second DPM then go over the strap and bolts ? Before my insulation and finished floor ?

Another thing I've been thinking about is internal finish. I'd really like to have a plasterboard finish internally, does that effect my ability to use OSB ? Can I just fix my PB to the OSB or is that a no no ? If I cant could I use OSB on the External side as sheathing, and use Cellotex (taped) internally as my Vapour barrier ? Aesthetically it might look a bit odd as I'd have the width of the OSB, then my 25mm batten and then feather-edge all which leaves a gap between the feather-edge cladding and the dwarf wall.
 
Another question ! (Sorry)

The adjoining wall from the garage has DPC but is only single skin. I'd like to build framing against this wall and insulate but I'm unsure whether its worth matching the dwarf wall of the other three walls, or whether I can just fix my soleplate to the concrete Seeing as there's no chance of moisture along this wall.
 
You don't have to screw strapping to the concrete. It works perfectly well to screw it to the brick plinth with normal screws-and-plugs.

Plasterboard over OSB is fine. I do it all the time in houses. Don't, whatever you do, put the OSB on the outside of the frame. It's proper place is on the inside as it acts as a vapour barrier.

I wouldn't put a plinth underneath the "party" wall (to the garage). Indeed, I wouldn't put framing up there. I would screw 2x2's to the wall and insulate between them, then put another layer of 2x2's over that, the other way (ie if the first layer was horizontal the 2nd layer should be vertical), with another layer of insulation between.
 
Thanks Mike much appreciated.

Matched and ordered my bricks at the local reclamation yard yesterday, so within a couple of weeks or so should have dwarf wall built and ready for some timber.

In regards to framing a mono pitched roof, should I be framing in a standard rectangle and then building up a frame later to meet my rafters ?
 
I think you are asking if your wall plates should be horizontal, and then the gables infilled after the roof is built. If that's right, then the answer is yes, that's the usual (and probably the easiest) way.
 
Mike G":k810x288 said:
I think you are asking if your wall plates should be horizontal, and then the gables infilled after the roof is built. If that's right, then the answer is yes, that's the usual (and probably the easiest) way.

Ha yes, exactly what I was trying to ask (badly) .

Just had a thought about my previous strapping question. I think maybe straps might be necessary after all, as I'd like to replicate your project Mike with something like these behind the brick.

https://www.mkmbs.co.uk/prodb003992-440 ... eld-block/

But I understand they don't take too well to fixings like concrete block or brick ?
 
With the right screws you can screw directly into those blocks, without the need for plugs.Just be careful not to over-tighten.
 
Clipboard01.jpg

Not much to report but bricks have arrived along with sand and cement. One stumbling block (Pardon the pun) is that it appears 50mm blocks are rare as hens teeth within a 100 mile radius of here, so I'm trying to think of alternatives.

Mike I like that you've used the 50mm block to reduce the overhang of the cladding but also because it provides a little insulation for that 9 inches or so at the base of the dwarf wall.

Have I got any alternatives to using 50mm block but achieving the same effect both visually and for insulation ? I suppose I could use a 100mm block and rework the timber detail ? Soleplate on the block instead of brickwork ?

All suggestions welcome ! :D
 
For my workshop I used 100mm blocks and cut them down the middle to make 2 x 50mm blocks.

I used a hand masonry saw from Tool Station - about £15, but MikeG says that any reasonable wood saw will go through them.

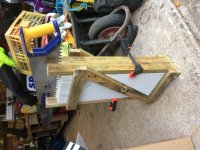
I used some roofing batten 50x25 to make a little jig to make sure I cut down them straight. There are some pictures of it on my 'shop build.

I think it took me only a couple of hors to cut enough for the build.
 
Simon_M":3l6vm6v8 said:
How much benefit do you get from having a window in the new workshop?

I have daylight in the 'shop whenever I enter and it's enough to do non close work with. The windows ventilate while the door is closed. I never considered not having one.

It's placement, though, I think is critical in security terms. It should face the house where it's continuously overlooked. If it's round the back out of the way, some scrote will break in through it.
 
Yes, is the back looking away from house e.g. to woodland? You don’t want your tools to go the same way.
 
Some progress at last ! Oh and some more questions !

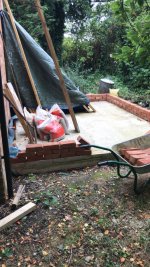
Finally found some 50mm thermalite blocks so got the dwarf wall and blocks in.

dwarf1.jpg

dwarf2.jpg

So question. I'm using Kingspan and foil tape in between my timber frame instead of batts. Am I right to assume this could act as my vapor barrier and could then use the OSB for shear strength on the outside of the frame before wrapping it all in my membrane ?
 
No, you aren't right. The OSB must go on the inside.
 
You don't put a vapour barrier on the wrong side of the insulation.
 
Mike G":2h4q5lil said:
You don't put a vapour barrier on the wrong side of the insulation.

I was wondering more why in this case the Kingspan being foil backed, and foil taped doesn't act as the vapor barrier ?
 
bulla":2kxj7wjg said:
Mike G":2kxj7wjg said:
You don't put a vapour barrier on the wrong side of the insulation.

I was wondering more why in this case the Kingspan being foil backed, and foil taped doesn't act as the vapor barrier ?

It isn't continuous. It stops and starts at each stud, and around the edges. Each of those joins is a place for air, with its water vapour, to penetrate the structure. You would then have warm moist air meeting the cold impermeable inside face of the OSB, where it would condense. Those damp patches would allow the growth of mould, and in the end, rot.
 
Mike G":1l029jp4 said:
bulla":1l029jp4 said:
Mike G":1l029jp4 said:
You don't put a vapour barrier on the wrong side of the insulation.

I was wondering more why in this case the Kingspan being foil backed, and foil taped doesn't act as the vapor barrier ?

It isn't continuous. It stops and starts at each stud, and around the edges. Each of those joins is a place for air, with its water vapour, to penetrate the structure. You would then have warm moist air meeting the cold impermeable inside face of the OSB, where it would condense. Those damp patches would allow the growth of mould, and in the end, rot.

Thanks Mike, clear as day when you put it like that :D OSB internally it is !
 
Mike G":p4lxnei6 said:
bulla":p4lxnei6 said:
Mike G":p4lxnei6 said:
You don't put a vapour barrier on the wrong side of the insulation.

I was wondering more why in this case the Kingspan being foil backed, and foil taped doesn't act as the vapor barrier ?

It isn't continuous. It stops and starts at each stud, and around the edges. Each of those joins is a place for air, with its water vapour, to penetrate the structure. You would then have warm moist air meeting the cold impermeable inside face of the OSB, where it would condense. Those damp patches would allow the growth of mould, and in the end, rot.

When we did our house, we put foil tape over those joins. Was that the wrong thing to do ?
 
No, that's fine, Roger. That's not the issue. The issue is where the vapour barrier is in relation to the insulation..............and it must be on the inside (in our climate).
 
Back
Top