

RogerM
Nordic Pine
After making an end grain cutting board as a wedding pressie for a nephew, my son showed some interest so having found a photo of what he wanted I've made this one. The full process is shown in this YouTube video so I'll not do a blow by blow account.
[youtube]J0MH97I3tg0[/youtube]
Whilst I drool over the spiral Felder planer in the video, you can do this perfectly adequately with a standard 10" hobbyist's planer thicknesser. A drum sander is a real help, but you could at a pinch flatten the end grain with a router on a sledge and finish with a belt sander and/or a ROS.
This design uses a lot of wood, so is not a cheap option. There are 20 glue-up processes involved in building it. Here is just some of the oak, sycamore and wenge that went into the building of this.

Having glued up 12 different panels, they were then glued into 4 different 3 layer sandwiches. Here are the sycamore/wenge/sycamore sandwiches in the vacuum bag.

Having glued up the four 3 layer sandwiches, as shown on Youtube, they are then cut into strips at an angle of 30 deg, and the strips glued together side by side as shown here.

These new boards are then cut into strips 43mm wide so that when rotated through 90 deg they can be sanded down to make a board 40mm thick.

These strips are then glued together, ensuring that the pattern matches at each join.

Finally cut square, sand smooth on the drum sander, smooth through the grits with a ROS and finish with a food-safe mineral oil. I used Chestnut Food Safe Oil. If you look carefully on the right, the joint slipped without me noticing during the clamping process which annoyed me intensely, but I was past the point of no return by the time I noticed.
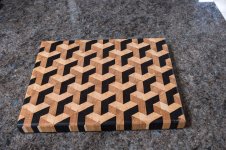
However, overall I'm happy with the result. I have sufficient left over to cut another board about 8mm thick which I will glue to a substrate, adding a solid edge, so watch this space.
[youtube]J0MH97I3tg0[/youtube]
Whilst I drool over the spiral Felder planer in the video, you can do this perfectly adequately with a standard 10" hobbyist's planer thicknesser. A drum sander is a real help, but you could at a pinch flatten the end grain with a router on a sledge and finish with a belt sander and/or a ROS.
This design uses a lot of wood, so is not a cheap option. There are 20 glue-up processes involved in building it. Here is just some of the oak, sycamore and wenge that went into the building of this.
Having glued up 12 different panels, they were then glued into 4 different 3 layer sandwiches. Here are the sycamore/wenge/sycamore sandwiches in the vacuum bag.
Having glued up the four 3 layer sandwiches, as shown on Youtube, they are then cut into strips at an angle of 30 deg, and the strips glued together side by side as shown here.
These new boards are then cut into strips 43mm wide so that when rotated through 90 deg they can be sanded down to make a board 40mm thick.
These strips are then glued together, ensuring that the pattern matches at each join.
Finally cut square, sand smooth on the drum sander, smooth through the grits with a ROS and finish with a food-safe mineral oil. I used Chestnut Food Safe Oil. If you look carefully on the right, the joint slipped without me noticing during the clamping process which annoyed me intensely, but I was past the point of no return by the time I noticed.
However, overall I'm happy with the result. I have sufficient left over to cut another board about 8mm thick which I will glue to a substrate, adding a solid edge, so watch this space.


