

Woodbloke
Sequoia
Whilst I was waiting for the shelves for the Cabinet of Curiosities, I knocked together this display stand, based on one that we'd seen in Kyoto on our recent travels.
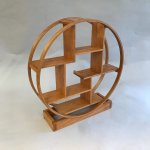
I drew it out full size and made it in the way that you used to build (and still do) model balsa aircraft, ie by fitting bits to size over the plan. The hoops are laminated in two sections and made from 5 strips of American Cherry veneer, glued with Cascamite. When set, each half was fed through the Jet 16-32 drum sander and finished at 15mm wide.
Each semicircle was then jointed with a pair of joints using a slotting cutter on the router table and a corresponding wafer of cherry was glued in; and each completed circle was cramped in a Bessey band clamp.
The supports between each of the hoops were doweled in place using small sections of bamboo BBQ skewers which although small, are incredibly strong.

The shelves were then fitted one at a time and a 6.4mm router cutter was used to joint them. This was probably one of the fiddliest, most awkward bloody projects that I've done for a long, long time; it proved so tricky to do that even detail sanding at the end was tiresome and to finish all I did was to slosh over a coat of Liberon Finishing Oil and then some wax polish over the top. Anyone asks you to do one and tells you that they're easy to make is spouting porkies - Rob
- Rob
I drew it out full size and made it in the way that you used to build (and still do) model balsa aircraft, ie by fitting bits to size over the plan. The hoops are laminated in two sections and made from 5 strips of American Cherry veneer, glued with Cascamite. When set, each half was fed through the Jet 16-32 drum sander and finished at 15mm wide.
Each semicircle was then jointed with a pair of joints using a slotting cutter on the router table and a corresponding wafer of cherry was glued in; and each completed circle was cramped in a Bessey band clamp.
The supports between each of the hoops were doweled in place using small sections of bamboo BBQ skewers which although small, are incredibly strong.
The shelves were then fitted one at a time and a 6.4mm router cutter was used to joint them. This was probably one of the fiddliest, most awkward bloody projects that I've done for a long, long time; it proved so tricky to do that even detail sanding at the end was tiresome and to finish all I did was to slosh over a coat of Liberon Finishing Oil and then some wax polish over the top. Anyone asks you to do one and tells you that they're easy to make is spouting porkies
- Rob


