• Hi all and welcome to TheWoodHaven2 brought into the 21st Century, kicking and screaming! We all have Alasdair to thank for the vast bulk of the heavy lifting to get us here, no more so than me because he's taken away a huge burden of responsibility from my shoulders and brought us to this new shiny home, with all your previous content (hopefully) still intact! Please peruse and feed back. There is still plenty to do, like changing the colour scheme, adding the banner graphic, tweaking the odd setting here and there so I have added a new thread in the 'Technical Issues, Bugs and Feature Requests' forum for you to add any issues you find, any missing settings or just anything you'd like to see added/removed from the feature set that Xenforo offers. We will get to everything over the coming weeks so please be patient, but add anything at all to the thread I mention above and we promise to get to them over the next few days/weeks/months. In the meantime, please enjoy!

Robert Sorby #2 hand Axe

AndyP

Moderator
Staff member
Joined
Jul 22, 2014
Messages
14,352
Reaction score
1,909
Location
14860 Normandy, France
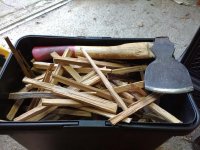
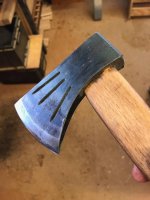
Could anyone offer some advice and guidance on how to do a better job of fitting a handle to this axe?

IMG_20201219_110141917.jpg

IMG_20201219_111245215.jpg

As you can see I made a right hash of it a few years back. One of the problems I had was the top and bottom of the "hole" where wider than the middle. So getting the handle passed the middle and still having a tight fit at the top was beyond me.
 
That sort of head needs a full width shallow depth wooden wedge that goes no deeper than the narrowest part of the head to splay out the top section.
If the wedge is too deep it will likely just grip the middle of the head not at the top.
The shoulder of the handle needs cutting to the profile of the head too.
Fiddly job!

Bob
 
9fingers":3fhvpn8k said:
The shoulder of the handle needs cutting to the profile of the head too.
Fiddly job!

Bob

I’m not sure there’s any need if you make the handle the correct thickness?

5161D50C-EF0E-4216-BD27-FFB075AC9261.jpeg

Have a look at some of the Swedish hand made Axe manufacturers Andy to see how they do it. The handle for example, unlike yours, often extends beyond the head a little.
 
I've got the Japanese carving hatchet from WH and like the chisels, the owner is required to seat the head to the handle before use. I did a lamentable job the first time round and it soon came loose, so I had to do it again.

IMG_5151.jpg

IMG_5150.jpg

I cut a full length slot (the width of the head) into the handle, tapped it into the axe head to seat it securely and then drove in a full length wedge. Just for good measure, I then drove in a brass wedge at 90deg and then used a file to flush the end, which is now about 4mm proud of the blade.

Thus far, it ain't come loose :eusa-whistle: - Rob
 
Some spot on advice so far, but, do read the excellent guide written by Robin Wood on the subject of making and fitting axe handles. Note well his comments on wood selection and annular ring direction relative to the profile of the handle. And that it must be completely dry ... I did a 4lb Goldenberg axe and thought my handle was dry when it wasn't quite. Quite a heavy lump to have working loose !

I'd grind off the burrs where the axe has been struck, buy a couple of splitting wedges, so your axe never need be abused again. You can end up spreading the eye.
 
If you look there are lots of articles and videos about axe handles on the net. Unless I had the wood I’m not sure I’d actually start from scratch though?

119092B4-6CD0-41BA-BA22-41AD892AD64E.jpeg
 
Ah, a Kent-Pattern, I'm not sure about this one was but quite a lot of these were made from a single flat section of mild steel, bent around a form to create the eye and a piece of high carbon steel sandwiched between the two cheeks of the axe and forge welded together. Not that that's relevant for what you're doing, just an interesting tidbit. I've re-handled quite a few axes and hammers, it's quite simple once you've got the knack of it.

First things first I would get a file out and knock off all that mushrooming off the head from what I assume is someone pounding it onto the handle from above? Once that is done it will be easier for the handle to project out from the top.

You should be able to re-use the existing handle although it will be roughly 1/2" to a full 1" shorter than it is now. What you need to do is put a sweeping taper onto it with a spokeshave or a knife, a similar sort of shape to half an hourglass in cross-section only less extreme, imagine the neck of the hourglass is the narrow at the centre of the axe head and where it splays out at the bottom for the sand is the same taper that is from the middle point of the axe eye to the bottom. From the narrow upwards you want it to be roughly parallel.

Once that is done, you want to put the head on and it should be a relatively snug fit, you then want to hold the handle in your hand with the top of the axe pointing towards the floor and give the handle a firm whack with a hammer at its end. The weight of the head wishes to stay in place in the air while the force of hitting the bottom of the handle drives it further into the eye of the head. This is a process of trial and error to get a good head seating, particularly if you haven't done it before, you eye up down the handle and make sure that the cutting edge is in-line with the handle and you have to take the head off and check where it's touching on the taper, if the head is a little skew-iff you can adjust it by taking material off the corresponding part of the taper to bring it back to be in-line. Generally, the eye of the head is quite dirty so it can leave quite helpful marks where it's touching so you can remove these spots to ensure that the bottom of the eye is making good contact all around the handle.

Once you're satisfied you've got a nice and snug fit on the bottom of the eye, run a saw cut down the top of the handle about 2/3rds the length of the eye and put the head back on the handle, driving it firmly onto the handle using the technique I mentioned earlier, you will actually hear the change in resonance when you've got it firmly on the handle as the handle will make quite a dead noise compared to the noise when the head is loose on the handle. Cut a new wedge that's a little longer than your saw cut, and tapers from nothing to a little wider than the two gaps on either side of the handle in the top of the eye combined and drive it in firmly with a hammer. You can put a secondary wedge in at 90-degrees or 45-degrees relative to the wooden wedge, these are usually steel and can be bought online for a couple of quid for a set of various sizes.

Once you've done all that you've got a proper tool :)
 
Not having the requisite wood to hand I bought an ash sledgehammer handle from the local shed enough for two cock-ups before I get the third one right. :) I'll leave it indoors to make sure it is fully dry and try and follow the comprehensive advices above.

I'll post images when done.
 
Sheffield Tony":3fif3xnq said:
Some spot on advice so far, but, do read the excellent guide written by Robin Wood on the subject of making and fitting axe handles. Note well his comments on wood selection and annular ring direction relative to the profile of the handle. And that it must be completely dry ... I did a 4lb Goldenberg axe and thought my handle was dry when it wasn't quite. Quite a heavy lump to have working loose !
Robin certainly knows his stuff! I should add that I soaked my Japanese Axe head and handle in raw Linseed Oil as well before I fitted it all together. Matthew advises soaking in water but I decided on LO instead just to completely saturate the wood - Rob
 
Woodbloke":vy920nwh said:
Sheffield Tony":vy920nwh said:
Some spot on advice so far, but, do read the excellent guide written by Robin Wood on the subject of making and fitting axe handles. Note well his comments on wood selection and annular ring direction relative to the profile of the handle. And that it must be completely dry ... I did a 4lb Goldenberg axe and thought my handle was dry when it wasn't quite. Quite a heavy lump to have working loose !
Robin certainly knows his stuff! I should add that I soaked my Japanese Axe head and handle in raw Linseed Oil as well before I fitted it all together. Matthew advises soaking in water but I decided on LO instead just to completely saturate the wood - Rob

That’s confusing me, I would have thought you would soak after assembly to make the wood swell into the head.
 
No idea why you would soak it ? Soaking the whole thing in linseed after assembly, that makes sense. But if you soak it in water first, won't it swell and no longer fit the eye ? Seems all wrong to me. Robin doesn't do that either in his description.
 
I'd assume that soaking in water was to soften the wood, rather than swell it - the softer it is, the tighter it could be fitted, and once it's dried out and hardened again it wouldn't be going anywhere soon.
 
spb":2tw4ibrh said:
I'd assume that soaking in water was to soften the wood, rather than swell it - the softer it is, the tighter it could be fitted, and once it's dried out and hardened again it wouldn't be going anywhere soon.
I think that's probably the reasoning. These are the instructions on WH to fit the handle:

"With many Japanese tools, the final step of preparation for use is left for the new owner to complete and these axes are no exception. The handle must be properly secured by the user before use.

A couple of sharp blows with a hammer on the base of the handle (with the axe held in the air) to fully seat the head, soak the head in water for 20 minutes and trim off the excess, then drive the metal wedge home. You may notice some blackening of the wood after soaking, this is just the tannin in the oak reacting with the iron and is completely normal."


When fitting hoops on Japanese chisels, a similar procedure of soaking the handle is followed - Rob
 
Back
Top