• Hi all and welcome to TheWoodHaven2 brought into the 21st Century, kicking and screaming! We all have Alasdair to thank for the vast bulk of the heavy lifting to get us here, no more so than me because he's taken away a huge burden of responsibility from my shoulders and brought us to this new shiny home, with all your previous content (hopefully) still intact! Please peruse and feed back. There is still plenty to do, like changing the colour scheme, adding the banner graphic, tweaking the odd setting here and there so I have added a new thread in the 'Technical Issues, Bugs and Feature Requests' forum for you to add any issues you find, any missing settings or just anything you'd like to see added/removed from the feature set that Xenforo offers. We will get to everything over the coming weeks so please be patient, but add anything at all to the thread I mention above and we promise to get to them over the next few days/weeks/months. In the meantime, please enjoy!

Slow TV - Master Craftsmen at work

Dr.Al

Old Oak
Joined
Dec 31, 2020
Messages
4,035
Reaction score
2,992
Location
Dursley, Gloucestershire
Name
Al
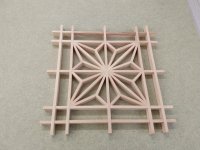
At the Japanese Carpentry exhibition in London, they had a beautiful Kumiko picture. There's a photo of it below (hidden in a "spoiler" tag" in case anyone would rather see it in the "flesh" first) - click to reveal.

20250607_104732 - Copy.jpg

Accompanying the Kumiko image were some video clips showing part of the process of making it. I was quite keen to dig out that video to have a better look. I haven't found the exact same one, but this video includes a lot of the same clips and a lot more. The only bit that I remember from the Japan House that isn't in this one was laying out the grid with dividers.

I found it to be a very enjoyable and peaceful half-an-hour watching some master craftsmen at work and thought others might be interested too. If you're planning to go to the exhibition and have deliberately not clicked on the "spoiler" image above, then don't watch the video yet either!

 
I'm off to JH on Tues 17th to have a peek at the exhibition. I've dabbled at making a small kumiko panel and it's not too difficult, provided you make the chiseling blocks to get the correct angles on the little bits of wood. Fiddly but enjoyable and the kumiko is best done in my experience using a decent quality softwood - Rob
 
I'm off to JH on Tues 17th to have a peek at the exhibition. I've dabbled at making a small kumiko panel and it's not too difficult, provided you make the chiseling blocks to get the correct angles on the little bits of wood. Fiddly but enjoyable and the kumiko is best done in my experience using a decent quality softwood - Rob
When I made my first Kumiko project (which was much simpler than that drawing, obviously), I found maple worked quite well. I initially tried using lime (which was quite easy to buy as ready-made strips), but it was really brittle and cutting the halving joints (by hand) was a pain. On the second attempt, I made my own strips (resawn on the bandsaw and then planed on a hand plane thicknessing jig) out of maple and they worked much better.

When I made the Japanese-style Kumiko/shoji lamp, I used some obeche (another hardwood), again bought as strips. That worked very well too.

As you say, it's quite straightforward to make simple panels if you make the chiselling blocks. The thing I found most difficult was making the grids: most youtube videos and some books I've read use a table saw for that, but I wanted to make them by hand (and I don't have a table saw any more). In the video linked above, he uses a specialised hand plane with three blades: two "nickers" and a 3 mm plough blade. I used a Dozuki hand saw and a chisel.

What they're making in the video is, of course, in a completely different league to what us mere mortals dabble at.
 
As you say, it's quite straightforward to make simple panels if you make the chiselling blocks. The thing I found most difficult was making the grids: most youtube videos and some books I've read use a table saw for that, but I wanted to make them by hand (and I don't have a table saw any more).

What they're making in the video is, of course, in a completely different league to what us mere mortals dabble at.
As I'm sans tablesaur, I used a 3mm cutter in the router table to make the grids. I recollect taping severial bits together and doing all of them in one pass. Worked quite well but it took a few attempts to get them exactly right. When I finished the panel, the whole thing went through the drum sander to level off any inequalities in it's surface; made a huge difference - Rob
 
As I'm sans tablesaur, I used a 3mm cutter in the router table to make the grids. I recollect taping severial bits together and doing all of them in one pass. Worked quite well but it took a few attempts to get them exactly right. When I finished the panel, the whole thing went through the drum sander to level off any inequalities in it's surface; made a huge difference - Rob
I'd wondered about the router table (I have lots of small endmills thanks to metalworking), but I was trying to avoid any screaming monsters and it was really quite satisfying (but much more difficult) to make them by hand. Of course mine weren't completely hand-powered as I did the resawing with the bandsaw.

I gave mine a light rub on some sandpaper when they were assembled, but they'd all been thicknessed together with the hand plane jig, so hand sanding only took a few seconds.
 
I’ve used air dried lime in the past for Kumiko & found it lovely to work, I machine planed it to thickness the finish being so good it only needed the lightest of sanding, I wouldn’t have fancied cutting such thin strips on the panel saw.
 
I’ve used air dried lime in the past for Kumiko & found it lovely to work, I machine planed it to thickness the finish being so good it only needed the lightest of sanding, I wouldn’t have fancied cutting such thin strips on the panel saw.
Sounds the ideal material for this sort of malarky! I used some Japanese Cedar for mine which was great but lime would probably have been equally as good, if not better. I initially tried hard maple and that was a 'no hoper' - Rob
 
I’ve used air dried lime in the past for Kumiko & found it lovely to work, I machine planed it to thickness the finish being so good it only needed the lightest of sanding, I wouldn’t have fancied cutting such thin strips on the panel saw.
How did you cut the halving joints? I found the lime lovely to work for the chiselled joints, but the halving joints were horrible as I kept getting bits breaking off.
 
How did you cut the halving joints? I found the lime lovely to work for the chiselled joints, but the halving joints were horrible as I kept getting bits breaking off.
More than likely using the trenching facility on the chopsaw & gang cutting them, just looked back & it was 6 years ago when I last did some & my memory is like a sieve these days.
This is one of the pieces I did don’t think it was glued up at that point.
IMG_20200419_111842269.jpeg
 
This is one of the pieces I did don’t think it was glued up at that point.
View attachment 34012

That was the first design I tried: almost exactly the same I think. I still use it as a coaster. I think I probably I glued the halving joints together, but the angled pieces are just held in by friction & it has lasted several years and many cups of tea like that.

This was the second one I did, which looks simpler but was quite difficult just because of hand cutting the halving joints in the middle bit: the stick-out beyond the joints is very short which made them quite fragile.

kumiko_box_1.jpg


Of course, comparing any of these to the one in the video is like comparing a stick-man drawing to a Monet!
 
I bought a few books by desmond king a while ago, been meaning to get into kumiko, have always loved it, this has inspired me to give it a go, it really is fascinating.
 
This is my first effort in Japanese Cedar:

IMG_5214.jpeg

What I miserably failed to do was to make the door dead square so I had to insert a couple of Pink Ivory inserts to fill the gap. I should've made a square mdf former and then clamped the frame to it as the glue set. As it is, the pink bits don't appear to detract from the project. I've still got all the chiseling blocks so may have another go at a panel later on...fiddly but enjoyable! - Rob
 
More than likely using the trenching facility on the chopsaw & gang cutting them, just looked back & it was 6 years ago when I last did some & my memory is like a sieve these days.
This is one of the pieces I did don’t think it was glued up at that point.
Very nice Doug, did you mount that into something?
By the way a sieve keeps in what it is supposed to.:)
 
Back
Top