• Hi all and welcome to TheWoodHaven2 brought into the 21st Century, kicking and screaming! We all have Alasdair to thank for the vast bulk of the heavy lifting to get us here, no more so than me because he's taken away a huge burden of responsibility from my shoulders and brought us to this new shiny home, with all your previous content (hopefully) still intact! Please peruse and feed back. There is still plenty to do, like changing the colour scheme, adding the banner graphic, tweaking the odd setting here and there so I have added a new thread in the 'Technical Issues, Bugs and Feature Requests' forum for you to add any issues you find, any missing settings or just anything you'd like to see added/removed from the feature set that Xenforo offers. We will get to everything over the coming weeks so please be patient, but add anything at all to the thread I mention above and we promise to get to them over the next few days/weeks/months. In the meantime, please enjoy!

The 'Moon' Jewellery Box

Woodbloke

Sequoia
Joined
Jul 22, 2014
Messages
7,521
Reaction score
1,632
Location
Salisbury, UK
I'll freely admit that I'm pretty rubbish at designing stuff (mostly :D ) but occasionally I see something that ticks all the right boxes and Peter Lloyd's 'Moon Box' was just such a beastie.
No1 son in Lockdown Londres has for a few months now had a delightful Canadian partner and when I met her in the Summer, she mentioned that she wouldn't mind a few rough sticks knocked into some sort of box in which to keep odds n'ends of jewellery.

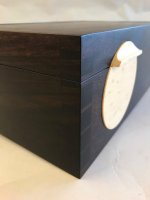
The 'Moon' Jewellery Box is made from solid Indian Rosewood :shock: through dovetailed with the lid mitred at the corners. The wood is so dark you can't actually make out any jointing detail, but it's 'adequate' :D

IMG_5067.jpg

IMG_5068.jpg

IMG_5069.jpg

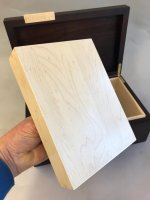
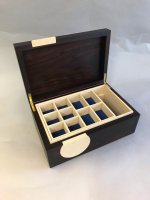
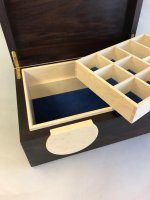
The moon shaped circular handle is made from highly figured Bird's Eye Maple as is the internal tray, where all the tiny compartments are made using housing joints with dovetails at the corners and a veneered base.
IMG_5073.jpg

IMG_5074.jpg

IMG_5075.jpg

The royal blue lining is in 'Alcantara' and 'SmartHinges' from Andrew Crawford
were also used. Finished with four coats of Regal Red 'Peacock Oil' and several applications of 'Alfie Shine'. In total, the finishing process took around two months as the oil took some considerable time to cure. It's now being carefully packed and will be couriered to London for Emma to open on Christmas morning

It should be noted that this was easier to make than an oriental 'Whirligig' :D - Rob
 
Wow! What a lucky girl! I love the concept, and beautifully executed as always.


Sent from my ONEPLUS A5010 using Tapatalk
 
Gorgeous as always Rob.

With each project you make it harder for me to post my "efforts" at Christmas pressies.
 
You have created a thing of beauty there Rob.

Peacock Oil and the Alfie Shine wax are great finishing products.

I was interested in your earlier post on Alcantra - I have always used pig suede but plan to change over when I next re-stock.
 
Superb, love that! :eusa-clap:

You need to give it with the proviso that you get it back if they split up. :eusa-whistle:
 
That is lovely, Rob. Making boxes is not easy. Making great boxes is really hard. That's a great box.
 
Thanks chaps, appreciated. I should add that I struggled a bit with trying to decided on the type of glue to use for the dovetails as I wanted one with a really long 'open time' so that everything could be pulled up really tightly. In the end, I went for some proper 'old skool' Alaldite that I got from Evilbay for more or less half price. I did the glue up in the morning and left the whole shenanigans overnight for 24hrs until it had gone off rock solid. It was difficult also to plane the rosewood as there were lots of interlocking bits of grain and minor defects, so it had to be scraped and sanded into submission.

Lons":2qdpx7qc said:
Superb, love that! :eusa-clap:

You need to give it with the proviso that you get it back if they split up. :eusa-whistle:

Having got through the the first lockdown in the Spring, they look to be a pretty solid couple and have recently decided to move out of his flat and buy a place together in Bromley, so it's fingers crossed. The box now belongs to her for good or ill; I sincerely hope they don't split as they appear to compliment each other really well. - Rob
 
Lovely work, the contrast between the rosewood and maple is particularly nice. And the internals are every bit as impressive as the outside, by which I mean very.
 
Hopefully it will become an heirloom to be passed down through the family Rob, it's certainly good enough quality for that. :eusa-clap:

My "take it back" comment was of course very much tongue in cheek and I wish them all the best.
 
Lons":2cugvaif said:
Hopefully it will become an heirloom to be passed down through the family Rob, it's certainly good enough quality for that. :eusa-clap:

My "take it back" comment was of course very much tongue in cheek and I wish them all the best.
Appreciated Bob, many thanks; SWIMBO and I hope that they'll be OK as a couple. First impressions were certainly very favourable and as an old fart :D getting distinctly long in the tooth, I had a good feeling about it from the 'get go' :twisted: (don't you just hate that 'murrican expression :D ) - Rob
 
Rob - would you care to talk us through how you set the moon into the front of the box please? I can understand how you may have used a forstner bit to cut the recess, but cutting a perfect disk to set in to it is stumping me! It looks to be that tricky size that is too big for a plug cautter, and too small for a router on a trammel. :?: :eusa-think:
 
RogerM":20gdn1nc said:
Rob - would you care to talk us through how you set the moon into the front of the box please? I can understand how you may have used a forstner bit to cut the recess, but cutting a perfect disk to set in to it is stumping me! It looks to be that tricky size that is too big for a plug cautter, and too small for a router on a trammel. :?: :eusa-think:

It took me three or four goes if I recollect to get the BYM 'moon' to be a 'perfick' fit. The procedure I adopted is as follows:

Do the dovetail jointing; fairly standard and leaving enough space in the extra wide pin to cut 'orf the lid (Japanese saw here) Then use some wide 100g sandpaper taped to a dead flat surface (p/t infeed table) to clean up both pieces to ensure a decent fit 'twixt lid and box. Next clamp both bits together so they are exactly co-planar as they would be in the finished box. Then make a circular template on the lathe for the router from a large bit of 6 or 9mm mdf, mark out the position of the handle hole and cramp the template in place.

Bearing cut the hole recess in both the lid and the box; cunning huh? :D

The actual handles for the lid and box were turned on the lathe separately, not as one and then cut with a saw. The reason for doing it this way was that sawing and cleaning up would produce too much waste resulting in a sloppy mating fit between them; hence they were done individually on the lathe. Took me a while to work out how to do it, but I got there in the end - Rob
 
Woodbloke":vbywfp2i said:
RogerM":vbywfp2i said:
Rob - would you care to talk us through how you set the moon into the front of the box please? I can understand how you may have used a forstner bit to cut the recess, but cutting a perfect disk to set in to it is stumping me! It looks to be that tricky size that is too big for a plug cautter, and too small for a router on a trammel. :?: :eusa-think:

It took me three or four goes if I recollect to get the BYM 'moon' to be a 'perfick' fit. The procedure I adopted is as follows:

Do the dovetail jointing; fairly standard and leaving enough space in the extra wide pin to cut 'orf the lid (Japanese saw here) Then use some wide 100g sandpaper taped to a dead flat surface (p/t infeed table) to clean up both pieces to ensure a decent fit 'twixt lid and box. Next clamp both bits together so they are exactly co-planar as they would be in the finished box. Then make a circular template on the lathe for the router from a large bit of 6 or 9mm mdf, mark out the position of the handle hole and cramp the template in place.

Bearing cut the hole recess in both the lid and the box; cunning huh? :D

The actual handles for the lid and box were turned on the lathe separately, not as one and then cut with a saw. The reason for doing it this way was that sawing and cleaning up would produce too much waste resulting in a sloppy mating fit between them; hence they were done individually on the lathe. Took me a while to work out how to do it, but I got there in the end - Rob
Thanks Rob. I don't have one of those spinning gizmos so would have to find a different way! Maybe cut a female template with a hole saw, and then use a pair of appropriately sized router bushes and spiral down cutters?

Sent from my ONEPLUS A5010 using Tapatalk
 
RogerM":1pbkx5jl said:
Thanks Rob. I don't have one of those spinning gizmos....

Time to do some grovelling in front of SWIMBO perhaps :lol: :lol:

Seriously though, I use the lathe for all sorts of spiny stuff to do with other projects and not just for lathe work stuff in itself (although I do sometimes have a 'lathe' day when the moment grabs me :eusa-whistle: ) - Rob
 
Woodbloke":3614ue9t said:
RogerM":3614ue9t said:
Thanks Rob. I don't have one of those spinning gizmos....

Time to do some grovelling in front of SWIMBO perhaps :lol: :lol:

Seriously though, I use the lathe for all sorts of spiny stuff to do with other projects and not just for lathe work stuff in itself (although I do sometimes have a 'lathe' day when the moment grabs me :eusa-whistle: ) - Rob

Haha! At the moment, the thing I need in my workshop more than anything else is more space and storage!

I was just admiring the dovetails in your Moon Box Rob. The slope looks pretty shallow - 1:8 ?
 
RogerM":1n6kp6fs said:
I was just admiring the dovetails in your Moon Box Rob. The slope looks pretty shallow - 1:8 ?

Correct Rog and a sod to cut as the stuff is so hard there's no 'squishability factor' in it :( They had to be trial fitted part way umpteen times before the glue up, which I did with 'old skool' Araldite that I left to set overnight. The corners on the lid were also mitred which was also fun, but with sufficient crampage they pulled up tightly, which was a relief

Emma now has it in London and I mentioned to her on WhatsAp that there was to be no 'touchies' or 'feelies' or all her Christmas chocolate (she has a sweet tooth) would, as if by magic, go 'off' :lol: - Rob
 
Lovely piece - just been working through a whole bunch of recent projects here over the last few days - the quality of work is quite amazing.
 
Same here. That really does look flawless. Something for us all to aspire to.
I especially like the ingenious method of getting the handles to fit perfectly.
 
AndyT":31yw30jg said:
Same here. That really does look flawless. Something for us all to aspire to.
I especially like the ingenious method of getting the handles to fit perfectly.
Thanks Andy and others. I forgot to mention that I made a full size pine 'lash up' box to test out how to make and fit the two sections of the 'moon' handle. Fitting the handles and getting both parts exactly co-planar was probably the most difficult bit of the whole thing - Rob
 
thetyreman":2xdammrl said:
Beautiful box Rob, love the attention to detail.
Many thanks and welcome to the forum btw :D

It transpires that they're off to Calgary next summer (Covid and jabs permitting) for her brother's wedding; yesterday I was trying to work out the odds of being asked to make something to take as a gift - Rob
 
Back
Top