• Hi all and welcome to TheWoodHaven2 brought into the 21st Century, kicking and screaming! We all have Alasdair to thank for the vast bulk of the heavy lifting to get us here, no more so than me because he's taken away a huge burden of responsibility from my shoulders and brought us to this new shiny home, with all your previous content (hopefully) still intact! Please peruse and feed back. There is still plenty to do, like changing the colour scheme, adding the banner graphic, tweaking the odd setting here and there so I have added a new thread in the 'Technical Issues, Bugs and Feature Requests' forum for you to add any issues you find, any missing settings or just anything you'd like to see added/removed from the feature set that Xenforo offers. We will get to everything over the coming weeks so please be patient, but add anything at all to the thread I mention above and we promise to get to them over the next few days/weeks/months. In the meantime, please enjoy!

A Japanese style garden shed

The bamboo nails are shop made. It is possible to buy them from Japan ready made but much cheaper to make your own from kabob skewers, a saw, and a pencil sharpener. These are 4 mm diameter.
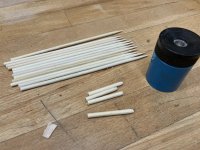
4DFCFD06-7CF9-4D99-8567-292CBA1B00C5_1_201_a.jpeg

And after tapping them into pre-drilled holes and paring them flush:
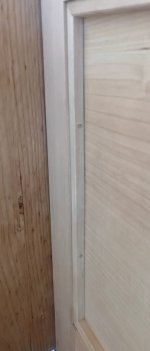
CA8C5D4C-36E7-49B9-B06B-06F28A8051E3_4_5005_c.jpeg

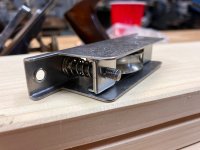
The rollers are all stainless steel. There is a set screw that levers the wheel up or down within its carriage. There are other styles of roller that put an adjustment screw running horizontally with access through a hole drilled into the rail. That is much more convenient since the door can be adjusted without removing it for each adjustment. But that style didn't come in stainless steel in a size that I needed.
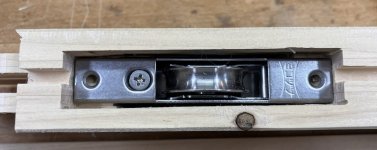
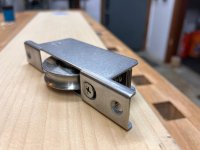
063F85A6-FF0C-4DB1-B4DD-E9B40B9C8635_1_201_a.jpeg

647188ED-ACBC-40D2-AB85-2EF83A209054.jpegBCEBE748-9E3E-468E-B973-F24B4DC94243.jpeg

"Hip board" was new to me, too. I think it must be a translation from Japanese shoji door terminology since I've read it in several places in that context.
 
Oh, I see....the rollers run on a rail. Obvious when you think about it.
 
Hmm. I think we are well past shed here and maybe function is now compromised in favour of delicate joinery and finishing.
 
You might be right, Adrian. Especially when I start enforcing the "no shoes in the shed" policy. 😉

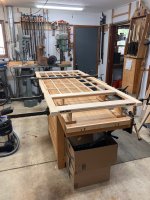
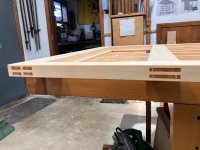
Clamping up the second door. The M&T joints are through and wedged with black locust. After getting it clamped as in the picture (and yes i checked for twist and square (diagonals within a mm this time). I glued in the wedges. let the glue dry, then removed the clamps and sawed off the excess. After planing the excess flush I sealed all the end grain with cyanoacrylate glue. I've never seen this last bit done before but I used this technique on a garden gate I did three years ago and it has done its job so far. A clear finish and waterproof. I don't know about its UV resistance. Does anyone?

AB223B14-D9F0-4337-A5F5-8E6339069683.JPG

AC75C1F1-BAA1-4393-9DC2-DA7790EF762C.JPG

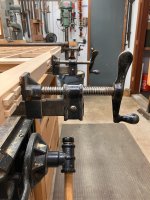
A word about the clamps/cramps. They are Jorgensen model #603's, made in Chicago probably 80-100 years ago before Jorgensen switched to multiple clutch clamps. They are heavy and great for large things like doors and casework. A little too heavy and cumbersome for furniture. They don't stand by themselves so I borrowed a technique from a friend and made a set of plywood stand-offs for them. I faced the clamp surfaces with leather. There is also an old no-name pipe clamp in the field.

E0D290E9-F041-4C02-8227-20ADF46A976C.JPG571D6280-AED8-4ED3-98BC-A42C5B232FEF_1_201_a.jpeg


I also ordered the glass today. It should be available next week.
 
Gary, did you use glue with the bamboo nails or is the pressed fit sufficient? What is the make and model of your floor mount drill press?
 
Gary, did you use glue with the bamboo nails or is the pressed fit sufficient? What is the make and model of your floor mount drill press?
I just press fit them. 4 mm bamboo and 5/32" holes seemed a perfect fit. But they certainly could be glued.

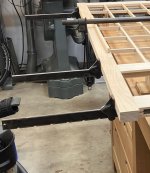
The drill press is a Powermatic 1100, built around 1965 or so. I bought it used around 2006.
 
And very nice they are too!
I’m having to bring my Record sash cramps over to the States next year as I just can’t find anything nearly as good there.
Those old Jorgensens would be ok with stands, but no longer made I suppose?
Ian
 
And very nice they are too!
I’m having to bring my Record sash cramps over to the States next year as I just can’t find anything nearly as good there.
Those old Jorgensens would be ok with stands, but no longer made I suppose?
Ian
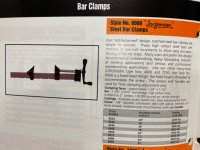
They were made at least until 2007 but I think they have been discontinued. Here is the catalog description. Mine are tagged with a #603 rather than 6xxx but are the same clamp. The 7000 series replaces them. Just as heavy duty but with an I-bar and multiple clutch design.

jorgensen clamp 6000.jpg
 
I may have missed this - are you going to put glass or something else in them Gary. Will add a fair bit of weight.
 
Oh that’s good to know thanks Gary, I will keep my eyes open on Marketplace when I get back as I really don’t want to have to wait till next year to glue my bench up.
Ian
This kind of sturdy old bar clamp comes up used fairly often. Besides the Jorgensen/Pony line of clamps, still in business but now made in China, the most common USA brand names you'll find are Cincinnati Tool (from 1877) or Hargrave (same company, changed their name in 1925). Also Wetzler, made in Pennsylvania and highly regarded but much more rare. You can find all of them on eBay but shipping is usually a killer for such long and heavy items.
 
While thinking about my sliding doors I recalled seeing this short video of sliding doors in a high end residence in Japan. In this case there are shoji doors inside, and then a kind of veranda called an engawa, (in this case the engawa is reduced to an inch or so) and then outside of that are doors are amado, a solid wood shutter that secures the structure from bad weather or miscreants. The amado panels are stored in a separate box during the day (seen at right) and rolled into place at night. I love this video because it shows how the amado are installed to turn an inside corner (outside corners can be done, too) and also the careful selection of grain patterns for the amado planks.

 
It’s a very different world over there, that was quite brilliant and obviously works well if a little clatty. I’m just trying to imagine getting someone to supply and fit something like that in the uk, also how long would it last weather wise.
Disaster ensues lol.
 
Despite time in Japan, I've never seen that system. Interesting video. I do very much like the concept of decluttered Japanese living spaces with everything put away. Serene.
 
Despite time in Japan, I've never seen that system. Interesting video. I do very much like the concept of decluttered Japanese living spaces with everything put away. Serene.
You may not have seen any clips of tiny, minuscule apartments in Tokyo which are anything but serene and decluttered - Rob
 
It’s a very different world over there, that was quite brilliant and obviously works well if a little clatty. I’m just trying to imagine getting someone to supply and fit something like that in the uk, also how long would it last weather wise.
Disaster ensues lol.
From everything I've read, the traditional way of building that looks so great in photos was also drafty and cold and dark to live in. Little to no insulation, little weather sealing, paper covered shoji rather than glass, cold floors, etc. All of that wood was also a great fire hazard. I would not live in a house built that way but for a shed it seems OK to me.
 
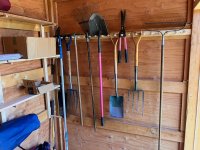
Nothing fancy today but I did knock together a tool rack and some shelf supports. The shelves themselves are just some scraps that were abou the length I need and aren't attached. I'm not sure what I want for these things and it will all have to come down for plastering anyway so I didn't spend a lot of time on it. I do like the rhythm of the simple pegs, though. I might keep that part. 97DF6C0A-E688-4E40-A7BE-B388388CFA75.JPG
 
Nothing fancy today but I did knock together a tool rack and some shelf supports. The shelves themselves are just some scraps that were abou the length I need and aren't attached. I'm not sure what I want for these things and it will all have to come down for plastering anyway so I didn't spend a lot of time on it. I do like the rhythm of the simple pegs, though. I might keep that part. View attachment 27687
Nice Gary, looks like you have quality gardening tools. Are the forks to the right and spade/square mouthed shovel from the same manafacturer?
Definitely the wood pegs are fitting.
 
Good eye. The spade and fork I bought decades ago. They were made in England by a company whose name I have forgotten. Not the most comfortable to use because they are heavy, but they will far outlast me and probably the next several owners.
 
Putting those pegs at an angle on the tool rack reduces the chance of tools being accidentally knocked off. A bit late now unless you refit the whole rack at an angle.

You are going to plaster the inside of a “shed”?? :eek:
 
Putting those pegs at an angle on the tool rack reduces the chance of tools being accidentally knocked off. A bit late now unless you refit the whole rack at an angle.

You are going to plaster the inside of a “shed”?? :eek:
Ha! One step ahead of you. I did insert the pegs at an angle of about 2 degrees (eyeballed). That may not be enough but as I said, it will all get demounted for plastering so I can make a new one then. Yes, the inside will be plastered. In for a penny, in for a pound. Plus, I want to cover over the ugly exposed plywood.
 
Enjoying all the fine woodwork, and had completely forgotten this was a normal "shed"! The tools hanging up caught me by surprise.

I've not been to Japan but I have always thought although elegant Japanes traditional building methods look cold and drafty to live in!
 
I've not been to Japan but I have always thought although elegant Japanes traditional building methods look cold and drafty to live in!
Japanese winters can be fearsome and traditional sliding doors do let in the draft. More to the point, there was never any heating in the old buildings; even the Samurai lord had to wrap up warm. Even today, central heating via radiators as we have in the UK appear to be non existent in modern Japanese homes and many rely on portable paraffin heaters. Some years ago we stayed in a modern ryokan (a hotel with traditional futons on the floor etc) which used these heaters in the reception area - Rob
 
The book Building the Japanese House Today ("today" being 20 years ago in California) by Len Brackett and Peggy Landers Rao shows how Brackett's company addressed requirements for better comfort, energy efficiency, and modern building codes while retaining as much of the traditional Japanese house esthetic as possible. It is a very expensive way to build, of course. The company web site:


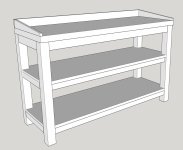
Tool peg board and shelves are done. Now on to the potting bench. This will be nothing fancy. I intend to use up scraps from the build and pieces in my stash that aren't usable for home furniture. Here is a sketch. Any suggestions to make it more user-friendly?

Dimensions are roughly 1700 mm wide, 950 mm tall (my wife's requirement) and 550 mm deep. Legs are 80x80. Other dimensions are approximations.

149E8481-0BD9-46F1-A0E4-8DDA9726FC4A_1_201_a.jpeg
 
Through my past experience working in a greenhouse many years ago, we would make the potting benches with higher sides and back above the table top. Seeing that this bench is for home garden use, 6 " to 8" high back and sides should work. Possibly have a narrow shelf above the top to put small items onto. Secateurs, garden trowel etc.
 
All looks good to me Gary, the only thing I would maybe add are some of your pegs on one end? Also two concave shaped pieces of wood in the back corners to ease sweeping up.
Is this going to be a quick screwed together job or full M and T’s ?
Ian
 
Through my past experience working in a greenhouse many years ago, we would make the potting benches with higher sides and back above the table top. Seeing that this bench is for home garden use, 6 " to 8" high back and sides should work. Possibly have a narrow shelf above the top to put small items onto. Secateurs, garden trowel etc.
Thanks, raising the sides and back is a good tip. As this will be against a wall, the wall will have at least one and probably two shelves for all of those items.
 
All looks good to me Gary, the only thing I would maybe add are some of your pegs on one end? Also two concave shaped pieces of wood in the back corners to ease sweeping up.
Is this going to be a quick screwed together job or full M and T’s ?
Ian
I've designed it to fit into the narrow end of the shed so there won't be room for pegs on the sides but there should be plenty of wall space for pegs and shelves. I love the idea of adding some cove moulding to make chasing dirt from the corners easier. Thanks for that.
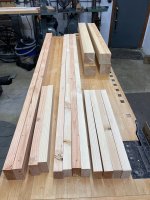
The leg stock is rift or quarter sawn western red cedar straight and clear.

Yes, draw bored mortice and tenon joinery. These aren't the best woods for that but I'm doing it anyway.


FD451024-2BB0-49F7-853F-A443AACD11F0.JPG
 
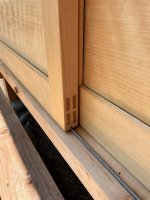
I just noticed, don't think I have seen a quad mortise and tenon before...
I never had either until I was researching shutter designs. I like the way it looks decided to try it on the bottom rail. It would be more functional on a taller rail where a single tall tenon might move too much seasonally. But it works here, too. It was barely visible in a previous photo or two. Here is a better picture that also shows the track for the rollers.

CD42B463-A77A-4295-B1DD-8832AEBB0F56.JPG
 
Back
Top