
-
Hi all and welcome to TheWoodHaven2 brought into the 21st Century, kicking and screaming! We all have Alasdair to thank for the vast bulk of the heavy lifting to get us here, no more so than me because he's taken away a huge burden of responsibility from my shoulders and brought us to this new shiny home, with all your previous content (hopefully) still intact! Please peruse and feed back. There is still plenty to do, like changing the colour scheme, adding the banner graphic, tweaking the odd setting here and there so I have added a new thread in the 'Technical Issues, Bugs and Feature Requests' forum for you to add any issues you find, any missing settings or just anything you'd like to see added/removed from the feature set that Xenforo offers. We will get to everything over the coming weeks so please be patient, but add anything at all to the thread I mention above and we promise to get to them over the next few days/weeks/months. In the meantime, please enjoy!
You are using an out of date browser. It may not display this or other websites correctly.
You should upgrade or use an alternative browser.
You should upgrade or use an alternative browser.
Mike's ext'n & renovation (solar panels)
- Thread starter Mike G
- Start date
Cabinetman
Sequoia
- Joined
- Oct 11, 2020
- Messages
- 5,734
- Reaction score
- 1,408
- Location
- Lincolnshire Wolds + Massachusetts
- Name
- Ian
Super work as always Mike as said very classy.

Mike G
Petrified Pine
There aren't many prying eyes around here. It's the quietest lane imaginable, and we know everyone who would ever walk past our house.Nice wall. Would be an oak gate for me to keep the prying eyes out.
Mark

Will the gate be to your design fabricated by a local smith?
Mike G
Petrified Pine
Yes, unless I do it myself.Will the gate be to your design fabricated by a local smith?

Phil
Old Oak
Very, very smart! 

AJB Temple
Sequoia
- Joined
- Apr 15, 2019
- Messages
- 7,816
- Reaction score
- 1,286
Very nice work. Looks a treat.
duke
Old Oak
Mike have you decided on what you are doing between the the flint wall and the garage?
Or is is it a wait and see for us.
Or is is it a wait and see for us.
Mike G
Petrified Pine
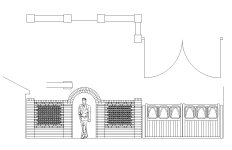
I thought I'd posted a drawing previously, but it turns out I hadn't. Anyway, there is going to be a little return on the brickwork and another (shorter) pier, then a pair of oak gates I copied from an old churchyard:
duke
Old Oak
You are correct you did post it on June 7, the gates looked to be inline with the flint wall. Wasn't sure if it was the final plan. Looking forward to your progress with the gates Mike.I thought I'd posted a drawing previously, but it turns out I hadn't. Anyway, there is going to be a little return on the brickwork and another (shorter) pier, then a pair of oak gates I copied from an old churchyard:
View attachment 28368
Mike G
Petrified Pine
The gates won't be happening for a while. I have one last burst of outdoor jobs to do, not including the gates, then the winter will be a series of workshop jobs for inside the house.You are correct you did post it on June 7, the gates looked to be inline with the flint wall. Wasn't sure if it was the final plan. Looking forward to your progress with the gates Mike.
Nice work Mike, but I will never be truly satisfied until I see a picture of you standing in the new gate arch in your best double breasted...
duke
Old Oak
Mike I remember on one of my visits to England seeing a knapped flint wall , you wouldn't want to brush against that wall.
Was it common practice at one time?
Was it common practice at one time?
Mike G
Petrified Pine
Knapped flint is mainly seen on higher status buildings, such as churches. Have a search for images of Long Melford church for a great local example. It's almost like tiling. Ordinary or "country" work (cottages, farm out-buildings, boundary walls etc) seldom used deliberately knapped flint, but the odd one was chipped to shape now and then. Well done knapped flint walls shouldn't leave sharp edges, although these might be exposed by the mortar weathering away over the centuries.Mike I remember on one of my visits to England seeing a knapped flint wall , you wouldn't want to brush against that wall.
Was it common practice at one time?
Mike G
Petrified Pine
Sticking a finger into a spinning planer blade has somewhat slowed things, but I have managed to make a couple of upstairs doors in the last little while. Here is the story of one of them, but they're all fundamentally the same. You won't get this repeated for each of the 4 upstairs doors I am doing in this batch.
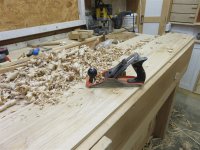
You might recall I made ledged and boarded oak doors with hand-cut cinched nails for downstairs, 5 or more years ago. Upstairs rooms have had 1970s doors temporarily fitted in the opening for goodness knows how long, so I am just copying the doors from downstairs (a mediaeval design). The process is fairly quick, except for shaping the middle board. It started with ripping the sapwood off, and then paying a visit to a friend who has a big planer thicknesser, capable of handling these boards which are up to 375mm wide. That was the rough grunt work done. I then finish planed the outer two boards, and turned to the middle board. I started work on this with an electric plane to hack away the bulk, then reverted to a scrub plane:
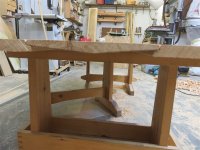
After putting a rebate on the inside edges of the outer boards, you end up with a section looking like this:
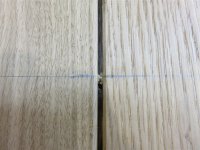
After cleaning up the edges, and chamfering on the exposed edges, it's time to assemble. My little hidden secret is to insert metal dowels into the edges of the boards, to prevent one board dropping in relation to another. I've used 5mm brass for these:
My other little secret is to countersink the holes which relate to the edges which I'm allowing to move with seasonal fluctuations of humidity levels, and gluing the ledges on at the point of the boards which I want to hold in place:
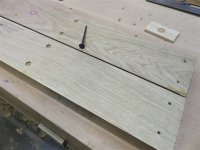
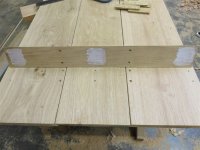
So you can see that the outer dimensions of the door won't vary, and if there is any movement it will occur in a gap I have left between the boards (although both the new oak for these doors and all timber indoors measure 5 to 6% on my moisture meter, so there shouldn't be a lot of movement). The nails are thin enough that they'll flex in the gap formed by the face-to-face countersinks:
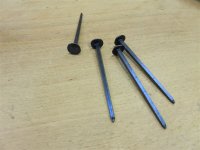
They're French machine-made traditional nails, and the factory they come from is an incredible time-warp.
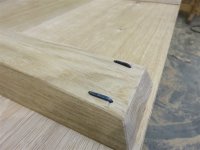
One little subtlety that you'll only ever think of if you build doors like this, is that at least some of the nails for each ledge are unavoidably nailed up from the underside, which is a pain in the neck. Once they hammered through (a G clamp helps hold everything together whilst hammering..........F clamps come undone), the nails (46 per door) are folded over:
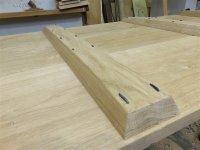
The ledges are shaped all around to try to avoid a square-edged look:
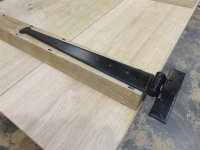
After doing a final sizing (yeah, righto) using a soft-melt glued pattern taken from the opening, it's time to screw on the ironmongery:
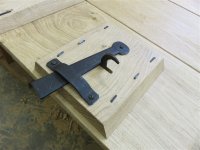
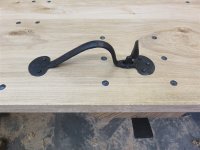
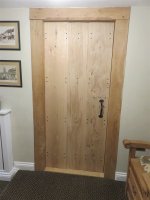
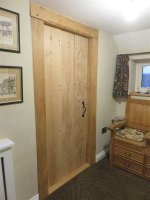
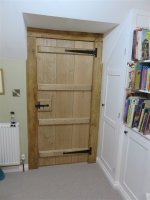
Hanging the doors is relatively straightforward, as the pattern-taking ensured that they were all-but spot on straight from the workshop. The "smart" side traditionally goes to the hall/ landing, and the ledges face into the room:
Door stops will be done in a batch when all the doors are hung.
You might recall I made ledged and boarded oak doors with hand-cut cinched nails for downstairs, 5 or more years ago. Upstairs rooms have had 1970s doors temporarily fitted in the opening for goodness knows how long, so I am just copying the doors from downstairs (a mediaeval design). The process is fairly quick, except for shaping the middle board. It started with ripping the sapwood off, and then paying a visit to a friend who has a big planer thicknesser, capable of handling these boards which are up to 375mm wide. That was the rough grunt work done. I then finish planed the outer two boards, and turned to the middle board. I started work on this with an electric plane to hack away the bulk, then reverted to a scrub plane:
After putting a rebate on the inside edges of the outer boards, you end up with a section looking like this:
After cleaning up the edges, and chamfering on the exposed edges, it's time to assemble. My little hidden secret is to insert metal dowels into the edges of the boards, to prevent one board dropping in relation to another. I've used 5mm brass for these:
My other little secret is to countersink the holes which relate to the edges which I'm allowing to move with seasonal fluctuations of humidity levels, and gluing the ledges on at the point of the boards which I want to hold in place:
So you can see that the outer dimensions of the door won't vary, and if there is any movement it will occur in a gap I have left between the boards (although both the new oak for these doors and all timber indoors measure 5 to 6% on my moisture meter, so there shouldn't be a lot of movement). The nails are thin enough that they'll flex in the gap formed by the face-to-face countersinks:
They're French machine-made traditional nails, and the factory they come from is an incredible time-warp.
One little subtlety that you'll only ever think of if you build doors like this, is that at least some of the nails for each ledge are unavoidably nailed up from the underside, which is a pain in the neck. Once they hammered through (a G clamp helps hold everything together whilst hammering..........F clamps come undone), the nails (46 per door) are folded over:
The ledges are shaped all around to try to avoid a square-edged look:
After doing a final sizing (yeah, righto) using a soft-melt glued pattern taken from the opening, it's time to screw on the ironmongery:
Hanging the doors is relatively straightforward, as the pattern-taking ensured that they were all-but spot on straight from the workshop. The "smart" side traditionally goes to the hall/ landing, and the ledges face into the room:
Door stops will be done in a batch when all the doors are hung.
Last edited:


Mike G
Petrified Pine
Why no diagonal bracing Mike?
I’m sure I’ve seen them indoors but happy to accept that’s more to do with fashion than tradition.
Mike G
Petrified Pine
Oh yes, they've been sold ledged and braced for 50 or 70 years, at least. Even framed ledged and braced. This is the sort of look I'm after, although this looks like it might be elm, and has 4 boards:
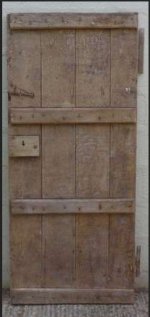
I don't think I've ever seen a photo of a door with a profiled middle board like the ones I'm doing, but I have seen them described in textbooks.
I don't think I've ever seen a photo of a door with a profiled middle board like the ones I'm doing, but I have seen them described in textbooks.
Cabinetman
Sequoia
- Joined
- Oct 11, 2020
- Messages
- 5,734
- Reaction score
- 1,408
- Location
- Lincolnshire Wolds + Massachusetts
- Name
- Ian
Yes I like those and the design a lot Mike, and they fit in a treat in the setting.
Never done any clenched nail work, are the pointy ends folded over and hammered in? I think I’ve seen that done before?
Never done any clenched nail work, are the pointy ends folded over and hammered in? I think I’ve seen that done before?
Great stuff. I have used them and have a few left. At the time, Chris Schwarz had blogged about a UK source for small quantities which I used. It was Objects of Use, in Oxford, but they don't have them on their website now. I guess you used Dictum in Germany?
Mike G
Petrified Pine
No, I got them from the same place as you. I bought them a few years ago when I did the doors downstairs, and luckily, I could count. I've got enough.Great stuff. I have used them and have a few left. At the time, Chris Schwarz had blogged about a UK source for small quantities which I used. It was Objects of Use, in Oxford, but they don't have them on their website now. I guess you used Dictum in Germany?
Mike G
Petrified Pine
You can do that, but these nails aren't long enough. I've just laid them flat on the surface. The problem with hammering the end in is that as you do that you are also hammering the head out, slightly.Yes I like those and the design a lot Mike, and they fit in a treat in the setting.
Never done any clenched nail work, are the pointy ends folded over and hammered in? I think I’ve seen that done before?
duke
Old Oak
I remember your older thread about the doors you made, at the time I tried to convince my wife to change out our doors but no go.
I will try again with the pic of your latest door, hopefully she will bend.
Most impressed with your door construction Mike.
I will try again with the pic of your latest door, hopefully she will bend.
Most impressed with your door construction Mike.
AJB Temple
Sequoia
- Joined
- Apr 15, 2019
- Messages
- 7,816
- Reaction score
- 1,286
Nice work as ever. Surprisingly narrow and thick ledges. Really like the nails. I think we both used the same door furniture supplier and exactly the same hinges and latches. (I found the screws they supplied to be poor quality but the iron work was quite good - very little slop in the hinges). I beaded my planks which was what I liked at the time (and still like) with an old beading scraper plane. Took hours. When I made ours we needed 14 doors and I made them all at the same time .....the novelty wears off quite quickly. Still have the last one to hang. I rather wish now I had nailed / studded them as you have done instead of hiding the fixings.
Mike G
Petrified Pine
....Surprisingly narrow and thick ledges. ...
They're ex 1-1/2" stock, so probably finished around 32mm thick. I made them narrower than my downstairs doors because I was a little conscious of those looking too wide compared with doors I see in old houses and in pubs. There is one gorgeous local pub door which was my model, although I have the variation of having the hinges fixed to the ledges rather than the boards. My doors look disappointingly clean-lined and uniform in comparison with the hewn and rough look of older doors.

chataigner
Old Oak
- Joined
- Jul 23, 2014
- Messages
- 1,127
- Reaction score
- 55
Lovely work, they look great. I presume draughts are not an issue chez toi, doors like that in my house which has an unheated hall and stairway would be a no-no. (unheated because it rises 3 floors to the roof and uses more heat than the whole of the rest of the house).
chataigner
Old Oak
- Joined
- Jul 23, 2014
- Messages
- 1,127
- Reaction score
- 55
The discussion of ledged v ledged/braced reminded me that I have not posted anything about the shutters I'm making to replace the knackered ones on our downstairs windows. I'll start another thread.
Mike G
Petrified Pine
No, draughts aren't an issue here. The whole house is the same temperature all the time. I expect the heating will come on in 2 or 3 weeks time, perhaps.Lovely work, they look great. I presume draughts are not an issue chez toi, doors like that in my house which has an unheated hall and stairway would be a no-no. (unheated because it rises 3 floors to the roof and uses more heat than the whole of the rest of the house).
meccarroll
Nordic Pine
- Joined
- May 12, 2016
- Messages
- 815
- Reaction score
- 180
It's nice to see the correct type of nails being used on such doors, the shape helps to keep the door from dropping.
Cabinetman
Sequoia
- Joined
- Oct 11, 2020
- Messages
- 5,734
- Reaction score
- 1,408
- Location
- Lincolnshire Wolds + Massachusetts
- Name
- Ian
I wasn’t paying attention (keep up at the back) when I read it the first time, that’s a pretty neat trick with the countersinks on where the two boards touch each other at nail positions Mike. It will give the nails room to bend just a fraction and prevent splitting when and if the wood moves.
Not that I think your wood will move much, if you aren’t putting your heating on for weeks yet and your house is the same temperature all the way through you must have pretty good insulation.
I was talking to a guy over here re wood movement and it would seem that we don’t know we’re born in the uk!
I’ve been experimenting with insulation, including air gaps, thread starting soon.
Not that I think your wood will move much, if you aren’t putting your heating on for weeks yet and your house is the same temperature all the way through you must have pretty good insulation.
I was talking to a guy over here re wood movement and it would seem that we don’t know we’re born in the uk!
I’ve been experimenting with insulation, including air gaps, thread starting soon.
Mike G
Petrified Pine
.......that’s a pretty neat trick with the countersinks on where the two boards touch each other at nail positions Mike. It will give the nails room to bend just a fraction and prevent splitting when and if the wood moves....
Well spotted Ian. Yes, it probably gives them 1/2" in which to bend without fighting with the wood. The downstairs doors of the same design have been in for 4 or 5 years at least, and there is no sign of any movement, or bending of the ledges. A screwed door of the same design would be showing signs by now.

Lons
Old Oak
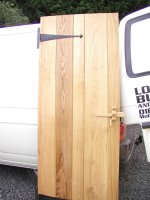
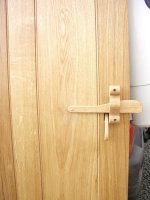
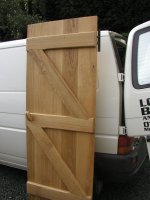
Hopefully not hijacking your thread Mike this is an example of the doors and oak catches I made for the stable block conversion many years ago. The design was selected by the customer from several I submitted and tbh by the time I'd made and fitted the 14 doors and wood latches I was sick to death of the damn things. The couple were very happy though and I was well rewarded.
ps cross head screws holding the catch were temporary while waiting for slotted brass.
ps cross head screws holding the catch were temporary while waiting for slotted brass.
Attachments
Mike G
Petrified Pine
I made wooden ones for my previous house, but my wife wasn't a fan, and strongly suggested wrought iron this time. I buried a bit of lead in the back of the latch to get it to lower itself nicely.
Lons
Old Oak
Clever bugger,I made wooden ones for my previous house, but my wife wasn't a fan, and strongly suggested wrought iron this time. I buried a bit of lead in the back of the latch to get it to lower itself nicely.
It never crossed my mind to weight the latches. Definitely would have been an improvement.GaryR
Nordic Pine
Those are handsome doors. I can feel the solidity from here.
Lons
Old Oak
Mike
Do you find that only two hinges are sufficient to carry the weight of the oak doors? I was concerned about the ones I fitted although I didn't get any complaints. When I made a heavy mahogany door in similar style for my son I fitted three strap hinges.
Do you find that only two hinges are sufficient to carry the weight of the oak doors? I was concerned about the ones I fitted although I didn't get any complaints. When I made a heavy mahogany door in similar style for my son I fitted three strap hinges.