• Hi all and welcome to TheWoodHaven2 brought into the 21st Century, kicking and screaming! We all have Alasdair to thank for the vast bulk of the heavy lifting to get us here, no more so than me because he's taken away a huge burden of responsibility from my shoulders and brought us to this new shiny home, with all your previous content (hopefully) still intact! Please peruse and feed back. There is still plenty to do, like changing the colour scheme, adding the banner graphic, tweaking the odd setting here and there so I have added a new thread in the 'Technical Issues, Bugs and Feature Requests' forum for you to add any issues you find, any missing settings or just anything you'd like to see added/removed from the feature set that Xenforo offers. We will get to everything over the coming weeks so please be patient, but add anything at all to the thread I mention above and we promise to get to them over the next few days/weeks/months. In the meantime, please enjoy!

Any tips on a safe longer rip on a short worksite table saw fence?

shortbusruss

Seedling
Joined
Apr 10, 2026
Messages
41
Reaction score
47
Name
Russ
LOCATION
Oundle/Peterborough
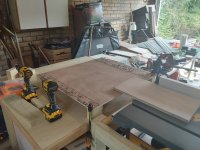
See my setup below. I built a quick tablesaw frame, but it ended up 4" too high for using my main assembly,y table for outfeed. So I built a raised platform that sits on top of the assembly workbench, so I have a good amount of outfeed.

But when running the piece in the picture through a simulated cut, it still feels like the piece does not have enough support when enough of it gets past the fence. And my ultimate goal is to rip cleats out of a 4-5 foot table top.

Is an auxiliary fence pretty much mandatory here?
Russ
 

Attachments

  • 20260816_154949.jpg
    20260816_154949.jpg
    194.5 KB · Views: 17
See my setup below. I built a quick tablesaw frame, but it ended up 4" too high for using my main assembly,y table for outfeed. So I built a raised platform that sits on top of the assembly workbench, so I have a good amount of outfeed.

But when running the piece in the picture through a simulated cut, it still feels like the piece does not have enough support when enough of it gets past the fence. And my ultimate goal is to rip cleats out of a 4-5 foot table top.

Is an auxiliary fence pretty much mandatory here?
Russ
No Russ, in actual fact the opposite applies, H and S here stipulate that the fence should be able to go in and out and line up with an imaginary line from the nearest tooth on the saw going off to the right at 45 degrees, this means that when the fence is further away from the blade a longer fence is “allowed”.
This is very different from the us where fences are the length of the table, this rule is to help prevent kickback. Obviously your fence can’t go in and out but shorter pieces of wood can be fastened to the fence to give the same result.
Once you get used to a short fence it works just fine, two push sticks one in each hand to push the wood against the fence and to push the wood through. They should be 400 mm long. (I think) this is to help stop you getting your body parts involved, believe it or not but till bad practices started to be shown on YouTube the amputation rate here was tiny compared to our American cousins.
So why not give it a try.
Ian
 
Can’t you cut 4” off the legs of the table saw frame you made so the table saw is level with your bench & you’ll get more support?
 
I know it's old and I am younger, but this is why you need a short fence for ripping.


S
Steve,

I get what you and Cabinetman are saying. (Well, I get "some" of what Cabinetman is saying..The 45 degree thing was Greek to me as an abject beginner..)

My no power test runs with the piece in the picture, I was seeing a significant amount of movement in the piece once the end of the piece got past the built in fence. Maybe it is a simple matter of lack of technique? And with the particular piece in question, my Powertech featherboard won't fit, as it is too far over even fully retracted when in the left miter slot.

This is all very new to me. I am 51 years old, and have not touched a table saw since I was in 9th grade in high school. When I did try ripping a piece against the short fence, I felt I was having to apply an undue amount of pressure against the back of the piece inward towards the blade to keep the back of the stock to keep it flat against the fence. I didn't feel I could get the leverage with a longer push stick, so was using a flat rubber pad, a d it was just a tad terrifying, and gave up on that after the first two cuts.

I bought a Milescraft 3406 gripper pad, and "for me", it feels safest to have the entire piece of wider stock supported by the fence all the way through the cut. Am I wildly off base here?
 
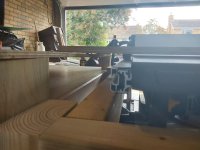
Looks like your outfeed table is back from the saw, it you can close the gap up so the leading edge of what you are cutting doesn't snag.
I can look into adjusting placement of the closest 2x4 block footers of the outfeed support. Right now, they physically block me putting the outfeed any closer to the saw. This picture shows that better. It did take me a few tries to get the height dialed in. Just a hair of a gap, but the support is just slightly lower than the table saw bed, which I think is optimal?

And the riving knife is definitely installed. The blade and riving knife are simply lowered right now while I do test slides.

This setup is temporary, until I can build a new table saw/router station to the height of my current assembly table in the pic. This temporary frame was "supposed" to be at that height, but ended up significantly higher, somehow.

I am still in the extreme neophyte stage, and just starting to come around to the idea that I can build my own solutions to compensate for misfires in original builds. I did add on some infeed support, and am using a clamped on piece of 2x4 for and extended infeed fence.

None of it felt super safe up to this point. Some additional infeed and this outfeed riser setup feels like an improvement.
 

Attachments

  • 20260816_155002.jpg
    20260816_155002.jpg
    138.6 KB · Views: 2
Last edited:
Can’t you cut 4” off the legs of the table saw frame you made so the table saw is level with your bench & you’ll get more support?
Unfortunately, the temp table saw frame has 2x4 cross pieces running horizontally, so it would take quite a bit of disassembly to get the current frame dialed in at correct height. For now, I am simply struggling to get storage so I can get tools, screws/fasteners out of the way so I can work. That means ripping cleats and building drawers, which means figuring out a way to cleanly/safely rip pieces to width on the table saw.

For now, the outfeed riser from my assembly workbench seems like it wil do fine if I clamp it into place.

I do wish I had had more foresight and just committed to a proper build in the first place.i had thoughts of ripping the rounded edges off the construction 2x4s, until I learned this is a recipe for disaster with the internal stresses meaning even if I did manage to do those safely, almost certainly would result in banana boards. Everything seems to becoming out wonky. I am amazed that the assembly table came out as good as it did, but even there, the legs did not come out perfectly square, which means extra work in getting a usable drawer box installed. One of the main things I am trying to do with the board in the original pic is to cut multiple pieces of matching width to use as spacers from the top and bottom of the drawer box get it to come out square, in a nonsquare frame.
 
Steve,

I get what you and Cabinetman are saying. (Well, I get "some" of what Cabinetman is saying..The 45 degree thing was Greek to me as an abject beginner..)

Russ,

If it helps, here is the procedure Ian described with the 45-degree angle. He and I have similar saws and I suspect the instructions in our manuals are similar. On the SCM saws, as well as Altendorf, Martin, Felder, and Hammer, the fence can be moved along the X and Y axis of the table.

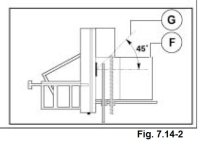
Here is a screen grab from my owner's manual showing the end of the fence in relation to the width of cut. On my saw, the end of the fence is on a 45-degree line starting at the arbor and extending to the limits of the fence (F in the diagram below). For narrow rips, the fence is close to the blade and the end of the fence is nearly aligned with the arbor. As the width of the rip increases, the end of the fence is moved towards the outfeed end along an imaginary line (G in the diagram below).

SC2C-Fence-Setting.jpg

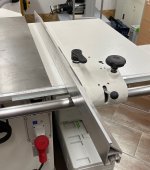
Here is a photo of the fence on my saw. As the fence knuckle is moved to the right by unlocking it with the lever with the ball on the end, the other lever on the top is loosened so the fence can be slid along the imaginary 45-degree line extending from the arbor. The round knob on the knuckle is the fine adjust for setting the rip width.


SC2C-Fence.jpg

I use French cleats in my shop and always cut them from 19mm plywood offcuts with the track saw. I don't know if you have a track saw, but I rarely use the table saw for sheet goods now.
 
If you are still unsure I can take some pics in the morning (your early afternoon)
Must say the sound of the pads to push the wood through the saw is frightening!
Anyone live near Russ and could show him safe use of a T/saw?
 
Back
Top