• Hi all and welcome to TheWoodHaven2 brought into the 21st Century, kicking and screaming! We all have Alasdair to thank for the vast bulk of the heavy lifting to get us here, no more so than me because he's taken away a huge burden of responsibility from my shoulders and brought us to this new shiny home, with all your previous content (hopefully) still intact! Please peruse and feed back. There is still plenty to do, like changing the colour scheme, adding the banner graphic, tweaking the odd setting here and there so I have added a new thread in the 'Technical Issues, Bugs and Feature Requests' forum for you to add any issues you find, any missing settings or just anything you'd like to see added/removed from the feature set that Xenforo offers. We will get to everything over the coming weeks so please be patient, but add anything at all to the thread I mention above and we promise to get to them over the next few days/weeks/months. In the meantime, please enjoy!

Secret hinge boxes....

Woodbloke

Sequoia
Joined
Jul 22, 2014
Messages
7,495
Reaction score
1,583
Location
Salisbury, UK
After a good old rummage this morning, hidden inside this assorted pile of offcuts :
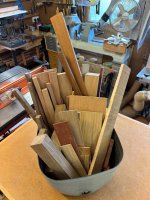
IMG_8306.jpeg

...of Walnut, Oak, Olive Ash, Paduk, Mahogany (not 19th cent Ian) Swiss Pear, London Plane & American Cherry are an unknown number of secret hinge boxes, popularised by Rob Cosman (like him or loathe him...take your pick:ROFLMAO:) and very scientifically stored in an old sawn off water butt that I did earlier today. The boxes will eventually be given to Wessex Rehab at Salisbury District Hospital to raise funds via their ever popular 'Stars Appeal'. The video linkie is worth a watch as it's a shortened version on how to make these boxes. I've no idea how long these will take but they will defo be done in 'slow time' and carry into next year. I did some of these a few years ago and there's probably a thread on it is somewhere.

Just remembered....forgot to include some bits of Bubinga in the bucket. Silly me:ROFLMAO: - Rob
 
Think I’d move the Bubinga to the pile marked “bits of wood too difficult to do anything with.”
I wouldn’t hold back on the Victorian stuff necessarily it’s for a good cause.
Agreed about the Bubinga Ian, but all the stuff in the water butt bin is offcuts. As yet, there's no current small stuff from your excellent Victorian Mahogany, but in due course there will be. Today and yesterday was spent messing about with a trial dowel jig in Bubinga and making the 'real deal' in Greenheart, which is even harder than Bubinga, but surprisingly machines and hand planes quite nicely, the caveat being that your blade is a bit sharp. The Greenheart jig:

IMG_8308.jpeg

...is shown with 3 aluminium foil shims (from Waitrose quiche flans) to bring the cutter up to the right height. The fore n'aft position and angle of attack of the cutter is also critical, but if you get it right (which takes a lot of faffing) you'll eventually start to produce:

IMG_8307.jpeg

...polished dowels which are, give or take 0.01mm, spot on a quarter inch. This dowel is in London Plane and the box it'll installed into will eventually be personally delivered to our friends in Japan at Christmas - Rob
 
When you’ve finished the dowels Rob would you be good enough to show us the hole in the Bubinga, I can’t quite see how it works, and also what size dowel do you start off with pls?
Ian
The 'dowels' start off as square blanks, roughly 7 or 7.5mm, which are then turned into a hexagon section:

IMG_8310.jpeg

...in a jig in the vice. A point is then made on the disc sander:

IMG_8311.jpeg

...and the blank pushed through. This particular little bit of Swiss Pear was fished out of the waste bin for a demo, but I made it too small and it came out undersize so the ideal size for the blank is around 7.5>8mm, taking off 15 or so shavings from each corner to turn it into a hex section. It's all done by guess work and trial n'error with quite a lot of waste. The Bubinga trial jig is shown and you can see that there are burn marks, which means that the spinning wood was rubbing against the jig before it touched the cutter. The remedy is to nudge the cutter forward a mm or so until the blank starts to cut as it enters the jig. You can feel when it's cutting correctly as there's a slight resistance as the blank is pushed through the hole at the back of the jig....too much resistance and the blank will snap, especially if the grain isn't particularly straight - Rob

Edit - RC made his jig out of self-lubricating Lignum
 
Nice collection and selection of timber offcuts Rob. Looking forward to seeing the results. Also, a thanks for explaining how you do the dowels.
 
Thanks Rob, that’s a brill description!
Ian
Nice collection and selection of timber offcuts Rob. Looking forward to seeing the results. Also, a thanks for explaining how you do the dowels.
No problem chaps. It's a very simple technique, exactly the same as a pencil sharpener, but it's fiddly, time consuming and exasperating when it doesn't go quite right, or the dowels are under size. However, by adding an extra aluminium shim (0.08mm) the dowels come out very slightly over size, so it's relatively easy to spin them between some 240/320g papers to bring them down to size. If they're undersize of course, they're snapped in half and thrown in the bin - Rob
 
Back
Top