• Hi all and welcome to TheWoodHaven2 brought into the 21st Century, kicking and screaming! We all have Alasdair to thank for the vast bulk of the heavy lifting to get us here, no more so than me because he's taken away a huge burden of responsibility from my shoulders and brought us to this new shiny home, with all your previous content (hopefully) still intact! Please peruse and feed back. There is still plenty to do, like changing the colour scheme, adding the banner graphic, tweaking the odd setting here and there so I have added a new thread in the 'Technical Issues, Bugs and Feature Requests' forum for you to add any issues you find, any missing settings or just anything you'd like to see added/removed from the feature set that Xenforo offers. We will get to everything over the coming weeks so please be patient, but add anything at all to the thread I mention above and we promise to get to them over the next few days/weeks/months. In the meantime, please enjoy!

American here in Oundle (Peterborough) - Brand new to woodworking

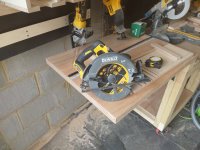
One small step for man....
 

Attachments

  • 20260822_172435.jpg
    20260822_172435.jpg
    143.2 KB · Views: 8
Will you paint the unit dewalt yellow with black accents?
My god, no. It was just a battery ecosystem choice starting from zero good tools, ever. I am going with black and tan for all the furniture. Black French cleat backer board, birch tool hangers. Black frames, birch tops. Drawers, hardwood plywood, black stained mahogany false fronts.
 
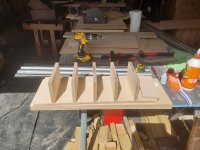
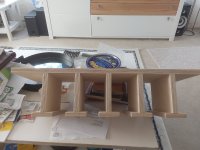
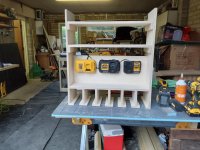
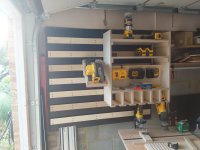
I am pretty exhausted. Spent a good portion of the day trying to figure out this tool holder, battery storage/charging station.. Had to hang it up around 8pm..
 

Attachments

  • 20260823_135508.jpg
    20260823_135508.jpg
    180.3 KB · Views: 13
  • 20260823_175120.jpg
    20260823_175120.jpg
    153.4 KB · Views: 14
  • 20260823_203849.jpg
    20260823_203849.jpg
    167.3 KB · Views: 13
Last edited:
Grrrrrrr! I guess it is one of the challenges of being new to a hobby, and "not knowing what you don't know".

1. Stripped the T15 Torx driver bit that I was using on my 4.5 x 30mm screws.
2. Also ran out of 4.5 x 30mm screws I am using for the overal tool holder assemblies.
3. I have no 4.5 x 16mm screws for hanging the chargers on the flat panel sitting right above the tool hangers.

Every little project is bringing a little bit more knowledge about how to be a little bit more efficient and build up processes for "getting it right the first time". But for now.. Everything seems to take 3x longer than it should, due to unexpected delays.
 
Always good to have ample supply of screws, nails etc. too many is never a problem.
It does happen to me which entails a 1 1/2 hr return trip for hardware. :mad:
 
Always good to have ample supply of screws, nails etc. too many is never a problem.
It does happen to me which entails a 1 1/2 hr return trip for hardware. :mad:

Welll.. On a positive note.. This tool hanger/charging/bit storage station is probably the most complicated buld that will reside on the french cleat wall.. So once it gets built... Everything else goes up "really" fast.

And once I can get all the tools, screws, bits, clamps up and out of the way.. I have space to work on drawer box for the assembly table, and to build a proper combo table saw/router workbench.
 
Didn't plan out the cleat attachment that well. Should have built in a flat panel high and low flush with the back. Will end up needing to add them to the completed back, so entire shelf system will sit further out from wall 3/4" further than necessary.
 

Attachments

  • 20260826_190100.jpg
    20260826_190100.jpg
    197.2 KB · Views: 12
Are you not able to trim the ¾"/18mm from the sides and shelves - either the back or the front edge? If you could that would take care of it sitting out from the wall ¾" further than necessary... Just a thought. Otherwise it's looking good 👍
 
Are you not able to trim the ¾"/18mm from the sides and shelves - either the back or the front edge? If you could that would take care of it sitting out from the wall ¾" further than necessary... Just a thought. Otherwise it's looking good 👍
I glued, pin nailed, and screwed in those top two shelves, and I believe there are screws in the last inch or so of both those top shelves. It came out nice enough, that I don't really want to get too creative trying to get the entire thing to sit 3/4" closer to the wall. I think having another 3/4" inch piece behind the top portion and the tool hangers is not the worst thing in the world for antiracking anyways, so..
 
Well that looks fine to me, but is it for 6 drill / drivers or something else?
I’ve seen YouTubers with rows of them and always wondered what on earth they do with them all.
Ian
Yeah.. Drill, driver.. Pin nailer, and anything else that has either a head or handle thin enough to insert between the legs.

(Keep your mind outta the gutter, man.. We are talking TOOLS here!)
 
Ok, Am I missing something here. If the cleat is screwed to the backside of the shelf sides, yes it will be proud but when you set it on the wall cleat the back of the unit will be flat to the wall.?

Edit: As Frank said maybe slip in ply between the unit shelf and below supports.
 
Last edited:
Ok, Am I missing something here. If the cleat is screwed to the backside of the shelf sides, yes it will be proud but when you set it on the wall cleat the back of the unit will be flat to the wall.?

Edit: As Frank said maybe slip in ply between the unit shelf and below supports.
Yeah.. I could screw the cleats into the thin edge of the shelf sides. It's gonna be the heaviest shelf on the wall though, when loaded, so I was not sure about relying on just screws into the thin edge of 3/4" plywood.

Though.. Come to think of it.. That top shelf has no bracing.. So I could just insert a strip of birch plywood flush with the rear of that portion, glue and screw it through the bottom of that top shelf, then attach the cleat to that. Plus one more cleat attached "somewhere" lower and out of site, to distribute the unit's weight across two cleats.

I know I could just trim out some rear inserts for the shelves that have bracing.. But I've generally not done a good job at accurately cutting out such notches.

Putting strips "below" the shelf supports.. Ehhh.. That would leave an open gap where the supports are, and I would rather either fully cover up the back of a shelf, or leave it fully open. I made a concession already leaving the gap above the chargers, and I don't want to make a habit of multiple shortcuts in the same piece.

Hope it is clear enough what I am trying to do, if I can. Keep the rear of the unit flat, so that with cleats attached, it sits flush against cleat strips on the wall. Without introducing more "half gaps" than I have already.
 
Ended up going with a single cleat, because I am lazy, and it seemed solid enough to me. A few tools are in temporary spots for now, until I can build some smaller holders for them.
 

Attachments

  • 20260827_185748.jpg
    20260827_185748.jpg
    169 KB · Views: 12
Anudda one bites dah dust...
 

Attachments

  • 20260830_152547.jpg
    20260830_152547.jpg
    109.5 KB · Views: 11
  • 20260830_152552.jpg
    20260830_152552.jpg
    129.9 KB · Views: 11
  • 20260830_152605.jpg
    20260830_152605.jpg
    215.3 KB · Views: 10
  • 20260830_152618.jpg
    20260830_152618.jpg
    162 KB · Views: 10
  • 20260830_152623.jpg
    20260830_152623.jpg
    147.4 KB · Views: 9
Anudda one bites dah dust...
Coming on nicely... 👍

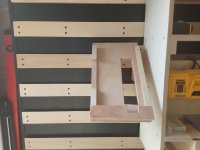
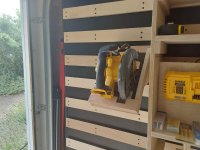
Just one take on the holder for the circular saw... I would be extending the support (triangular pieces) down so the weight is also resting/pressing against the lower cleat as well as hanging from the top one it's 'hooked' on.
 
Coming on nicely... 👍

Just one take on the holder for the circular saw... I would be extending the support (triangular pieces) down so the weight is also resting/pressing against the lower cleat as well as hanging from the top one it's 'hooked' on.
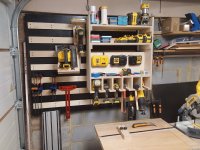
Yeah.. There is a leg on the right side for this purpose, but I probably should have made the holder deeper so I could store blades in it. Honestly, have been in kind of a rush to just get "some" storage online as quickly as possible, just to get tools where I can find them, and off of worktop. I am not super happy with how some of these are coming out, as in the moment, I started using some lower grade 1/4" plywood I bought for drawer bottoms, and on some of the holders, it has kind of ruined the look I was going for, which is less utilitarian, and more clean and well thought out.

A couple of missteps here and there. Like not thinking about how I was going to make the hole for my jigsaw holder before I build the holder strips around the edge. This prevented both a "two hole and join with jigsaw", and a templated routing type solution to make that look really clean. And not planning how to hold the jigsaw tight in the holder to the wall, so it is tilted forward a bit.

It's all workable for now, but it is all coming out a bit of hodgepodge right now. I cleaned up and left it like this tonight..
 

Attachments

  • 20260830_194945.jpg
    20260830_194945.jpg
    201.8 KB · Views: 14
@shortbusruss been there myself trying to get tools out of the way and, like you, had a few hiccups along the way so you're not alone there.

Look on it as a temporary measure and a learning curve 😉. You can return to it later as you make room on the worktops getting your stuff out of the way. You'll more than likely find where you put some of these that they don’t quite 'work out' placement wise and you'll move them around. That's the fun of having these sort of tool holders.

Like I've said... you're on the way - well done 👍
 
Last edited:
Next evolution: Picked up this Record RSDE1 dust extractor today off marketplace. Planning on building a small plenum box into the bottom of my miter saw station, then I am going to 3D print blast gate ports for it to connect to miter saw, table saw, router, with an additional port for connecting to small tools, and for shop vacuum heads. A short length of 4" hose to connect into plenum either from front, when miter station is stored, or from side, so that extractor sits under the left flip up wing. All other hoses will run through the workbench bays to other tools. The multi-use port will be on the front of plenum box for easy connection to my Cen-tec hose system.
 

Attachments

  • 772989146_975304838896242_7412412221739042803_n.jpg
    772989146_975304838896242_7412412221739042803_n.jpg
    86.3 KB · Views: 1
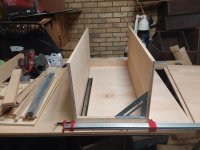
Finally trying to get some under workbench storage sorted. The workbench already has a plywood floor in the lower section, so the overall solution is to cut a top to the drawer box, and have two sides, with a separator in the middle, for two sets of drawers side by side..

The challenge is to get the sides and separator to be perfectly parallel to each other when connected to the top with pocket screws, then use equal sized spacers front and back when I slide the assembly underneath the workbench, so I can pocket screw the sides down into the preexisting floor. This hopefully helps insure the drawer box sides are perfectly parallel, even if my table legs are not.

In these pictures, I am dry fitting one side and the separator to see if at least the corners that will be attached to the top are 90 degrees. Looks decent, I think? These sides are cut intentionally short, so the roof of the drawer box provides storage for longer things, such as a table saw sled.

The under section of the workbench is approx. 3'x3'. If I had though it through a little better, I would have made two sides taller to completely fill up the vertical height of the under area, so whatever is inserted into the top shelf cannot slide out the sides. I might just go with what I have since I have already cut 4 identical panels in the size you see standing up here.

The idea is to build the drawer box outside the workbench, insure everything is perfectly square, then insert it, use spacers to get the unsupported "legs" exactly the same distance apart as top attached to roof, and lock it all down with pocket screws.

This is my first time doing anything like this.. Any major issues I am overlooking before I commit to cutting the roof of the drawer box? The plywood piece that will be cut out of is what the dry fit is currently resting on.

The sides are intentionally longer than this first set of rails, as the drawer box will be open front and back, so both sides of the workbench have drawers. The set on the back will be shorter.
 

Attachments

  • 20260902_063429.jpg
    20260902_063429.jpg
    161.5 KB · Views: 6
  • 20260902_063442.jpg
    20260902_063442.jpg
    154.2 KB · Views: 5
it has kind of ruined the look I was going for, which is less utilitarian, and more clean and well thought
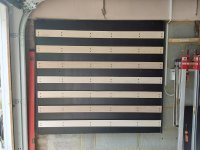
If it does the job, it's good enough. Looks are (relatively) unimportant. Save your time - and finesse - for when your creation is highly visible or decorative. Spending time getting something "purty" that might then get 'clattered' by unexpected workshop events (a.k.a. SNAFU's) is counterproductive.
 
I’ve never caught the pocket screw bug, but I could imagine that the action of screwing them together will pull things out of line a bit?
I’m sure there are ways to cramp it all tight so this won’t happen.
Ian
 
Back
Top