

kirkpoore1
Old Oak
In line with my medieval hobby, trying to make my campsite less modern can run into some snags. First, I don't cook over an open fire. Second, I still like to eat. So I've opted for the usual Coleman propane stove when cooking in camp. But it looks like exactly what it is. What to do? How about hide it?
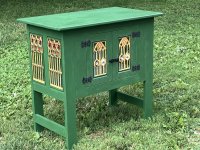
My plan was to make an aumbry, a medieval cabinet often used for food or valuables. These frequently had pierced and carved planks or panels to allow air flow. (When used for food, they could have cloth tacked over the holes on the inside to keep bugs out.) According to Cescinsky & Gribble, aumbries and other cupboard or cabinet type furniture start showing up in the 15th century and began replacing chests for quick and easy access because of the front doors and multiple internal shelves by the 1470's.
I've never been able to wrap my brain around CAD programs, especially Sketchup, so it's strictly graph paper for me. Here's the first draft:
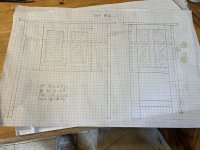
(Please bear with me--I'm still figuring out the new software and how to make it work.)
My aumbry would be left outside under a shade fly most of the time, so needed a finish, preferably paint. Also, it needed to break down into flat pieces and not weigh a ton while still being durable enough to survive transportation. Thus this project uses panel-frame construction, the wood is poplar (except for the internal plywood shelves), and the finish is latex and acrylic paint. My wood was in 5/4, 3/4, and (for panels) 1/2" thicknesses. I went with 1" final thicknesses on the legs and the front & back panel outer frame parts to make it easier to install the mortise bed hook sets which hold the sections together. The rest of the frame was made of 3/4" pieces, as was the top.

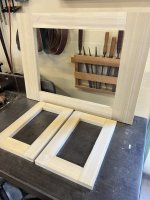
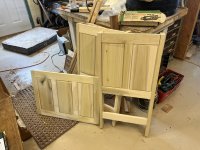
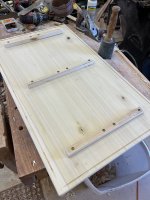
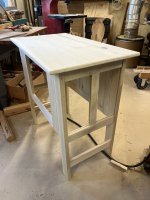
It took a couple of days to cut out the parts, add mortises and tenons, glue up the top, and add grooves for panels. Test fitting went well:
Next up was to lay out and carve the panels. I found a wall hanging cupboard that I liked on the St Thomas Guild website, with the item itself located in Cologne:
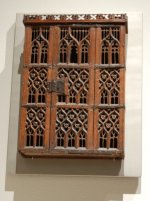
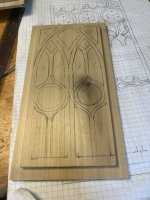
This gave me a nice range of interleaved circular elements paired with vertical elements, and I drew up a couple of examples, rearranging and slightly altering the basic shapes. Here's the door panel design after transfer to wood:
Next up was to drill holes and cut out the pierce work. My scroll saw would have given the most accurate cuts, but I was running out of time so went with the considerably faster jig saw:

This led immediately to the carving. Poplar carves easily but does leave some splinters for cleanup.
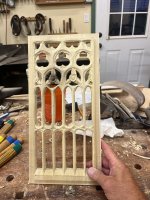
Most of the prototype carving was quatrefoil-based, while I went with an also common trefoil-based design. After carving and cleaning up the designs, I had to paint. Back and edges got the primary green color, whiile I added gold and red elements to the front to make the carving pop. (I've used gold leaf before, but hey, this was going to be outside. And I was running out of time.) Painting was a team effort, with me doing the initial work and my girlfriend Lisa (an artist and expert calligrapher) painting the fine detail and straightening out my wobbly edges. All green colors were latex housepaint, while the other colors were acrylics.

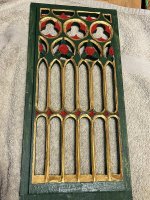
I would have preferred more time to let the paint cure, but I was out of time so had to assemble shortly after painting.

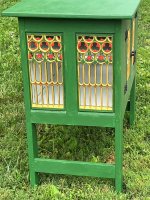
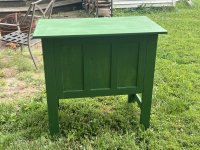
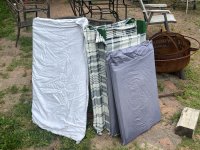
The next day I packed. By mere coincidence, I found that old pillow cases and unused pillow shams fit all the pieces perfectly, except the top which I wrapped in an old flannel sheet. Everything made my trip to Pennsylvania in perfect condition.
In my two weeks camping we got a lot of rain. The cabinet held up really well, though was hard to take apart at the end. I suspect the latex paint wasn't fully cured, and the wood swelled slightly from the rain. I had to beat the legs down with my carving mallet to get the front and back to release. Alarming, but solid wood construction can take that kind of (careful) abuse.
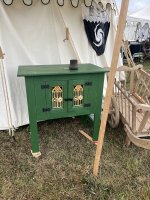
The aumbry holds the Coleman stove on the upper shelf, and most of my cooking gear (pans, utensils, wash basin) on the lower shelf. You can't see the contents in any detail through the panel holes.
Kirk
My plan was to make an aumbry, a medieval cabinet often used for food or valuables. These frequently had pierced and carved planks or panels to allow air flow. (When used for food, they could have cloth tacked over the holes on the inside to keep bugs out.) According to Cescinsky & Gribble, aumbries and other cupboard or cabinet type furniture start showing up in the 15th century and began replacing chests for quick and easy access because of the front doors and multiple internal shelves by the 1470's.
I've never been able to wrap my brain around CAD programs, especially Sketchup, so it's strictly graph paper for me. Here's the first draft:
(Please bear with me--I'm still figuring out the new software and how to make it work.)
My aumbry would be left outside under a shade fly most of the time, so needed a finish, preferably paint. Also, it needed to break down into flat pieces and not weigh a ton while still being durable enough to survive transportation. Thus this project uses panel-frame construction, the wood is poplar (except for the internal plywood shelves), and the finish is latex and acrylic paint. My wood was in 5/4, 3/4, and (for panels) 1/2" thicknesses. I went with 1" final thicknesses on the legs and the front & back panel outer frame parts to make it easier to install the mortise bed hook sets which hold the sections together. The rest of the frame was made of 3/4" pieces, as was the top.
It took a couple of days to cut out the parts, add mortises and tenons, glue up the top, and add grooves for panels. Test fitting went well:
Next up was to lay out and carve the panels. I found a wall hanging cupboard that I liked on the St Thomas Guild website, with the item itself located in Cologne:
This gave me a nice range of interleaved circular elements paired with vertical elements, and I drew up a couple of examples, rearranging and slightly altering the basic shapes. Here's the door panel design after transfer to wood:
Next up was to drill holes and cut out the pierce work. My scroll saw would have given the most accurate cuts, but I was running out of time so went with the considerably faster jig saw:
This led immediately to the carving. Poplar carves easily but does leave some splinters for cleanup.
Most of the prototype carving was quatrefoil-based, while I went with an also common trefoil-based design. After carving and cleaning up the designs, I had to paint. Back and edges got the primary green color, whiile I added gold and red elements to the front to make the carving pop. (I've used gold leaf before, but hey, this was going to be outside. And I was running out of time.) Painting was a team effort, with me doing the initial work and my girlfriend Lisa (an artist and expert calligrapher) painting the fine detail and straightening out my wobbly edges. All green colors were latex housepaint, while the other colors were acrylics.
I would have preferred more time to let the paint cure, but I was out of time so had to assemble shortly after painting.
The next day I packed. By mere coincidence, I found that old pillow cases and unused pillow shams fit all the pieces perfectly, except the top which I wrapped in an old flannel sheet. Everything made my trip to Pennsylvania in perfect condition.
In my two weeks camping we got a lot of rain. The cabinet held up really well, though was hard to take apart at the end. I suspect the latex paint wasn't fully cured, and the wood swelled slightly from the rain. I had to beat the legs down with my carving mallet to get the front and back to release. Alarming, but solid wood construction can take that kind of (careful) abuse.
The aumbry holds the Coleman stove on the upper shelf, and most of my cooking gear (pans, utensils, wash basin) on the lower shelf. You can't see the contents in any detail through the panel holes.
Kirk


