• Hi all and welcome to TheWoodHaven2 brought into the 21st Century, kicking and screaming! We all have Alasdair to thank for the vast bulk of the heavy lifting to get us here, no more so than me because he's taken away a huge burden of responsibility from my shoulders and brought us to this new shiny home, with all your previous content (hopefully) still intact! Please peruse and feed back. There is still plenty to do, like changing the colour scheme, adding the banner graphic, tweaking the odd setting here and there so I have added a new thread in the 'Technical Issues, Bugs and Feature Requests' forum for you to add any issues you find, any missing settings or just anything you'd like to see added/removed from the feature set that Xenforo offers. We will get to everything over the coming weeks so please be patient, but add anything at all to the thread I mention above and we promise to get to them over the next few days/weeks/months. In the meantime, please enjoy!

15th Century Italian Cassone

kirkpoore1

Old Oak
Joined
Jul 21, 2014
Messages
1,179
Reaction score
257
Location
O'Fallon, Illinois
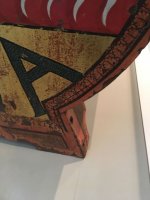
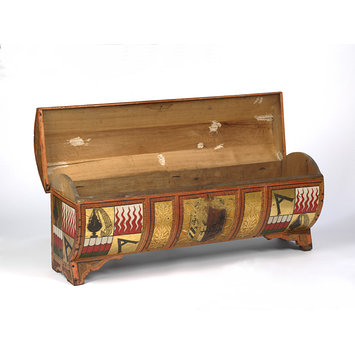
As you guys may recall, back in August I was in Wales for a week long vacation. Shortly after arrival I managed to lose my passport, so I had to make a quick trip to the embassy in London to get a replacement. After getting that done, I still had a couple of hours to kill so I walked over the Victoria and Albert to look at their medieval woodwork collection again. Once again I encountered this Italian cassone (marriage chest) and took some better pictures this time:

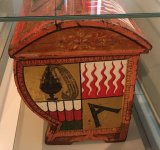
chest_front.jpg

chest_left_end.jpg

chest_left_detail.jpg

I found the shape of the chest to be a real change of pace from anything I'd done or even seen before, and the 500 year old paint job to be a radical departure from the clear finishes or stains that mostly get used today. Looking closely at the structure, though, it didn't really look too hard to build. I decided to give it a shot.

The chest is roughly 60" long, 21-1/2" tall, and 17-1/2" deep (front to back). Except for the length, that seemed to be a practical size. I decided to keep the profile and just shorten it. The V&A has some details including pictures with the top open on their website which also helped out with the details:
https://collections.vam.ac.uk/item/O109268/cassone-unknown/

The original front had been hewn from a single plank, and the top shaped from only 3 boards. I decided to go with multiple boards for each to allow the workload to be practical and keep the weight down. I have a lot of sycamore (Platanus occidentalis, not your sycamore) in my wood shed, and it's all 15+ inches wide, so that would work for the chest ends. The original chest was built of poplar, so I called a friend who sells wood and got 24 bdft of quartersawn 4/4 poplar for a little under $3/ft. These boards were 6-1/2" wide (rough sawn) and just over 8' long, so I was able to get six 3" x 32" out of each of the first three boards.

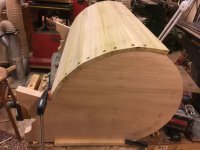
For practical purposes, i.e. not wanting to have each front or top board trimmed on the inside to a unique curvature, I laid out the front and the top to sections of a circle. Here are the ends during and after being cut out:
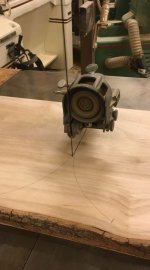
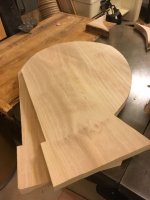
end cutting.jpg

end cut.jpg

I decided to make the ends of the poplar boards curved to match the front curve, then plane down the outside to give a matching curve there. I don't have a compass plane, so I put together a jig to hold the boards while I used my router:
routing jig.jpg
The jig is a 2x4 piece ripped to my poplar board width. It has a plywood template screwed to the top, a couple of tabs sticking forward off the sides to hold the work boards straight, and a backing block under to allow me to clamp the whole thing including work board in my Veritas twin screw vise between the screws. I used my longest router bit with a guide bushing to cut the curves. It turned out very clean and easy.
The picture shows two test examples, one mounted and the other already cut. I managed to make all the cuts without putting any cuts on opposite faces of the same board. :)

Results were pretty decent:
curve match.jpg
Not perfect in all cases, but much better than flat.

Next up I resawed another piece of scyamore down to form the bottom and back of the chest. I then cut a shallow dado across the insides of the ends to hold the bottom, and nailed these parts together:
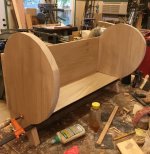
back and bottom.jpg

Finally I could test fit the front boards and determine the correct bevel angle on each to make their long edges match up.
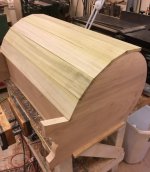
testfit.jpg

Ok, that's it for tonight. By now you should be hearing ominous music in the background as I have already made an annoying but not fatal mistake. More later...

Kirk
 
Rod":3i4ufod5 said:
Am I correct in thinking you haven’t cut off the side part of the lid?

Rod

Actually, the sides stay rounded at the top. Here's a V&A pic:

2009CR5369_jpg_ds.jpg


The top overlaps on the outside. On mine, the lid actually rests on those rounded side parts.

Kirk
 
After getting the bevels pretty close, I attached the side slats using countersunk 3/4" screws. The reason for this is that the nail heads will all be below surface level so that the nail holes can be filled with gesso and sanded smooth. Also I needed to make sure it all worked and do final tweaking on the fit. The screws, with their shallow heads, also allowed me to hand plane and sand the surface to a more rounded shape.

teststand.jpg

screwed on.jpg
At this point you should be thinking that there's something not quite right. And there is. Though I hadn't discovered it yet, I made the "foot" on the front too small/too far to the back. That tends to make this ready to tip over to the front. Unfortunately, I didn't figure out what was wrong for a few more days.

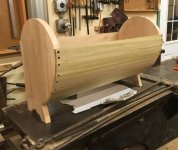
Still, it wasn't obvious. And the chest was starting to look pretty good, after I glued up the slats and replaced the screws with nails. (I used screws and kept them in place until the glue dried.) Here it is sitting on my jointer, which I used as a reference surface so I could level the feet.
nailed.jpg

Next up was the top. The top sides have to straddle the base sides with a little extra room to lift up easily. So they need to be parallel, but 30 inches (plus a little) apart. To do this I took an old 2x6 I had laying around, jointed it flat and square, and cut two dadoes across that were 30-1/8" apart and about an inch deep. This gave me a jig to hold the ends. This was the first try:
first_top.jpg
It's actually a pretty good fit, except for that the back of the top doesn't overlap the back of the chest. Time to redraw and try again. Oh, and add the front brackets.
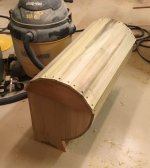
brackets.jpg

I rebuilt the top by cutting out new sides. Since the slats were just glued on, I didn't have to make new ones. Attaching the front lip to the top edge and then gluing each piece in turn, I got the new top.
second_top.jpg
But man, that's goofy looking. Like a bike helmet gone bad.

Ah well, that's a good breaking point for tonight. Time to go to bed, read a few pages, and nod off right afterwards.

(Digression. Not woodwork related at all:
You guys might have heard of the book--CV Wedgwood's "King Charles' War". Which I can find very interesting but I can only read about 10 pages at a time without falling asleep. The reason it's interesting is that it's entertaining and that portion of history is a total blank to me.

World history in the US is taught sparsely. Basically not much at all until you get Columbus-->Cortez & other bad Spaniards-->Spanish Armada-->Shakespeare-->Jamestown-->Pilgrims & Plymouth Rock-->French & Indian War-->American Revolution-->etc and so forth. Maybe Henry VIII thrown in for titillation. But after 1600, nothing in Europe. So Wedgwood's very readable series of books is filling in a pretty big hole. I'm also finding that what she is presenting is leading straight to the American Revolution. I've read some biographies of John Adams, and almost everything she is talking about are the exact things that he and the others like him were talking about 125 years later. Much more than before, I know where they were coming from.)

More later...

Kirk
 
Is the lid just hinged at the side?

November 5th - Bonfire Night, to celebrate the prevention of the Gunpowder Plot in 1605.
Religious intolerance again (Catholics and Protestants). A group of Catholics fed up of the persecution of their faith and religion attempted to blow up King James I and Parliament.
There’s been lots on TV recently about it.
Celebrated by bonfires, fireworks and the burning of a stuffed replica of Guy Fawkes ( one of the gang caught with the gunpowder barrels in the undercroft of Westminster).

Rod
 
I kind of despaired at the goofy looking lid on the chest. However, it was glued up so I had no choice but to press on. I painted on a layer of thinned hide glue to act as a seal on the outside, then figured out how I was going to do the hinges.

The original has double eyebolt style hinges--basically interlockled rings with a spike or cotter pin like end which can be nailed into or through wood. If the end goes through, the two cotter pin ends are bent out in opposite directions to prevent the hinge from coming out.

I only had some strap hinges to work with, made of fairly thin metal. I determined that I could put each hinge on the back of the chest, then have the remaining half stick backwards to catch the lid, and then be bent to match the inside surface. Each hinge would have three nails on each half.

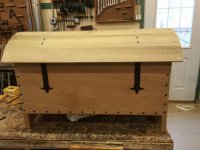
Here's the back with the external hinges:
back.jpg

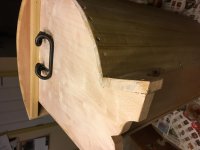
And back quarter, so you can see the handles too.
back_quarter.jpg

Inside was a little more complicated:
inside_strap.jpg
The strap hinge had to be bent to match the curvature. On the good side, this was easy. On the bad side, it was because the metal was really too thin for the load. It means delicate handling in the future, but that's OK given what the paint job will be when done.

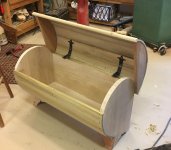
Here it is with the lid open:
front_open.jpg

The amazing thing was that the whole premise--the overextended back ledge on the chest keeping it from tilting too far--was exactly right. It fit almost perfectly from word go.

This is pretty much where the chest is now. I have whiting on order and hope to start covering it in gesso on Thursday night.

Kirk
 
Malc2098":kqwun6ht said:
Blimey, Kirk. That's nice. You were born out of your time!


I’m not so sure about that. It would be really tough to give up my big power tools!

2 kg of whiting arrived in the mail today, so tomorrow night is gesso night. :). Pics then.


Kirk
 
Will the moisture from the gesso rust the nails?
If so coating with Tippex correction fluid might prevent that.

Rod
 
Rod":bnkkrvf9 said:
Will the moisture from the gesso rust the nails?
If so coating with Tippex correction fluid might prevent that.

Rod
The answer is yes. The medieval solution was to cover the nail heads in tin foil. Not having tin, I used aluminum foil. The bent hinge nails on the top are unprotected for now. I’m going to seal them with oil based paint and hope for the best.

Kirk
 
Merry Christmas, Guys!

I realized I forgot to post the finishing steps on this project, so here we go.

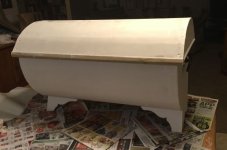
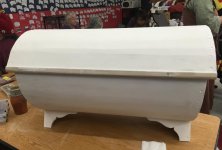
When I last posted, the chest was assembled but still only had a hide glue seal coat on it. The first thing to do was make up some more hide glue and use it to make gesso. I'd ordered whiting (finely ground chalk) from an art supply website, and began with an 8-1 water to hide glue mix and then added the whiting. The instructions said to make it about as thick as cream. Well, unlike you tea drinkers I'm not familiar with the flow characteristics of cream, so I went for a thickness somewhere between milk and latex paint. This painted on well.
IMG_3317.JPG
IMG_3316.JPG

This is after one coat. As you can see, it starts off pretty translucent. But it builds fast. I ended up with 4 coats of gesso done over two days.

top4thcoat.jpg
end_done.jpg
IMG_3328.JPG

By this stage, it looked a lot like an albino pig. I wound up using half my whiting on this, about 1 kg, so it adds some real weight.

Oh! Gotta run and take the kids to see Star Wars. More later...

Kirk
 
After gessoing the chest, I turned it over to Lisa, an an artist friend of mine in my medieval group. I then starting building her price--another cassone like this, only this time without the errors. So on hers the front feet are pushed forward 2" more, and I used the heavier hinges I'd received while this was being built.

When I gave her the chest, I gave her my dry pigments, the remaining whiting, and the hide glue granules. She started by making gesso and finishing the nail hole fill-in. Then she worked out the design and experimented with the pigments. The paint was going to be egg tempura--basically egg yolk mixed with pigment. I vetoed using gold leaf due to the delicacy of it and the time available (only about three weeks). We got together to finalize her design, and then she started to work.

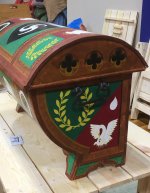
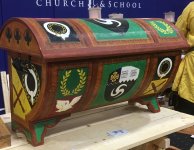
I got it back from her on Dec 6. I needed it to take to our Christmas market event on Dec 9, so she wasn't quite with all the detail. However, here are the pics. You can try to find the missing details.:)

IMG_3400.JPG
IMG_3401.JPG
IMG_3403 (2).JPG
quarter_detail.jpg
I think you can see in this picture why I think she did a first rate job with the shading. The lid actually has a slight (1/4") overhang. But if you compare the shadow from that with the "shadows" inside the top edges of the painted on quatrefoils, you can't really see the difference. And from any distance, the cassone looks like it's made with actual panels, just like the original.

top_close.JPG

Unfortunately, I found on the trip out and back that egg tempura over gesso is a really delicate surface. It took a few dings in the back of the truck even when carefully held in place and covered. And one nail pulled loose in the top, allowing the not very good glue joint to spring and forming a slight crack.

The final injury came after I got home. It seems that dogs like the takes of egg. I thought it had dried long enough to get past that, but no. My dog licked the paint off of an area maybe 2"x 3". Fortunately, this was right where I'd decided to fix the crack by inserting a screw, so that spot was going to be repainted anyway.
Ah well.

Anyway, once the paint and gesso are repaired, I'll let it sit under it's blanket for a few weeks to cure. I'm going to write the V&A and see what kind of sealer coat they put on the original. If I don't here from them, I'm going to test out the use of water based polyurethane on it and see what it looks like.

Kirk
 
Very nice Kirk, the painting is superb.
I have a couple of egg tempura paintings on gesso carried out by an artist who specialises in that medium.
They are not varnished and give off a satin sheen appearance.
I’ve read it can 3 to 6 months to harden!

Rod
 
Rod":84feazus said:
Very nice Kirk, the painting is superb.
I have a couple of egg tempura paintings on gesso carried out by an artist who specialises in that medium.
They are not varnished and give off a satin sheen appearance.
I’ve read it can 3 to 6 months to harden!

Rod

The sheen varies some with the pigment, but yes it tends to be a satin look. It also feels very odd--sort of like soft plastic, or painted leather.

Kirk
 
What a difference some paint makes! Looks great. No idea what might be missing but I don't really care :)

Thanks for completing the posting.
 
Back
Top