• Hi all and welcome to TheWoodHaven2 brought into the 21st Century, kicking and screaming! We all have Alasdair to thank for the vast bulk of the heavy lifting to get us here, no more so than me because he's taken away a huge burden of responsibility from my shoulders and brought us to this new shiny home, with all your previous content (hopefully) still intact! Please peruse and feed back. There is still plenty to do, like changing the colour scheme, adding the banner graphic, tweaking the odd setting here and there so I have added a new thread in the 'Technical Issues, Bugs and Feature Requests' forum for you to add any issues you find, any missing settings or just anything you'd like to see added/removed from the feature set that Xenforo offers. We will get to everything over the coming weeks so please be patient, but add anything at all to the thread I mention above and we promise to get to them over the next few days/weeks/months. In the meantime, please enjoy!

1m Kitchen base unit

9fingers

Moderator
Staff member
Joined
Jul 21, 2014
Messages
10,414
Reaction score
165
Location
Romsey Hampshire between Southampton and the New F
Recent clearance of the kitchen for decoration revealed a lot of stored cr4p but also some that needed to be retained and there was a space under some wall mounted shelves for a 1 metre wide base cabinet.

Rest of the kitchen dates back to 1985 with Wickes units in oak where the finish has darkened to a fairly mid orangy brown which we don't particularly like but at the moment I cant raise the enthusiasm to make all new door and drawers.

So the cabinet needs to match as best I can for now. Fortunately there will not be a side to side comparison so near enough should be good enough.

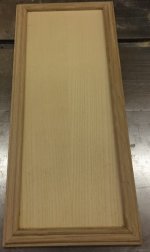
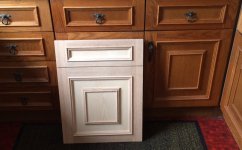
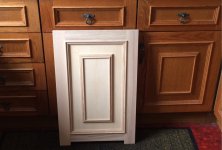
This is the style of the existing. Rail and stile construction with bolection mouldings and and extra decorative panel surrounded by a similar moulding.

Rotated existing style.jpg


Although I have a reasonable selection of router cutters, I could not copy the moulding exactly but this is near enough to be acceptable.

IMG_2664.JPG

Te starting stock was 17 x 21 mm and three passes with different cutters with combinations of feather boards etc kept it fairly safe but a bit hairy. Some snipe at the ends but I made several metres extra.

The basic cabinet is simple as are most kitchen cabinets. Stile and Rail end panels joined with face frame sections and stile and rail doors. The current units have drawers above the cupboards but I only wanted cupboards but kept the look of the drawers with an intermediate rail. Later on you will see a 4mm FTG kerf cut to keep the look of a drawer to all but a detailed inspection.

IMG_2640.JPG

IMG_2641.JPG

Rigidity against racking is provided by tight fitting bottom shelf of 16mm melamine coated chipboard and the back panels of 5mm ply I had lying around and painted white.

Infact everything was made from stock offcuts apart from the melamine chipboard. I've spared you pictures & description of all the stock preparation. All routine stuff.

The infill panels are ash veneered mdf 7mm overall and everthing else is oak and by the time it is stained, only the purists might spot it.

Currently posting this and trying to cook a roast dinner at the same time so more later! :lol:

Bob
 
Thanks Droogs!
The next job was to make the applique decorative panels. The existing units use a spacing all round of 50mm but after careful measurement of my offcuts of ash faced mdf, I could only manage 54mm spacing but good enough.
This is where the superglue post comes in. Having cut the four pieces of moulding I thought it would be easier to tack the mitres together then glue the completed frame onto the panel.
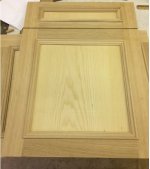
Here are the completed appliques for the dorr and the end panel.

2643.jpg

2644.jpg

More moulding cutting saw the bolection moldings ready to fit

2645.jpg

I mentioned the kerf cut I planned to use to give the iillusion of a drawer front above the door panel.
this can be seen above

2648.jpg

After a bit of gluing

2646.jpg

2649.jpg

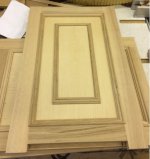
and with the applique panels fitted

2650.jpg

2647.jpg


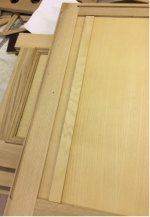
A combination of material shortage and an error, the end panel going against a wall looks like this with a couple of misplaced screw holes and a butt join in the panel

2651.jpg

2652.jpg

2653.jpg

behind the join is a reinforcing strip which will be deep inside the cupboard

2654.jpg

Here are comparisons between new and existing.

2667.jpg

2668.jpg

Thats more or less up to date.

Currently applying tinted varnish to try and match the colours.

Bob
 
Excellent stuff Bob. Your fun is going to start when it comes to trying to colour match.
 
Excellent work, Bob. Pity you didn't ask me as I could have run you up some moulding. Would have been good to repay all the favours you've given me.

And for once, a workshop as untidy (if not more so ;) ) than mine :lol:
 
RogerS":zw7wkhxe said:
Excellent work, Bob. Pity you didn't ask me as I could have run you up some moulding. Would have been good to repay all the favours you've given me.

And for once, a workshop as untidy (if not more so ;) ) than mine :lol:

The problem with the moulding was that with all my spindle cutters and router bits I still did not have a match and also I could not take a piece off and existing door/drawer without the risk of wrecking it.
I quite enjoy making batches of things like mouldings and had loads of offcuts salvaged from Stu's place when he moved out.

Bob
 
Thanks for the compliments guys. I'd become very aware that even though I've been doing quite a bit in the workshop that I've not been taking pictures nor posting much on the forum. Even on this project I did not take any of the stile and rail making process so glossed over that.
I did use one hand tool apart from a screw driver. A moderately blunt 1/2" chisel has been useful to scrape out fillets of glue from the odd corner. Oh yes and a old ground down kitchen knife to scrape the glue off the chisel.

Apart from that, as you would expect of me, it has been machines all the way.

There might be a bit of gap now as I have to make a top and will have a play with some veneer onto mdf and then edge it in oak. Might be a chance to have a play with a new (to me) vacuum pump?

Bob
 
Job's a good'un Bob, and as my Dad used to say, "there's nothing a blind man on a galloping horse would notice!" :lol: I reckon no one will notice any minor differences in style - nicely matched. So far as colour is concerned, are you making any allowances for future differential changes in colour between the new and the old? If so, please elaborate 'cos I've no idea how you would do that!
 
RogerM":i6896eqx said:
Jobs a good'un Bob, and as my Dad used to say, "there's nothing a blind man on a galloping horse would notice!" :lol: I reckon no one will notice any minor differences in style - nicely matched. So far as colour is concerned, are you making any allowances for future differential changes in colour between the new and the old? If so, please elaborate 'cos I've no idea how you would do that!

Thanks Roger,
I too have no idea on the colour matching with time. I'm sure the originals must have darkened with time since 1985 when I built the kitchen. Interestingly there is little colour difference between units facing the window to those under it so what colour change there is is not light level dependent.
The new unit will go against a wall that has no old units close by so thankfully direct comparison can't be readily made.

I've been varnishing an offcut as I go and after two coats of my brew* it is close to the lightest piece of the originals so maybe another two coats will sort it? no 3 just applied.

* the brew is 5 parts antique pine 1 part teak Rustins polyurethane satin and 1 part whitespirit although in the mixing and decanting it has lost some of its matting agent and looking a bit glossy so it might have a coat of clear satin to finish with.

I want to get it out of the workshop asap as it is stopping me doing anything in there for fear of raising any dust.

Bob
 
I've been able to complete this project in the last few days.

Several years ago a friend gave me a whole load of oak veneer which was dry as a bone with a few splits etc.
Turns out is is about 40 years old and kept in a loft so no wonder it is dry!.
Its in a roll about 400mm diameter so I cut off a bit longer pieces than I needed by sticking masking tape on both side along the length of the cut and then cutting it through.
I then used a steam iron to carefully take as much of the curl out as possible. After several goes it would lay flat under its own weight.

I found a piece of 18mm MRMDF about the right size and then vacuum veneered both sides. No pics I'm afraid but I used the same method as here viewtopic.php?f=19&t=2990&p=45022

Once trimmed to final size, I lipped the edges all round with more offcuts of solid European oak to make the edges up to about 28mm.
Stained using light teak spirit stain for the closest match to the surroundings and a few coats of water based satin floor varnish.

IMG_2683.jpg

IMG_2681.JPG

IMG_2682.JPG

Swmbo approves so thats a result!

Thanks for looking

Bob
 
Back
Top