kirkpoore1
Old Oak
Happy New Year, guys! I'm sorry I haven't been around much--I got a job on a military base a few years ago and they frown on (as in filter) most non-US websites so I can't browse here at lunch, and I don't spend as much time on the computer at home as I could.
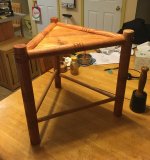
A friend (Hugo) in the medieval group that I'm active in is kind of a fanatic for 16th century Dutch stuff. I don't exactly know why, but it's his thing and he's going all out on it with research, clothes, shoes, cooking, the whole 9 yards. Anyway, he decided that he wanted to build a turned stool, and I offered to help. This is what he's after:

This is Peter Follansbee's blog post: https://pfollansbee.wordpress.com/2016/07/24/3-footed-turned-stool/
Follansbee really knows his stuff, but that doesn't mean that he gives a step-by-step guide. To keep from wasting Hugo's time by going down some blind alleys, I decided to make a stool first and work out the kinks in the process.
For wood, obviously I needed some thicker stock to turn the legs and the top rails. As it happens, I have a fair number of red oak 2x8's in the wood shed so I decided to go with that, and then (since this was supposed to be quick) use some 3/4" oak dowels I had for bottom rails. Solid seat would be 1/2" stock glued up from stuff in the scrap bin.
First steps were to cut & plane the stock to base dimension, in this case 1-3/4" for legs and 1-1/2" for top rails. I cut the leg piece to 19", planed and thicknessed it down to 1-7/8, and ripped the legs out to the same width. Same thing for the rails, except 1-5/8". I then beveled all the corners to give an octagon cross section. This was a mistake--I should have mortised them first and drilled for the lower rails. Oh well.
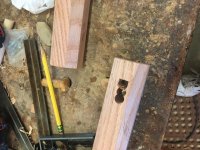
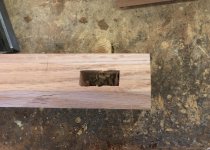
Since there were only three mortises, and they were going to go all the way through the leg, I elected to drill them out first and then finish with the mortising chisel:
Next was turning:

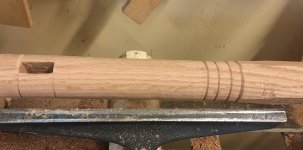
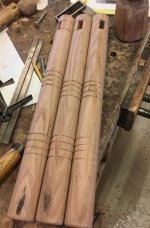
The grooves on the legs serve as markers as well as decoration.
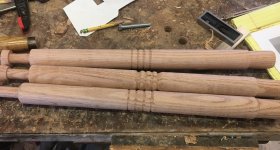
Here are the rails. I later turned down the ends on the left as much as I could to make the round tenon that would stick through the next leg over, piercing the flat tenon and holding it in place.
Next up was the flat tenon. To make this I cut the shoulder with a hand saw (sorry Bob, lots of hand work in this one), then split off most of the tenon cheeks and finally used my shoulder plane to get a flat surface.

Here's the first test fit:

That went well, so I marked and cut the rest of the flat tenons and tested them successfully. Then it was time to drill the hole through the leg and flat tenon, perhaps the key step in this build. I this case I wanted them to meet at precisely a 60 degree angle, so made up a quick 30 degree jig to hold the flat tenon rail:
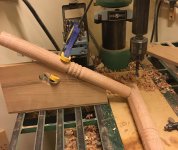
I tested the round tenon in a 5/8" hole to make sure it fit, and then assembled the joint. Unfortunately, I forgot to do something:

Adding some bevels to give clearance, drilling the holes for the lower rails, and doing some test fitting finally led to the frame dry fit:
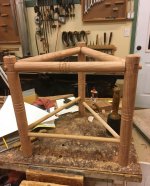

Next up was to add grooves to hold the seat. There were a few ways to do this, but I elected to go with my plow plane. However, this also meant I needed a jig to hold the rails. I cut a wide groove in a 2x4, screwed down a stop at one end, and added a clamped stop at the other.
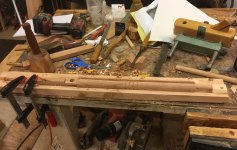

After cutting the grooves I reassembled the stool and trimmed a cardboard triangle to fit, giving me a pattern for the seat. The seat is 1/2" cherry, from a piece of scrap I had around that I cut and reglued to make it wide enough (16-3/8") at the base. I oriented the cuts so that each rail has end grain (either at 90 or 60 degrees) so that there won't be a break along a rail. Finally I tapered all three sides so they'd fit into the grooves and had a little room for expansion in the summer when it gets hot. It fit the first time out:


Sunday's job will be to take it apart again, do some cleanup, add the first coat of finish, then glue it up. I've already sat on it, and it's very sturdy and of course stable.
Kirk
A friend (Hugo) in the medieval group that I'm active in is kind of a fanatic for 16th century Dutch stuff. I don't exactly know why, but it's his thing and he's going all out on it with research, clothes, shoes, cooking, the whole 9 yards. Anyway, he decided that he wanted to build a turned stool, and I offered to help. This is what he's after:
This is Peter Follansbee's blog post: https://pfollansbee.wordpress.com/2016/07/24/3-footed-turned-stool/
Follansbee really knows his stuff, but that doesn't mean that he gives a step-by-step guide. To keep from wasting Hugo's time by going down some blind alleys, I decided to make a stool first and work out the kinks in the process.
For wood, obviously I needed some thicker stock to turn the legs and the top rails. As it happens, I have a fair number of red oak 2x8's in the wood shed so I decided to go with that, and then (since this was supposed to be quick) use some 3/4" oak dowels I had for bottom rails. Solid seat would be 1/2" stock glued up from stuff in the scrap bin.
First steps were to cut & plane the stock to base dimension, in this case 1-3/4" for legs and 1-1/2" for top rails. I cut the leg piece to 19", planed and thicknessed it down to 1-7/8, and ripped the legs out to the same width. Same thing for the rails, except 1-5/8". I then beveled all the corners to give an octagon cross section. This was a mistake--I should have mortised them first and drilled for the lower rails. Oh well.
Since there were only three mortises, and they were going to go all the way through the leg, I elected to drill them out first and then finish with the mortising chisel:
Next was turning:
The grooves on the legs serve as markers as well as decoration.
Here are the rails. I later turned down the ends on the left as much as I could to make the round tenon that would stick through the next leg over, piercing the flat tenon and holding it in place.
Next up was the flat tenon. To make this I cut the shoulder with a hand saw (sorry Bob, lots of hand work in this one), then split off most of the tenon cheeks and finally used my shoulder plane to get a flat surface.
Here's the first test fit:
That went well, so I marked and cut the rest of the flat tenons and tested them successfully. Then it was time to drill the hole through the leg and flat tenon, perhaps the key step in this build. I this case I wanted them to meet at precisely a 60 degree angle, so made up a quick 30 degree jig to hold the flat tenon rail:
I tested the round tenon in a 5/8" hole to make sure it fit, and then assembled the joint. Unfortunately, I forgot to do something:
Adding some bevels to give clearance, drilling the holes for the lower rails, and doing some test fitting finally led to the frame dry fit:
Next up was to add grooves to hold the seat. There were a few ways to do this, but I elected to go with my plow plane. However, this also meant I needed a jig to hold the rails. I cut a wide groove in a 2x4, screwed down a stop at one end, and added a clamped stop at the other.
After cutting the grooves I reassembled the stool and trimmed a cardboard triangle to fit, giving me a pattern for the seat. The seat is 1/2" cherry, from a piece of scrap I had around that I cut and reglued to make it wide enough (16-3/8") at the base. I oriented the cuts so that each rail has end grain (either at 90 or 60 degrees) so that there won't be a break along a rail. Finally I tapered all three sides so they'd fit into the grooves and had a little room for expansion in the summer when it gets hot. It fit the first time out:
Sunday's job will be to take it apart again, do some cleanup, add the first coat of finish, then glue it up. I've already sat on it, and it's very sturdy and of course stable.
Kirk


 I think if one doesn't ordinarily sit on one's crown jewels, they should be just fine.