• Hi all and welcome to TheWoodHaven2 brought into the 21st Century, kicking and screaming! We all have Alasdair to thank for the vast bulk of the heavy lifting to get us here, no more so than me because he's taken away a huge burden of responsibility from my shoulders and brought us to this new shiny home, with all your previous content (hopefully) still intact! Please peruse and feed back. There is still plenty to do, like changing the colour scheme, adding the banner graphic, tweaking the odd setting here and there so I have added a new thread in the 'Technical Issues, Bugs and Feature Requests' forum for you to add any issues you find, any missing settings or just anything you'd like to see added/removed from the feature set that Xenforo offers. We will get to everything over the coming weeks so please be patient, but add anything at all to the thread I mention above and we promise to get to them over the next few days/weeks/months. In the meantime, please enjoy!

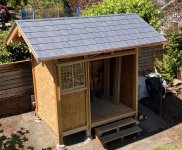
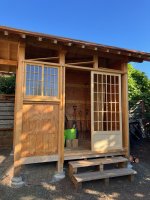
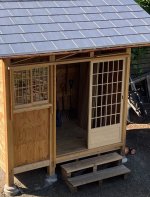
A Japanese style garden shed

Looks just like the sort of wood needed for twin doors Gary, I always worry about movement as I’m sure you did. A bit damper on the outside than the in and I think any door might get a bit bendy. What finish- if any are you putting on them? Just thinking it might help prevent moisture absorption.
Hope it works well for you.
Ian
 
Ian, there won't be any finish on the solid wood parts. The walls, windows, and doors will mostly be sheltered from rain and with the lattices at the gable ends the shed will be leaky to air movement and should mostly be at moisture equilibrium inside and out most of the time. Except that the doors are on the south side and will get some sun on their lower half so might dry out faster there outside than inside. In my favor is that the door frames are all perfectly straight grained. And since the shed is not intended to be weather tight I'm not as concerned about a bit of twist or imperfect seals at their borders. As long as the doors don't bind seasonally I'll be happy. Fingers crossed.

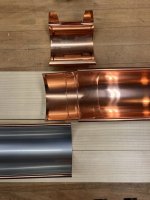
I now have almost all the parts and materials I need for the gutters. Now I am furiously reading about soldering copper. And I have an additional complication that I bought one additional gutter section from Japan, and the manufacturer has switched from pure copper to copper clad stainless steel. So I have one section where I need to solder copper to stainless steel. Here is the transition which involves the stainless/copper clad gutter on the left, copper gutter on the right, an interior transition/seal piece in pure copper, and an exterior wrapping piece in pure copper. My plan is to solder only the interior piece to the stainless steel on one side and to the copper piece on the other. The exterior wrap piece is just for esthetics to hide the soldering but won't itself be soldered. Does that seem a reasonable plan?

F3700C39-C6B5-4088-80E6-496ACB2AB7F5_1_201_a.jpeg

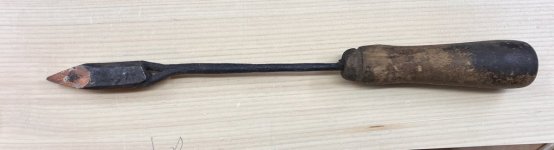
As for soldering tools, I have three old school copper soldering irons of various weights that look like this one:

F7B50041-B72A-418A-B568-651643F78971_1_105_c.jpeg

And I have a propane barbecue grill or a backpacking stove to heat them up. I also have ordered an electric soldering iron with a chisel tip intended for roofing work. And 50:50 lead:tin solder, and fluxes for copper and for stainless steel.

What else should I be thinking about? Am I on the right path?
 
That sounds good about the doors Gary.
Very far from being an expert on soldering, the pieces need to be such a perfect fit that the solder flows by capillary action, it won’t gap fill at all. Also it looks to me as if the copper has a finish on it. Sorry to put a dampener on it, if it were me I would "glue" them together with CT1 or similar,and as you said the joint has an outside cover.
Ian
 
No, no finish on the copper, just a bit of oxidation. I will clean to bare metal before soldering. And yes I could use some kind of caulk/sealer instead but everything I've read about copper gutters says soldering will last longer than the gutters themselves, if done properly. It's that "done properly" part that gives me pause. I also am trying to avoid caulks and sealants and finishes and plastics for this particular project. Just wood, metal, glass, and lime plaster. (I'd did hide some polyester weather barrier under the metal roof panels so as not to void the warranty/guaranty on the panels).

I think I have the soldering principles down and have some copper flashing to practice on before committing to the gutters. I'm waiting to recieve an electric soldering iron sized for the task. Next week, I hope. If I had miles of seams to solder I'd probably hire it out to professionals but I have a total of just 48 inches of seams to solder. That seems within my abilities.

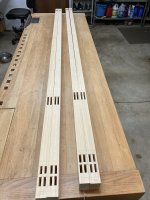
Meanwhile, I spent a day making mortices for the doors. These are through mortices. I still need to go back and make the shallow mortices for the haunches. 528D8EA3-14A4-4728-AA84-8B405EDBD952_1_201_a.jpeg
 
soldering shouldn't be too hard, try and use lead solder though if possible, it sticks much better.
 
Have you considered using a gas torch, rather than an iron? I mean the basic sort with a replaceable can of liquified gas, as used by plumbers joining copper pipes. It could be easier to waft a flame around those big curves than to keep the tip of an iron in close contact.
 
Yes, I have a 50:50 lead:tin solder. I also do have a small propane torch and using that is Plan B. I'm not sure yet which will work best so I'll try them both.
 
Looks good and I think you made the right decision buying those ends.

Presumably it will all turn pastel green in a year or two?
 
Looks good and I think you made the right decision buying those ends.

Presumably it will all turn pastel green in a year or two?
From what I've read: brown first and then slowly green. How long that will take I don't know.

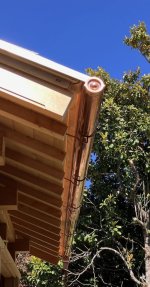
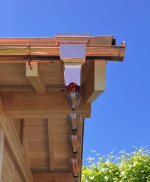
The gutter brackets come packs of 5 with graded riser heights to produce the drainage slope. They come in two styles; this one and another that is screwed to the side of the rafter tail rather than inserting into the end grain. I like the look of this style. Apparently most construction in Japan now uses fascia boards rather exposed rafter tails and there is only one company left that makes this style of bracket.

Here they are on a somewhat larger structure (ha) in Japan.


934CB841-8032-4BF6-8C02-10626C5E1E6F_1_105_c.jpeg
 
Last edited:
I got the other gutter up today. No photos because it looks just like the first one. I did, however, test out the rain chain. We are in our dry season now. It likely will not rain for the next three months. I didn't want to wait that long to see how it worked so I just put a garden hose on the roof.


That’s interesting, slightly different action from a chain drain, but I suppose both will only take so much water before "overflowing" amazing that you live where you can be confident not to have any rain for the next 3 months. We don’t know about the next 3 days- or less sometimes!
I think the last time it didn’t rain for 3 months here was in 1976 and there was a severe draught with people collecting water in buckets from standpipes in the street, the official Government slogan was "bath with a friend” lol. Coincided with a plague of Ladybirds (Ladybugs) of Biblical proportions.
A minister for draught was appointed and within 2 days it started to rain, and didn’t stop for months then of course we had flooding. Not well prepared for extremes of weather in good old Blighty.
Nice guttering and downthings.
Ian
 
I got the other gutter up today. No photos because it looks just like the first one. I did, however, test out the rain chain. We are in our dry season now. It likely will not rain for the next three months. I didn't want to wait that long to see how it worked so I just put a garden hose on the roof.


Looks good Gary, have you chosen your rock or stone to anchor the bottom or the rain chain? Or did I miss it in your video.
 
Years ago I did a Shinto style covered entrance with standard eaves trough and used a simple chain attached to a base rock. Nothing as nice as your's, it is so pleasing to see the water moving down the chain. Very relaxing! No pic unfortunately as it was polaroid days.
 
I thought we were done with rain for the summer but we had a surprise daytime shower a few days ago so I ran out to the shed to check out the gutters and chain in real life. I'm happy to report no leaks. It was very satisfying to stand in the shed, completely dry, and see and listen to the storm and watch the water cascade down the chain. Simple pleasures, eh?


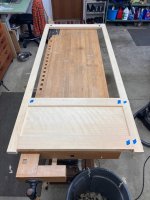
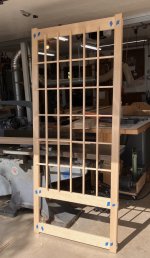
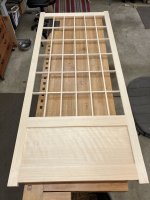
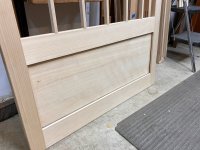
And I've got one door frame dry fit. For reference it is 35" wide and 78.5" tall. It barely fits on my bench. I should finish the other tomorrow and then move on to making their kumiko lattices.

92B0FA3F-007B-4AFD-A252-9A3724349A98.JPG
 
Is that the standard Japanese way of making such a door, Gary? The horizontal grain in the panel is the most obvious difference, but also the lack of a chamfer on the top of the lower rail appears to leave it vulnerable to rainwater pooling and thus starting the rotting process. I presume the joints are some version of through tenons. Is that right?
 
Mike, I think the hipboard in a lattice door is more commonly oriented vertically but a horizontal orientation is not unheard of. I'm going by the antique door collection seen here. To be sure, most of these doors are not meant to be directly exposed to weather but would be interior doors or if exterior exist under a very broad roof overhang.


In addition to lattice doors the site has collections for solid doors and glass doors. My design is kind of a hybrid.

That bottom rail will get a bevel later. Although I've kept an eye on the door frame all winter and the wide eave seems to do a good job keeping the door area dry. It should be even better now that the gutters are up. But, if I'm wrong I'll make new doors.

Yes, through and wedged tenons for all the connections.
 
The "reet" bit I got. I've never heard "gradely".
 
My maternal grandfather, who was a professional gardener from god knows where, used to say "reet gradely" which meant very good or right excellent. He also called anything that he couldn't describe as "the doins" (doings). He had a wide range of idioms and odd phrases, most of which I've forgotten. However, 'appen was used a lot and in his case was a non committal word meaning maybe. "Bayant" was a favourite word and I'm still not quite sure what it meant.
 
I got the other gutter up today. No photos because it looks just like the first one. I did, however, test out the rain chain. We are in our dry season now. It likely will not rain for the next three months. I didn't want to wait that long to see how it worked so I just put a garden hose on the roof.


Very nice, you know you need some copper wind chimes to hang from the other end now...
 
That’s interesting, slightly different action from a chain drain, but I suppose both will only take so much water before "overflowing" amazing that you live where you can be confident not to have any rain for the next 3 months. We don’t know about the next 3 days- or less sometimes!
I think the last time it didn’t rain for 3 months here was in 1976 and there was a severe draught with people collecting water in buckets from standpipes in the street, the official Government slogan was "bath with a friend” lol. Coincided with a plague of Ladybirds (Ladybugs) of Biblical proportions.
A minister for draught was appointed and within 2 days it started to rain, and didn’t stop for months then of course we had flooding. Not well prepared for extremes of weather in good old Blighty.
Nice guttering and downthings.
Ian
The summer I was born. My late mother reckons I was the cause, and am in some way some kind of weather God! :ROFLMAO:
 
I thought we were done with rain for the summer but we had a surprise daytime shower a few days ago so I ran out to the shed to check out the gutters and chain in real life. I'm happy to report no leaks. It was very satisfying to stand in the shed, completely dry, and see and listen to the storm and watch the water cascade down the chain. Simple pleasures, eh?


And I've got one door frame dry fit. For reference it is 35" wide and 78.5" tall. It barely fits on my bench. I should finish the other tomorrow and then move on to making their kumiko lattices.

View attachment 27217
Love the pattern the water makes going down the chain in the first video. Looks like it's shooting down in intervals.
 
Got the door fit yesterday. I'm happy to report that after some trimming and fiddling it slides like a dream. Just one finger will move the door. And the side to side fit is good. The rollers are adjustable to get the vertical left/right tilt right but that did require mounting and dismounting the door several times. That would be OK since it comes with the job and needs to be done just once, except that it was 102 degrees F/39 C yesterday. Same today. But now I can feel virtuous for suffering (for a few minutes). Today I installed the stops for the hip board panel. I stole design idea from Mike's doors and added a gasket for the panel. Mine is a 2mm EPDM glazing tape rather than the foam tape he used. I hope it works as well as his. Backing the panel are stops that I bamboo nailed to the door. I used bamboo nails because I like the look and they will be more easily removable if the hipboard panel ever needs to be replaced.

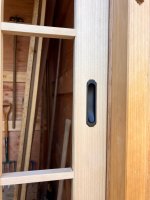
I also added the inset pulls. These are inexpensive zinc alloy pulls from a Japanese supplier. I like the design very much but they are a little small for my Western fingers. I would have preferred ones 25 or 50% larger in both dimensions but these are largest they offered.

The door still needs its glass but I moved it out to the shed to make some room in the shop while I complete the other door. D9FD226E-708E-41E2-A59C-CCE955AB413B_1_201_a.jpeg5A1B8124-8EA1-4EBD-B688-944222B93BAA.JPG2E728696-DEA1-4473-9E3A-A7DA681EAF68.JPG
 
Great stuff Gary. It would be nice to see a photo of the roller system, because it's difficult to picture how it might be adjustable. I'd also like to see the bamboo nails, as I've never come across them.

We do run into some fun little terminological differences every now and then. When you talk about stops in the context of a door, we here automatically think of vertical pieces at the jambs and head against which a door closes. And a hip board sounds like something the emergency services might use rather than a carpenter. But, with a moment's thought, I'm sure we all get it in the end! :)
 
Back
Top