It's been a while since I updated this one. It's not abandoned, just (as the thread title suggested) slow. Last time I was cutting tenons on the front side-to-side drawer supports, with very narrow cheeks as they were going to go into the sides of the vertical panels. The joints that connect the drawer frames together are more conventionally proportioned:


Having looked a bit closer at my stock of timber, I decided there wasn't enough maple to make the drawer sides, but there was enough for the non-visible parts of the drawer runners. Since it's significantly harder-wearing and a lot easier to work than this sapele, I decided to do that.
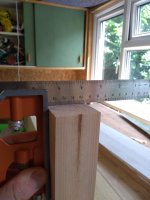
With the joints cut for the front ends of the runners, I was able to mark the length of each one - as is often the case, it's the shoulder line, not the overall length of the workpiece, that matters. What actually matters, of course, is the shoulder-to-shoulder line of the runner plus the width of the front and back pieces, so that's what I measured:

Of course, they didn't all go to plan...

Fortunately, that bit of blow-out (which happened on more than one piece) will be completely hidden inside the joints once everything's assembled. I knew when marking out that that area would be delicate, but also knew it wouldn't matter if they did break off.
With four such frames made up, there was just the matter of the top one being different - this one's going to have two drawers side by side, so needs a vertical divider and an additional pair of runners in the centre. I made that pair of runners out of a single wider piece, with a double tenon - for some reason this picture is after sawing but before cleaning up.

The reason for the double tenon is more obvious when you see the corresponding mortice layout...

The central runner comes in from behind, with the vertical divider joining from the top. The double tenon keeps the mortices out of each others' ways. With that cut twice, front and back, I ended up with a stack of drawer frames dry-assembled:

Next step was to fit them into the side panels. At this point hopefully all the questions from six months ago can be answered:

Mortices at the front, set back from the front edge. Those pieces will be glued in and fully captive. Open housings at the rear, both for movement room and to allow for assembly in multiple stages. The saw cuts that extend beyond the housings will be hidden by the runners once assembled - quite apart from those same runners being hidden by the drawers themselves. The whole lot fits together dry:

I don't have any pictures of the glue-up, because apart from the complexity of getting the drawer dividers in place between the side panel and divider, it's now over a year since the large panels were prepped and they've all bowed to some degree or another. That made the dry fit somewhat tricky, let alone with the added time pressure. However, the case is now glued up, scraped, sanded...

... and with a small repair made where my depth stop slipped while drilling the mortices in the side panel. Of course it was on the most visible one, at the top front on the outside panel. It's not a perfect fix (the plug snapped off while being hammered in, so it's very slightly below the surface and I didn't get a chance to rotate it properly), but just about holds up from a distance:

So, the case is now sitting on my secondary work surface, which is actually just a set of metal-and-MDF garage shelves sitting side by side instead of stacked on top.
The extra wood you can see stacked in front of it is some 15mm European Oak from Thorogoods, planed to 9mm thick, and waiting to become the drawer sides.















 Commiserations. I know















 . Very handy when you're labouring against some uncooperative wood and finding a good rhythm difficult to achieve.