• Hi all and welcome to TheWoodHaven2 brought into the 21st Century, kicking and screaming! We all have Alasdair to thank for the vast bulk of the heavy lifting to get us here, no more so than me because he's taken away a huge burden of responsibility from my shoulders and brought us to this new shiny home, with all your previous content (hopefully) still intact! Please peruse and feed back. There is still plenty to do, like changing the colour scheme, adding the banner graphic, tweaking the odd setting here and there so I have added a new thread in the 'Technical Issues, Bugs and Feature Requests' forum for you to add any issues you find, any missing settings or just anything you'd like to see added/removed from the feature set that Xenforo offers. We will get to everything over the coming weeks so please be patient, but add anything at all to the thread I mention above and we promise to get to them over the next few days/weeks/months. In the meantime, please enjoy!

American here in Oundle (Peterborough) - Brand new to woodworking

The BEST fences are secured at only one end.. Any fence that clamps across the table is likley to be very irritating because it won't clamp square.
This is my solution:


Your mileage may differ, but I've not come across anything better.
S
 
From time to time. In fact it's in the laundry basket at this very moment. I'm astonished that it still fits, TBH. Perhaps I've been a fat geezer for longer than I realised.
S
 
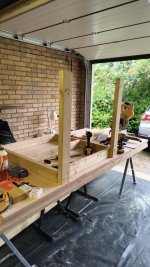
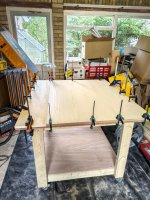
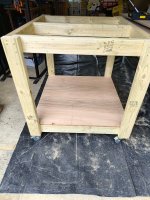
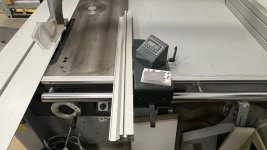
Well.. To get back on topic, and if anyone is interested.. I have made some progress on my shop buildout, but the going is slow. As of right now, I just got the basic skeleton of an infeed/outfeed table, and haven't made any progress towards building drawers for it yet. I did decide to not go over complicated.. Just 2x4 frame, 1 hardwood plywood layer on top, and another layer of birch veneered mdf on top of that, glued and screwed. Real oak edge banding, which did not come out NEARLY as nice as I hoped, more than anything due to not having an actual miter saw station yet, AND not having my table saw unboxed yet, let alone having a station for it to sit in. The miter saw I am "somewhat" okay shotgunning it on a temporary workbench of plywood sheets on top of sawhorses, but I absolutely have no intention of using the table saw until I can get it built into at least a basic bench.

So.. I been eyeballing with a tape measure for 2x4 pieces, and I got there eventually, but this table build seemed WAY harder than it needed to be, as I can't quite get the support needed to accurately cut these 4.8m structural 2x4s to accurate, repeatable lengths.

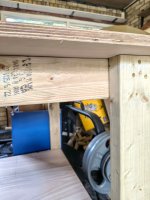
So, here are a few pics to show the process, and progress of my garage workshop, and table build.
 

Attachments

  • Messenger_creation_7DC61EA1-F2FA-4CC3-98C2-B5B58B07BED5.jpg
    Messenger_creation_7DC61EA1-F2FA-4CC3-98C2-B5B58B07BED5.jpg
    205.8 KB · Views: 6
  • Messenger_creation_08EFAC2B-594D-4DB2-B11B-8EBC2D08CAB1.jpg
    Messenger_creation_08EFAC2B-594D-4DB2-B11B-8EBC2D08CAB1.jpg
    198.1 KB · Views: 6
  • Messenger_creation_683026DD-B887-4763-BFAA-765409CA1C69.jpg
    Messenger_creation_683026DD-B887-4763-BFAA-765409CA1C69.jpg
    198.9 KB · Views: 6
  • Messenger_creation_C9B94F25-236C-49BC-9423-AAF390914C06.jpg
    Messenger_creation_C9B94F25-236C-49BC-9423-AAF390914C06.jpg
    197.2 KB · Views: 6
  • Messenger_creation_61D22F9C-16A6-489F-83E8-DFCBA256872D.jpg
    Messenger_creation_61D22F9C-16A6-489F-83E8-DFCBA256872D.jpg
    185.7 KB · Views: 6
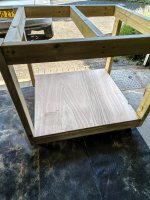
Top and bottom plywood layers in, and couldn't get the full sheet home for the birch veneered mdf, so went with a 2 piece top..
 

Attachments

  • Messenger_creation_7209B7B8-363E-421A-80C6-7237AF772570.jpeg
    Messenger_creation_7209B7B8-363E-421A-80C6-7237AF772570.jpeg
    278.6 KB · Views: 6
  • Messenger_creation_DAB93FB7-F553-4945-90D6-E3DC3564A501.jpeg
    Messenger_creation_DAB93FB7-F553-4945-90D6-E3DC3564A501.jpeg
    246.4 KB · Views: 6
  • Messenger_creation_DF8FEF71-563E-4269-AF69-65D2BE8CBE40.jpeg
    Messenger_creation_DF8FEF71-563E-4269-AF69-65D2BE8CBE40.jpeg
    273.3 KB · Views: 6
  • Messenger_creation_AA7FF109-2DAD-4549-86EE-21FA6B738580.jpeg
    Messenger_creation_AA7FF109-2DAD-4549-86EE-21FA6B738580.jpeg
    266.6 KB · Views: 6
  • Messenger_creation_D512FC1D-F414-45C6-9C9A-F4E24AD9A115.jpeg
    Messenger_creation_D512FC1D-F414-45C6-9C9A-F4E24AD9A115.jpeg
    284.1 KB · Views: 6
Originally built the table to be 40" tall. Could tell as soon as I built it, that the recommendation to build to 36" was the recommendation for a reason, so I ended up disassembling the table and cutting new legs to go for a 36" height. The table ended up built a LOT better, and the top actually sat nicely on the legs, flush all around. Was happy that I made that decision. Not sure the neighbors appreciated me banging the top back onto the new legs with a mallet for like 10 minutes.
 

Attachments

  • Messenger_creation_D75DDA72-5EE7-49F6-9007-872EA97D95B7.jpeg
    Messenger_creation_D75DDA72-5EE7-49F6-9007-872EA97D95B7.jpeg
    133.5 KB · Views: 5
  • Messenger_creation_1F23CF41-D01C-4E7D-AC2F-5CFC5B3D4F8B.jpeg
    Messenger_creation_1F23CF41-D01C-4E7D-AC2F-5CFC5B3D4F8B.jpeg
    151 KB · Views: 5
  • Messenger_creation_20F54285-7EA5-40DD-BDD1-85DE17BDDE4E.jpeg
    Messenger_creation_20F54285-7EA5-40DD-BDD1-85DE17BDDE4E.jpeg
    150 KB · Views: 5
Fast forward a bit in the build, due to me having an extremely hectic weekend, I did not take any pictures of the edge banding glue up and routing. Let's just say... That was an interesting journey. I had some spare long strips of oak from a local hardwood supplier, but.. They were a good 2" wide or somesuch. I brad nailed and glued them on as is... And figured out that was not such a good idea, as the subsequent trim routing out of that much hardwood material was NOT fun at all. And... It was my first time using a router. Like.. Ever. But, got it done, and put a champfer on the edge.

Two coats of half matte water based poly on so far on the top work surface. (Light sanding between coats) At least two more to go.I am thinking I might go with "just" poly on the top, and not the legs and bottom shelf. I know it's not optimal, but in the end, I don't like that I had to use these fat oversized 2x4s in the first place, and might end up rebuilding this table at some point anyways.

So, going forward, plans are to put a drawer box and drawers in this table, maybe before, maybe after building out a basic miter saw station. I only have a cheap track saw, and it's not the most fun for trying to cut smaller pieces on, and keeping them anywhere near square. I feel like I might best best served to get the table saw station built, "just" to hold the table saw only, with wings to be added later.. So I can use this current tabletop support cuts on the table saw, so I can set upthe tablesaw blade and fence to be square to miter slots. I feel if I czn getting that point, Ican quickly cut the flip up wings on mitersaw and table saw stations, and my capabilities will repaidly expand.

Once I get those two things done, I can eliminate the temp plywood work surface, and have a lot more room to work
 

Attachments

  • 20260525_211949.jpg
    20260525_211949.jpg
    210 KB · Views: 6
  • 20260525_211841.jpg
    20260525_211841.jpg
    186.7 KB · Views: 6
  • 20260525_211913.jpg
    20260525_211913.jpg
    124.2 KB · Views: 6
  • 20260525_211937.jpg
    20260525_211937.jpg
    129.8 KB · Views: 6
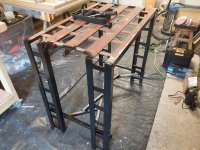
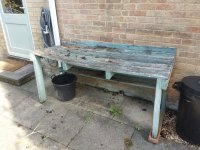
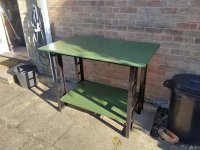
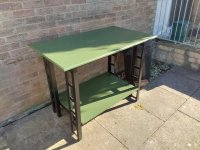
For anyone paying attention.. There is a metal table to the right that is currently in the process of being repainted with paint over rust product. I have a tin of a darkgreen outdoor paint that will be used on the flipped bottom plywood panel, and a new plywood top. Once that mini project is completed, this table will be moved out of the garage, and outdoors to replace a rotted out wooden table. This metal table belonged either the landlord's husband, or a previous tenant, and was used for metalworking, and is wayyyy too heavy to be any use in the garage woodshop, but would be perfect outdoors as a usable garden table.

Getting this table out of the garage will free up quite a bit of space on the right wall, which is where my mobile assembly table, mitersaw station, and table saw station will go.

I picked up those thinner ply sheets for drawer bottoms at about £2 per.
 
Making good progress!

I’ve also been learning that a trim router is good for defining edges and depths and less good for hogging out material. It’s a great tool when combined with a saw, a drill, or a planer.
 
Hoping that this is the last coat needed on the metal table base. The metal beneath keeps wanting to peek through..
 

Attachments

  • 20260526_172858.jpg
    20260526_172858.jpg
    260.8 KB · Views: 2
Back
Top