• Hi all and welcome to TheWoodHaven2 brought into the 21st Century, kicking and screaming! We all have Alasdair to thank for the vast bulk of the heavy lifting to get us here, no more so than me because he's taken away a huge burden of responsibility from my shoulders and brought us to this new shiny home, with all your previous content (hopefully) still intact! Please peruse and feed back. There is still plenty to do, like changing the colour scheme, adding the banner graphic, tweaking the odd setting here and there so I have added a new thread in the 'Technical Issues, Bugs and Feature Requests' forum for you to add any issues you find, any missing settings or just anything you'd like to see added/removed from the feature set that Xenforo offers. We will get to everything over the coming weeks so please be patient, but add anything at all to the thread I mention above and we promise to get to them over the next few days/weeks/months. In the meantime, please enjoy!

American here in Oundle (Peterborough) - Brand new to woodworking

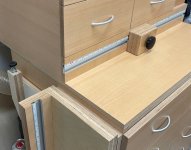
Here is the stop block setup for my miter saw workstation. I used a double-channel T-track so I could protect the scale. At the time, I never thought about putting the track on the horizontal shelf of the workstation. I have the T-track only on the left side of the saw and have never needed it on the right side (so far).

Miter-Stop-1.jpg

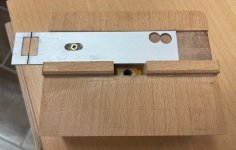
I made the stop block using what I had in my shop. If I ever get motivated enough, I'll put a bit more effort into a better stop block, but it has worked great. The cursor window is a small piece of plastic glued into cutout in the aluminum strip. A fine broom hair is glued to the back of the plastic for the cursor.

The far left side has a flip-up extension that allows a full two meters of capacity. The extension is lifted and the vertical support slides under it. When not needed, the extension is flat against the side of the workstation.

Miter-Stop-2.jpg

Miter-Stop-12.jpg


A smaller hinged extension on the right side allows me to get as close as 300mm to the blade. A set of rare earth magnets keep the extension in place while I move the stop block along the T-track.

Miter-Stop-4.jpg

Miter-Stop-5.jpg
 
Very neat Mike, I like the idea using a brush hair behind plastic, It took a second to work out how you’d zero it to the saw blade but easy enough I suppose. You had got me with the hair not being level with the block!
@shortbusruss coming on well, when I made one for Dil I sat the saw on a piece of ply and packed under it to level it with the side tables, but I like your idea too, presumably you plane the “feet” till all is level?
Ian
 
Very neat Mike, I like the idea using a brush hair behind plastic, It took a second to work out how you’d zero it to the saw blade but easy enough I suppose. You had got me with the hair not being level with the block!
Here is a photo of the back of the block showing the aluminum strip, plastic window, and brush hair. I used a small triangular file to cut a shallow groove into the aluminum and plastic to hold the hair while I tacked it into place on the ends. Ignore the two holes on the right side of the aluminum strip because I worked with what I had. The elongated hole allows some adjustment of the cursor.

Miter-Stop-9.jpg

After I installed the T-track, I loosely inserted the self-adhesive scale into the upper track without removing the backing. I measured and cut a 800mm length of wood and left it clamped to the table. There was nothing special about the 800mm and any length could have been used.

I slid the stop block to the left end of the wood and tightened the knob to keep it from moving. After moving the scale so the 800mm was under the cursor, I peeled the end of the backing from the right end of the scale and started pressing it in place. After the scale was secured to the T-Track, I used a utility knife to cut it at the places where the T-track folded away from the main section.
 
Here is a photo of the back of the block showing the aluminum strip, plastic window, and brush hair. I used a small triangular file to cut a shallow groove into the aluminum and plastic to hold the hair while I tacked it into place on the ends. Ignore the two holes on the right side of the aluminum strip because I worked with what I had. The elongated hole allows some adjustment of the cursor.

View attachment 56941

After I installed the T-track, I loosely inserted the self-adhesive scale into the upper track without removing the backing. I measured and cut a 800mm length of wood and left it clamped to the table. There was nothing special about the 800mm and any length could have been used.

I slid the stop block to the left end of the wood and tightened the knob to keep it from moving. After moving the scale so the 800mm was under the cursor, I peeled the end of the backing from the right end of the scale and started pressing it in place. After the scale was secured to the T-Track, I used a utility knife to cut it at the places where the T-track folded away from the main section.
Brill, that’s the method I thought about when I pondered it. I like the saw cut for the hair I would have struggled with glue on my fingers I suspect.
 
Very neat Mike, I like the idea using a brush hair behind plastic, It took a second to work out how you’d zero it to the saw blade but easy enough I suppose. You had got me with the hair not being level with the block!
@shortbusruss coming on well, when I made one for Dil I sat the saw on a piece of ply and packed under it to level it with the side tables, but I like your idea too, presumably you plane the “feet” till all is level?
Ian
Uggggh. I wish. No. I have nothing but a No. 5 plane, and planing end grain seemed like it would be beyond my ability to have a good outcome at this point in my journey. SO many mistakes, and a lot of hackish fixes. The legs ended up quite a bit off from each other due to lack of a good stop block setup while cutting them. Ended up trying to get the toppers for the legs level by just using an orbital sander.. Too much material. Ended up using a router on the bottom side of one end of the leg toppers (the pieces between the wings and main saw platform..) to trim the material a bit.

I now have something "just" good enough to work with to get a solid table saw workbench built now, and get 2x4s cut to the exact same length. I expect I will build a new miter saw station at some point.. Need to find a better solution for cutting aluminum cleanly too. Maybe a good metal blade on my jigsaw? The miter saw was melting the aluminum, even when using wax on a metal cutting blade. Plus, that wax made a mess.

This build was done by using a tape measure for the 2x4 cuts and attempting to "eyeball" each cut, and using the same methodology + track saw for "all" the plywood cuts. Legs not the same size.. Plywood pieces not completely square, etc. Just turrible.

I just did not feel comfortable at all setting up my Dewalt DCS7485 without building an actual workbench for it, so I could set it up properly. I am "hoping" this miter saw station is built just decent enough so that the stop block/T track ends up relatively square to the blade. I did get a good aftermarket miter guage for the table saw, so I think I may just end up cutting 2x4 pieces to "rough" length on the miter saw, and use the table saw/miter guage to crosscut to precise repeatable lengths.

YouTube makes it look so easy to get a great result. But with a little experience so far, I can see how specific choices in those builds make certain things SO much easier. Something as simple as having a narrow temporary worktop for the miter saw station, so clamping down 2x4 stop blocks became much easier. Working on full 4x8 sheets made that tougher than it needed to be. Realistically.. I probably should have taken a little bit more time to figure something out to get repeatable miter saw cuts, as legs being 1/8 - 1/4" longer/shorter due to pencil marks and cutting "on or beside" that pencil mark, made those uneven lengths cascade through the project into bigger and bigger issues.

The next miter saw station will DEFINITELY have a micro adjustment setup. And I know now that the complete workbench needs to be built first, and track for metal measuring tape routed (with a narrower bit) using a clampable straight edge on a dead square board, so I can be "sure" the T track ends up square over the full length of the workbench. And "then" mount the miter saw, so I can be sure the fence lines up properly to the T track.
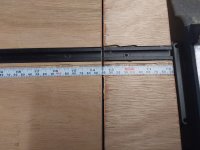
 
Oh crikey, you’ve been having problems. When I built the one for Dil it was built onto a concrete floor that sloped in every direction but it came out flat and level with only a mitre saw and a spirit level and pencil.
A mitre saw isn’t a tool I’ve had much experience with. But once I had determined the length of a leg I just put it on the saw and moved it so that the blade was up to the line before turning it on. I personally wouldn’t use a stop block except maybe if I had a lot of bits all the same length and I’m not someone who works to the exactness of Micro adjustment, I’ve just never found it necessary.
When I built the saw station for her I probably only used a tape measure once to set a height mark and everything was based on that mark from then on using the spirit level.
The plywood I had the Store cut to the depth of the saw table and that became the other mark, and it didn’t matter that they cut it 1/4” too small. From these two marks all distances were marked onto a thin lat (stick) and then transferred to the bit to be cut, but usually not even the lat, just marking from one piece to the next, maybe plus or minus the thickness of a bit of 2x4 which would have been stood onto the lat ( or next piece) against the line and a new line marked, transferring is way more accurate than measuring.
If I wanted two bits the same length the first piece is cut then the second one is put next to it, your fingers are incredibly good at letting you know when they are level at the the LH end then mark across with a sharp pencil. (not one of those rectangular carpenter’s pencils)
My way isn’t the only way by any means but it’s something I’ve refined over a lot of years. Really sorry you’ve had such an unpleasant experience of it, this sort of “sketch it and work it out as you go along “ build should be fun.
Ian
 
My two euros hereabouts. A mitre saw isn't anything I've ever needed or hankered after as I've always found a 'workaround'; I view them as a great, almost essential tool for site work where it can be set up close to a Transit van on a pair of tresses (or dedicated stand) but I see no use for one as a 'stand alone' in my 'shop for the sort of work I do. They take up a lot of space which is better occupied with stuff I would actually use - Rob
 
Sorry to hear of the issues you had with the measures, cuts and such for your mitre-saw unit.

I agree with @Cabinetman (Ian) re the measures; fingers/line up timber ends etc., and cuts.

My mitre-saw bench, fliptop workbench, built from some 18mm ply offcuts, 3"x2" base frame and such - same for the Triton TPT125 thicknesser and lathe...

I don't have the space to allow for the mitre-saw to be 'sunk' into the top to allow level 'wings' either side so have to resort to an additional support unit. It flips over so it's under the worktop so I've a flat bench top. Same happens with the thicknesser and lathe benches.

My mitre-saw, Evolution R210 SMS, has a lazer guide to line up with the pencil marks. Wouldn't be without it.

I did my forum introduction with a few photos of the fliptop workbench units.

All a learning curve - things get easier and better along the way.
 
I expect I will build a new miter saw station at some point.. Need to find a better solution for cutting aluminum cleanly too. Maybe a good metal blade on my jigsaw? The miter saw was melting the aluminum, even when using wax on a metal cutting blade. Plus, that wax made a mess.
I built my MFT-style workbench using 40x40mm and 80x40mm aluminum extrusion. All but a few pieces of the extrusion were machined by the vendor.

For the few pieces I cut to fit, I used a Trend CSB/AP30584 tungsten carbide tipped blade in my DeWalt DWS780 miter saw and my sliding table saw. The 84-tooth blade is specifically made for cutting aluminum and plastic without any lubricant.
 
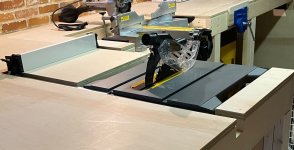
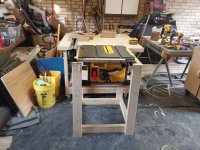
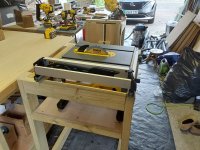
Today's build. Screwed it up here and there.. but it was only supposed to be temporary in order to use to build the real table saw workbench.. Accidentally mounted the saw base 2 inches higher than I meant to.. Overall table saw work surface ended up being FOURinches higher than my assembly table. Compounding errors! Turned out that this was the only way the rack and pinion rails ended up being able to move freely. The miter saw workbench stop block is janky as heck.. But it worked well enough to get all the relevant pieces "exactly" the same length.

I now have a temporary table to use as a reference for the final build, which will incorporate a router station in the right wing.
 

Attachments

  • 20260802_194142.jpg
    20260802_194142.jpg
    205.5 KB · Views: 6
  • 20260802_194224.jpg
    20260802_194224.jpg
    230.5 KB · Views: 6
I’ve shown this ad nauseum but this close up of the bit you’re talking about might help you in your design for the proper one? Ian

View attachment 57160
Yeah, that is the general idea, only there will be a router station where your fence is sitting right now. Your setup looks more or less exactly what mine will end up looking like. How wide is this table when looking at the front of the saw? With the other two work benches to sit against an approximate space of 11 feet, I have almost exactly 48" of width available for the final table saw workbench. I really need to clear out that section and put the workbenchs in their final positions, so I can measure "exactly" how much space I have up to the door jamb. It feels like an extra inch or three is really going to matter in this final workbench build.

I need to take some time to measure out exactly what the dimensions of different parts of the build will be, but for now, the table saw I know is 24" wide, and 4 end legs will be 2 2x4s laminated face to face, ripped down to 2.5". I need 2 more vertical pieces to support the left side of router section, and I have to consider whether I want that to be the "thickness" of a 2x4, or whether I want to maintain consistent aesthetics and make those 2.5" wide. I also need to consider that the drop in router plate needs to go between the rack and pinion slot and the front vertical pieces, with room to reach under and manipulate the router.

I "want" to build a dropover router fence for the Dewalt fence so I can reuse it for the router section, with a dust control plenum that pulls the sawdust away, and has a Cen-Tec quick connect fitting for connecting to my shop vac. The main consideration being the maximum width of the material the router section can comfortably support with the router plate set in as close to the table saw section as possible. The dropover fence needs to sit forward a few inches in front of Dewalt fence to give the dust control plenum access to the area right over the router bit when dropover fence is surrounding the largest bit.

I "think" I will be okay, because absolute worst scenario... I can build something that "docks" into the end of the router section to extend it to support larger stock, and I am not limited all that much in depth of the workstation, so I can build short flip up wings for front and back of router section to support running longer pieces against the router fence.
 
Back
Top