• Hi all and welcome to TheWoodHaven2 brought into the 21st Century, kicking and screaming! We all have Alasdair to thank for the vast bulk of the heavy lifting to get us here, no more so than me because he's taken away a huge burden of responsibility from my shoulders and brought us to this new shiny home, with all your previous content (hopefully) still intact! Please peruse and feed back. There is still plenty to do, like changing the colour scheme, adding the banner graphic, tweaking the odd setting here and there so I have added a new thread in the 'Technical Issues, Bugs and Feature Requests' forum for you to add any issues you find, any missing settings or just anything you'd like to see added/removed from the feature set that Xenforo offers. We will get to everything over the coming weeks so please be patient, but add anything at all to the thread I mention above and we promise to get to them over the next few days/weeks/months. In the meantime, please enjoy!

Another home made tool

Lons

Old Oak
Joined
Jul 21, 2014
Messages
2,967
Reaction score
1,118
Location
Northumberland
Name
Bob
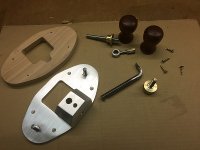
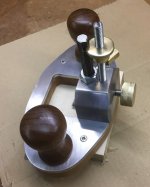
Encouraged by the marking gauge I've had a go at something else over the last few days, all from the scrap / saved metals stash so cost nothing apart from time and a couple of minor cut fingers, :oops: Overall size approx 180 x 100.
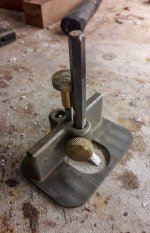
Alloy base is 8mm thick I've no idea what grades any of the metals are, blade is a 10mm allen key which I've managed to get pretty sharp but I didn't heat treat it so if the edge doesn't hold I might have to re think that, I have another spare if I need to start that again. Brass knobs turned on the little metal lathe for a change and I couldn't do the knurling properly 'cos the tool is knackered, the rest is hand worked with hacksaw and files after mocking up a rough template.

It's to be a working tool so I didn't bother to polish the alloy just fine sanding so it will likely oxidise.
 

Attachments

  • cowells.jpg
    cowells.jpg
    63.1 KB · Views: 8,312
  • cut out.jpg
    cut out.jpg
    58.8 KB · Views: 8,312
  • raw materils.jpg
    raw materils.jpg
    48.6 KB · Views: 8,312
  • RP 4.jpg
    RP 4.jpg
    38.7 KB · Views: 8,312
  • RP 3.jpg
    RP 3.jpg
    44.3 KB · Views: 8,312
  • RP 2.jpg
    RP 2.jpg
    42.6 KB · Views: 8,312
  • RP 1.jpg
    RP 1.jpg
    84.8 KB · Views: 8,312
They are great little tools. Just great. I actually finished mine yesterday, despite using it for the last couple of years. Heat treat that old Allen key now, otherwise you'll put it off forever. You'll notice a difference. They don't shift a lot of wood, but they can make joinery so much neater and easier. Oh, and router planes make a pretty decent marking gauge, too.
 
Thanks Mike I will have a go at heat treating it something I've only done a couple of times for knives though read about it often enough. I have a Rothenberger MAP torch and some dense blocks from old storage heaters so should be able to rig something up
 
That's lovely.

I've been watching lots and lots of router planes on ebay for ages, but they always go for silly money. Maybe I should have a go at making my own...
 
Lovely job. I can't wait for all this Covid stuff to end so I can come and have a grand workshop tour !
 
very nice, where do you plug the cable in though? :D

nice bit of work Mr Lons.
 
Yes very nice indeed, particularly liked the idea of using an Allen key, its shape means it Will keep pointing forwards and it’s already got a bend in it plus if you’re like me you’ve got a few of them hanging about from sets bought for the smaller sizes which get lost and depleted. Ian
 
Brilliant. No casting or welding needed to make a really useful tool.

And if I've understood it right, you've added an improvement with that depth stop from an oversized nut. Lovely!
 
That looks excellent Lons. There seems to be little difference in price now between buying a second-hand Stanley or Record and a veritas one (though I bet they are out of stock now).
 
RogerS":2cliuged said:
Lovely job. I can't wait for all this Covid stuff to end so I can come and have a grand workshop tour !

That's a plan Roger, do you want the quick 30 second stand in the middle and look around or the 10 minute grand tour where you'll have time to open every cupboard and drawer. :eusa-whistle:

A better plan would be for Sam and I drive across to view your palatial gaff. :eusa-dance: I suspect Sam might have a Guinness and I'll settle for a lager, non alcoholic if I'm the designated driver.
 
Thanks for the very kind comments gents, I found it enjoyable and am learning as I go.
 
novocaine":38vgpd23 said:
it's definitely prettier than my version. :D

I'd have done that if I'd thought of it. :eusa-doh: On second thoughts I'd need to practice my welding for a while first.
 
This was me playing about with the ARC welder to get my hand back in. :) I agree with all advice on welding that practice is king, but practice doesn't have to be running beads on the back of sheet of steel just wasting gas, materials and filler.

I'll post somewhere else on the last thing I did for practice. :D
 
novocaine":2vn99eyg said:
This was me playing about with the ARC welder to get my hand back in. :) I agree with all advice on welding that practice is king, but practice doesn't have to be running beads on the back of sheet of steel just wasting gas, materials and filler.

I'll post somewhere else on the last thing I did for practice. :D
I have an ancient SIP stick welder inherited from my late FiL, I think about 40 years old, works fine but I'm hopeless, anytime it's successful for me is purely accidental. :lol:
 
Despite marrying someone who could smell "De Quays" and (the grain there roasting) just by opening her front door, I am more an I.P.A. man - try "Caesar Augustus", Greene King, Tanglefoot or p'raps Hobgoblin Gold sometime? :obscene-drinkingcheers:

That is a 'quare kewl wee tule' Bob, nicely done. I almost have antibodies against the pressurised advertising that sets out to convince us all their particular shiny new toy is the Elixir of Life. So, it is nice to see a competently set out and effective tool coming out of an ordinary garage workshop.

I bet the satisfaction on finishing and using it was a good feeling too.

Sam
 
I think you've made a brilliant job of that.

I can honestly say that my router plane is my favourite tool to use. I had a go at doing some breadboard ends with (almost) hand tools only, and using the router to get the tenons the right size was the best bit!

Mine is the only Lie Nielsen tool I own. It's great, but I can't see it will work any better than yours. I only bought a LN router because it was (when I bought it) about a tenner more expensive than a second hand Stanley/Record. Unfortunately I think the prices have done up since then even thought it was less than a year ago.
 
Lons":3smvptzz said:
RogerS":3smvptzz said:
Lovely job. I can't wait for all this Covid stuff to end so I can come and have a grand workshop tour !

That's a plan Roger, do you want the quick 30 second stand in the middle and look around or the 10 minute grand tour where you'll have time to open every cupboard and drawer. :eusa-whistle:

A better plan would be for Sam and I drive across to view your palatial gaff. :eusa-dance: I suspect Sam might have a Guinness and I'll settle for a lager, non alcoholic if I'm the designated driver.

Sounds like a plan. Oh... :eusa-doh: lockdown.
 
Nice job; I have a smaller Luban stainless steel one from Workshop Heaven which I've used a few times now. I used to have a big Record router plane years ago but sold it on as it didn't get much use.

novocaine":2dcny1s9 said:
very nice, where do you plug the cable in though? :D
I prefer the cabled version even if it is noisier and dustier :D - Rob
 
Knocks my version out of the park to - made from an allen key and a lump of cast iron!

20201128_145656.jpg
 
I can't see anything wrong with that Steve, what's the hole at the back for?
I'f I'd had a suitable lump of iron I'd have used it, I looked at a broken plane sole first but decided it was easier to start from scratch, That sole might turn into something else.
 
It's in the shed and I'm in the warm, and I don't have a photo of the back of it here, I'll get a snap next time I'm out there.

The back is pretty much the same as the front, except the base just has 2 'wings', it doesn't have the bit of metal across the front.

The blade sticks out a little further than the wings, so you can use that side to get right up to the end of a blind channel.
 
Peri":3swxe0mc said:
It's in the shed and I'm in the warm, and I don't have a photo of the back of it here, I'll get a snap next time I'm out there.

The back is pretty much the same as the front, except the base just has 2 'wings', it doesn't have the bit of metal across the front.

The blade sticks out a little further than the wings, so you can use that side to get right up to the end of a blind channel.

I don’t have much use for one so no practical experience but having seen this type in the catalogues it certainly seems to make more sense, for the very reason you’ve mentioned.
3E8CBC9B-19EE-47E8-A90B-EC262A70A35F.jpeg
 
That design has a major flaw. If you are working in from the outside end of a housing, as you should to avoid break-out, it doesn't actually sit on your workpiece at the start of the cut. The whole point of this tool is that it references the top of the board.
 
Ah, right, thanks. Then I guess they have that mode just to get into the occasional corner where something gets in the way of the plate in the normal set up.
 
novocaine":20h3ngs6 said:
The blades is revesible Mike.

Yes that’s right. I picked that picture to make the point but you can put it in the other position. ;)
 
Here's my router plane. It only took about a year to finish it!

AVAe0Y5.png

ti45cGq.png

RpKF40x.png
 
That's nice Mike.
Presumably you took that long trying to find i nice piece of bog oak, :) It is bog oak isn't it?
 
Yes, it's bog oak. I made it well over a year ago and have been using it without the screw adjuster, and without a finish, ever since. I finally got it finished at the weekend.
 
Mike G":wefy4b0s said:
It locks the blade in position, Ian.

i assumed that though I couldn't see how it worked but I didn't want to look stupid so didn't ask. :oops:
 
A cam pushes on a piece which clamps across the post of the cutter.
 
Back
Top