• Hi all and welcome to TheWoodHaven2 brought into the 21st Century, kicking and screaming! We all have Alasdair to thank for the vast bulk of the heavy lifting to get us here, no more so than me because he's taken away a huge burden of responsibility from my shoulders and brought us to this new shiny home, with all your previous content (hopefully) still intact! Please peruse and feed back. There is still plenty to do, like changing the colour scheme, adding the banner graphic, tweaking the odd setting here and there so I have added a new thread in the 'Technical Issues, Bugs and Feature Requests' forum for you to add any issues you find, any missing settings or just anything you'd like to see added/removed from the feature set that Xenforo offers. We will get to everything over the coming weeks so please be patient, but add anything at all to the thread I mention above and we promise to get to them over the next few days/weeks/months. In the meantime, please enjoy!

Ash games table

Cabinetman":1fipx9o1 said:
That’s a real shame Craig, as I’ve said elsewhere I dislike routers it’s so easy to make a mistake with them as unfortunately you have found out, if it’s any consolation when I saw that picture about three from the end I thought to myself oh I don’t like that board, it stands out like a sore thumb compared to the other creamy ones. But you’re getting on with it and it will look super when it’s done. Ian

No its not ideal is it :) the table will have a dark stain and I was sort of hoping that would make it vanish a bit, im starting to look at this as a happy mistake so i can replace it with something more fitting.

I don't suppose it helped as it was new router im getting use to, which has a lot of mass to it.

cheers
 
So a quick update. will post some photos in the morning, but have made some progress.

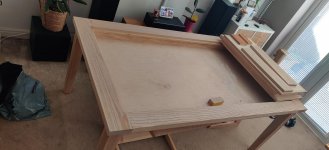
The dodgy rail has been replaced, and the rebate done.
The base which will be the gaming surface has been cut to fit.
The 4 panels for the leaves have been cut and edged with 20mm Ash.

Here in lies an issue. I oversized the edging a bit and have mostly planed it down around .5mm-1mm each side i didn't want to get too close for fear of the iron going straight through the paper thickness veneer.

My crude solution was to smear filler along the join between the edging and the ply and sand with 220 on a low speed until the filler goes and the edging is flush.......this of course is going to take forever! am i missing a trick to get this edging flush without destroying my back ?

Photos to come.
 
Craig Salisbury":wfmx28ig said:
Here in lies an issue. I oversized the edging a bit and have mostly planed it down around .5mm-1mm each side i didn't want to get too close for fear of the iron going straight through the paper thickness veneer.

My crude solution was to smear filler along the join between the edging and the ply and sand with 220 on a low speed until the filler goes and the edging is flush.......this of course is going to take forever! am i missing a trick to get this edging flush without destroying my back ?

Photos to come.

I did something a long time ago that was probably a bit similar - I had some ash veneered MDF that I edged with solid strips to make a work surface. Probably 15mm board and 18mm edging, but the same thin veneer.

I did what I could with the tools I had at the time and I think I would do the same again. This was to sharpen my plane and put it on the finest setting I could, so it was taking only wispy shavings and not tearing the grain. (You'll need the cap iron set nice and close and rub a candle end over the sole.) Plane outwards from the veneered surface, over the edging and out into space. Skew the direction of travel so that as much as possible of the rear of the plane's sole is registered on the flat surface but you are going along the length of the edging, not straight across.

Keep looking and feeling how close you have got. Once it's flat enough, then move on to the vertical edge of your solid strips, if they need any attention. And finally, ease off the arrises to take away any sharpness and make it all hand-friendly and safe.

I expect that power tool users will have a very different approach using bearing guided router bits or something; that probably works too but the above is what I would do, slowly and carefully.
 
I invariably cut my lipping as a T section and cut it to precisely the correct thickness plus a gnats willy

Cut a mating slot in the edge of the board and glue on. just the lightest of swipes with fine grit paper and the job a good un.
Naturally no hand tools involved let alone near veneers.

Bob
 
Well today has been a write-off but i do have some time tomorrow so ill get to it then. I did manage to freshly sharpen my iron which is cutting nicely, ill do a bit of practice before any attempt as im a bit wobbly with it and i could easily go straight through.

I do also have a trim router and flush trim bits i have never used so i guess theres another option.

I have some practice pieces so ill try both ways and see if i can find a happy medium.

I'll also get some photos finally.

another problem is removing the leaves when they are in place, my initial thought was putting strong magnets in the edging and having a little tool to lift up the first panel so it can be taken out, after trying a couple of different magnet options, they just didn't have the strength as a distance of a few mm (event the 20kg force ones)

Under the rebate is a channel for LED's so i cant put in a pusher either. any suggestions ? photo of this problem also to come.

- Bob, the edging was put on the dominos for alignment, the top (face) is decent, the underside has 1-1.5mm that needs shaving off, but as they are essentially reversable bot sides need to be equally nice.

cheers
 
Removing the leaves could be done in a couple of ways, a small flap of leather just big enough to grip could be left protruding. Or you could fit the sort of catch used on push to open doors on cabinets......no sorry just realised that won’t work in this case. Maybe a knob on the outside with a shaft that goes through the end frame of the table, that when turned it turns a cam which pushes a leaf upwards. Ian
 
Slowly getting there..

IMG_20220306_180247.jpg

The replacement rail in and rebat cut for the leaves.

IMG_20220314_100103.jpg

leaves cut and edged but left for trimming, the rails are loose on top, hence it looks gap-y

IMG_20220317_132848.jpg

Final bits of machining to do, channels for t-track which will be used to attach cupholders etc. and a 20 degree bevel to add the edge.

funny story, the cutter i wanted to use from Wealdon has been out of stock and I was assured it would be back in 1-2 weeks, after call this week it will be in stock in May.....next year!!! seems there supplier wont source materials from China now which has thrown a cutter in their works. so I opted for the same cutter but with an 8mm shaft instead of half inch which meant a collet purchase :/

@Ian, love the idea of a cam, but there isnt enough meat for a shaft and cam, it may end up with a brass flush ring pull although thats less than ideal

more TK

more TK.
 
Things are looking up. a wee bit of finessing on the leaves (and to figure out the removal process) a 2mm aris round should get rid of any sharpness and hide small imperfections. next up 20 degree bevel and a LOT of sanding / staining and osmo

IMG_20220318_083713.jpg

more tk
 
Well... that staining process has started!

I plan to do this in the following steps.

Stain the panels, then 2 coats of oil, then move on to the next part stain then oil, I just dont have the room to do everyone in one go.

IMG_20220322_174802.jpg
 
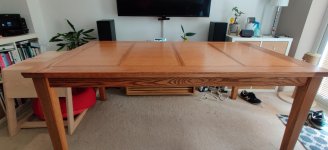
so after a lengthy stain and oil process, i finally put it all together. there's soo much im not happy with, but it will pass, mental note to self "never offer to build another"

the light control actually has a cover which hides the wires and mounts the control (not pictured)

IMG_20220408_155059.jpg
IMG_20220408_152037.jpg
IMG_20220408_152055.jpg
IMG_20220408_152152.jpg
IMG_20220408_152458.jpg
 
Back
Top