• Hi all and welcome to TheWoodHaven2 brought into the 21st Century, kicking and screaming! We all have Alasdair to thank for the vast bulk of the heavy lifting to get us here, no more so than me because he's taken away a huge burden of responsibility from my shoulders and brought us to this new shiny home, with all your previous content (hopefully) still intact! Please peruse and feed back. There is still plenty to do, like changing the colour scheme, adding the banner graphic, tweaking the odd setting here and there so I have added a new thread in the 'Technical Issues, Bugs and Feature Requests' forum for you to add any issues you find, any missing settings or just anything you'd like to see added/removed from the feature set that Xenforo offers. We will get to everything over the coming weeks so please be patient, but add anything at all to the thread I mention above and we promise to get to them over the next few days/weeks/months. In the meantime, please enjoy!

Bandsaw 'fettling'...

Accipiter

Sapling
Joined
Oct 16, 2025
Messages
439
Reaction score
363
Location
Frome, Somerset
Name
Frank
LOCATION
Somerset
I had an issue with my (cheap) Aldi/Ferrex 10" bandsaw with the tension bolt slipping with a damaged thread. Replaced the bolt - thought that was the problem. 2nd bolt also stopped thread so I re tapped the thread on the holder.

Re-set the saw up but now have a slight deviation of the cut at the start - hoping that the photos help. Cross cut and rip. The rip cut has a slim offcut in place to separate the pieces so to show the deviation.

The blade vibrates and flecks either side - as per video.

I'm unsure if this could be the blade possibly damaged on one side... I'm unable to see properly to decide! Could be something else so open to suggestions to eliminate the troubles 🙏

The only new blade I have at present is a ¼" x 10/14 m42 from Tuffsaws.
 

Attachments

  • 20260115_123143.jpg
    20260115_123143.jpg
    227.8 KB · Views: 8
  • 20260115_123833.jpg
    20260115_123833.jpg
    187 KB · Views: 8
Frank...bandsaw fettling always starts with a new blade. If you are going to judge it on the straightness of its ripping, then put in a new blade suitable for ripping, adjust it as well as you can, and then do some ripping.

Fundamentally, hobbyist lightweight bandsaws simply can't get the same amount of tension on a blade as a bigger machine can, and tension is just about the be-all-and-end-all of bandsaw performance. I have no experience of the machine you have, but ANY machine has its limits, and you just have to accept that your machine will be successful with smaller sections of timber than a bigger machine. I have a lovely 16" bandsaw, which is great.....but it still isn't as capable as my friend's 20" cast iron 3 phase monster. You won't know where your machine's limits are until you get a new blade properly tensioned.
 
Thanks Mike 🙏. I've a variety of blades on order 👍

I wondered if I'd be right in thinking that with the starting cut drifting towards the right - as you look at the cut - it would be indicative of the teeth on the left (?) being worn/blunt? The cross cut shows it hasn't cut square.

I also wondered if the vibration of the blade was due to incorrect tension? Did try again - adjust the tension - after reading your comment in the email notification I received but made no changes.

Hopefully a new blade will be helpful?
 
Wot Mike said. I use bandsaws all the time (no tablesaur) so I rely on both of my saws (a gurt big Ax industrial thing and a smaller 'trade' one) for all my major cutting tasks. Get a new blade from a reputable supplier (Ax are good as well as Tuffsaws), clean both the wheels of accumulated grunge and install the blade, setting it to the max tension. Check that the guides are set correctly, that the blade is square to the table and give it a trial run. The width of the blade must also be dead parallel with the fence; I use a 'Bandsaw Buddy' from Ax for this job but it's easy enough to make your own version. If the blade isn't parallel to the fence the cut will 'drift' - Rob
 
The problem you are experiencing is called "Drift". It is caused by the blade not running true on the wheels. This can be adjusted by altering the tracking knob on the back of the saw.
There are loads of videos on YT, some better than others. I've yet to see one that talks about eliminating drift. They all, even some of the big-hitters, much more of a YT star than I am, seem to recommend twisiting the rip fence to compensate for drift, rather than eliminating it in the first place. That works if you only ever use the saw for ripping, but for anything else, such as tenon shoulders or using a circle jig, you will run into problems. It is a very second-rate solution. Become friends with your tracking knob and life will be happier.
There is a most very excellent video called Bandsaw Essentials somewhere in the murky corners of the internet, by some geezer called Maskery, but you'll have to fork out a microscopic amount of dosh to get it. Otherwise, you'll have to watch YT for hours and hours and hours and sort the wheat from the chaff yourself! :)

S
Valuable Link!
 
Thanks @Woodbloke for the link to the Bandsaw Buddy... I should really add it to my arsenal of 'tools' 👍.

I checked for the blade/fence being parallel etc., and it is. As in my reply to Mike I was wondering if the wobble/vibration (?) thing of the blade was indicative of tooth damage to one side of the blade (?) apart from 'drift' being said to be a sign - or the tension not quite there? I've found no mention of that in my searches and viewing of YT videos: Alex Snodgrass etc., etc.
 
The problem you are experiencing is called "Drift". It is caused by the blade not running true on the wheels. This can be adjusted by altering the tracking knob on the back of the saw.
There are loads of videos on YT, some better than others. I've yet to see one that talks about eliminating drift. They all, even some of the big-hitters, much more of a YT star than I am, seem to recommend twisiting the rip fence to compensate for drift, rather than eliminating it in the first place. That works if you only ever use the saw for ripping, but for anything else, such as tenon shoulders or using a circle jig, you will run into problems. It is a very second-rate solution. Become friends with your tracking knob and life will be happier.
There is a most very excellent video called Bandsaw Essentials somewhere in the murky corners of the internet, by some geezer called Maskery, but you'll have to fork out a microscopic amount of dosh to get it. Otherwise, you'll have to watch YT for hours and hours and hours and sort the wheat from the chaff yourself! :)

S
Valuable Link!
Thanks Steve 👍... I'll check out the 'valuable link' after replying 🙂.

I've played with the tracking with the 'back' knob... and at this point the blade remains 'central' as the video guidance for blade position says. I've played, backwards and forwards, to the point of having the blade track to the back - almost coming off at the back - or too much forward... ready to come off...

I've not used it that often for ripping - I've the Evolution R255TBL+ for that - but tenons or half laps, recently mostly for ripping bits of plastic sheet (1.5~2mm thick) 8ft long to 4" wide. The blade came off because the tensioner housing wore part of the thread off the 'bolt' section...

Waiting on the new blades... I don't fancy 'fettling' with a very nice ¼" blade...

Now 'searching'... 😉
 
Hello, wobble and vibration issues is likely due to misalignment of the wheels,
Well...that is the case if the blade is in good condition.

I've posted many threads on such, just about everywhere,
which you'd easily find if you searched for wheel and motor alignment.
Note to seek info from late 2023 onward, as I was still discovering things before then.
i.e. the accuracy of the wheel rims necessary if using a beam/straight edge in order to align the wheels,
though as mentioned, an alternative method may be done by bolting a mounted laser onto the wheel shafts,
which would register off the inner race of the bearings instead.

The result of such would likely be displeasing, that goes for any contemporary bandsaw
That is, assuming one values longevity...unless they don't mind converting their machine to a foolproof design.
(this excluding modern designed honestly built huge resaws with foot mounted motors, i.e with 800mm wheels or above)
as it takes an honest design, for an honest setup.

All the best.
Tom
 
Hello, wobble and vibration issues is likely due to misalignment of the wheels,
Well...that is the case if the blade is in good condition.
Thanks Tom. I'm not sure about the blade... may sound daft but I can't quite make out the state of the teeth - even with my glasses on 😉. Im waiting for new blades but they won't be here until next week.

I've posted many threads on such, just about everywhere,
which you'd easily find if you searched for wheel and motor alignment.
Note to seek info from late 2023 onward, as I was still discovering things before then.
i.e. the accuracy of the wheel rims necessary if using a beam/straight edge in order to align the wheels, though as mentioned, an alternative method may be done by bolting a mounted laser onto the wheel shafts, which would register off the inner race of the bearings instead.
I'll search for your posts on this - Thanks for mentioning them. My 'saw is just one of the cheap 'hobby/DIY type 2 wheel machine. I may have misaligned the wheels with the trouble with the thread stripping on the bolt and replacing it twice - and having to tap the thread in the holder.

The result of such would likely be displeasing, that goes for any contemporary bandsaw
That is, assuming one values longevity...unless they don't mind converting their machine to a foolproof design. (this excluding modern designed honestly built huge resaws with foot mounted motors, i.e with 800mm wheels or above) as it takes an honest design, for an honest setup.

All the best.
Tom
 
There's so much duff info on the internet about bandsaw drift. I am really glad I happened across Steve's video on the subject before getting into the weeds of some of the other ideas (that are extremely popular, especially amongst the YouTube woodwork community).

Both Steve and Tom above make the point that having good wheel alignment is essential. In my experience it definitely is, but there's a few other big considerations. If you own a bandsaw with a cast iron/steel frame skip to the bottom of this post. If you're a voyeur, make a coffee (or pour a large tot of something stronger) and laugh suitably at my pain below...

I have a small, "Sip" bandsaw - only 12" wheels, giving a maximum reach of about 11 1/2". Significantly, it's made of mild steel, box section tubing. Note that this specific model is actually heavier construction (for its size) than most of the Chinese stuff that flooded the UK market under many brand names in the 2010s. Those have all the afflictions mine has, only worse.

The back part of the "G" shape is two pieces of box tube, basically tack-welded together. The second piece is supposed to stiffen the frame, but the welds are incomplete and an inch or so long with 5" to 6" gaps between the welds. They've even cut a large hole in the reinforcing tube, so they can mount the start-stop button assembly (d'Oh!")!

Consequently, it's really not very rigid. It's supposed to take up to 11/16" resaw blades (possibly 3/4" - would have to go look), however in practice, it starts to bend as soon as you try to tension anything around 5/16".

This throws out the geometry in all sorts of infuriating ways. The "G" closes up, so the upper blade guard, (that has guides on the end) ceases to be parallel with the blade. It twists clockwise (in the "X" axis).

But that's not all: because the tension forces are applied to the wheels, they tilt (in the "Z" axis), so the top wheel's upper rim and the bottom wheel's lower rim move nearer to each other (towards the front). And, of course, the blade guard/upper guides follow suit, so the bottom of the guard twists both to the left and to the front.

"Use the tracking adjustment, numpty!" I can hear you thinking it. But it doesn't fix the problem. I can return the upper wheel to the vertical, it's true, but a similar adjustment to the bottom wheel is an entirely different can of rotting sardines. I really, REALLY hate messing with the bottom wheel's tracking - four bolts pressing on the sides of the wheel's shaft - not even just three (which would be half sensible). What were the designers thinking? Were there any designers at all?

Even assuming I had the inclination and time to adjust everything, the two wheels are no longer coplanar, simply because the frame has twisted, and the bottom 'cupboard' is far more rigid than the top one, having the motor assembly mounted on it, etc..

In practice the not-coplanar issue cannot be easily fixed, as it occurs around maximum tension, so much so that you'd never manage to loosen and readjust anything, without risking "rapid unscheduled disassembly"*, or an unscheduled amputation (other limbs are NOT available!).

I can put a sticking plaster over it, by adjusting both top and bottom blade guides. Thankfully, they are proper triple-bearing types, but they have to go both backwards and to the right. This in itself is a fiddle. Also, the adjustment is only correct with the blade guard at one specific height! You can support the blade, but correcting for front-back blade tilt is actually impossible (so don't expect any stopped cuts with a resaw blade to ever be square!). Why? The origin of the issue isn't tracking, it's because the top and bottom wheels cannot be coplanar (because the frame twists). Sigh.

The idea of welding a third bit of box-section steel to the spine of the thing is getting more attractive as I think about it. And welding-up the tacked-together bits, too. It can't hurt, except if I try to lift the machine!

So as it stands, I can only set up the machine either for small blades and twisty cuts, or for resawing well, but not both together.

And I almost forgot to mention: If using a resaw blade, I can forget about tilting the table. the frame twist throws that out also (if you think about it)..

Cast iron bandsaw-frame owners pick up here: Mark Twain famously described England and America as "two nations, divided by a common language."

We really shouldn't get distracted by Aluminium being misspelled: Americans have a knack for simplifying things in a good way.

Decent small bandsaws across the pond have cast frames, and seem to be much more rigid than our Chinese ones. They can probably buy Chinese junk too (not the floaty spy-ship sort), but they do have the option of decent quality, if they want it.

I'm not sure we have that choice. I'm also not sure that the majority of small bandsaws in the UK (that are now available) are anything other than re-hashes of each other. They have different handwheels and paint jobs, but elsewhere similar components, and, crucially, for any given size, similar/identical frames, dust extraction port locations, etc.. I note Sheppach do differ significantly from the rest (over a certain size), probably in a good way, but otherwise? I have yet to see a modern-built small bandsaw on the British market with a cast frame, nor any that don't basically look like everyone else's.

So I watched Alex Snodgrass's trade show demo videos with increasing frustration. It's not that he's wrong (well, actually...), but that he's starting from a much better place than I am. And better than where the majority of British small bandsaw owners are. He demos his stuff on cast frame bandsaws, which are inherently more rigid than mine. He doesn't have to take into account most of the issues my bandsaw has, and his results (far more than his method, IMHO) show this.

I mention Mr. S., because he usually pops up sooner or later in any discussion on bandsaw drift or misalignment. I do believe my eyes: his method and add-ons seem to work very well, but NOT in my circumstances, on my bandsaw.

So often the question is, "I've just bought a small bandsaw from [Screwfix|Toolstation|Amazon|Poundland] and I can't get it to work properly. Can you help?"

Probably not, sadly. I'm in the same boat, but I've just had longer to chew on it.

E.

PS: Guess what the manufacturers of bigger bandsaws, e.g. Stenner, make their frames out of...

*(c)SpaceX
 
Last edited:
@Accipiter To test the relative sharpness of the two sides of the blade, run a fingertip DOWN each side gently (in the direction it moves, so you're rubbing the back of the tooth, not the front!). You should probably feel the difference if one side is blunted. You can also look for light reflecting from blunt teeth, right at the tip (LED torches ought to be good for this - you need a point source of light for best results). You can also look at both sides of any cut you make, but that's affected by blade alignment.

I don't think there's a foolproof method, because, at the end of the day, sharpness is a relative concept.
 
Last edited:
Hopefully a new blade will be helpful?

I have a small 14" bandsaw which when I bought it had various clones under the Charnwood and Axminster brand names, mine is a Draper brand.

I had a lot of problems with drift when I first bought it, the mitre slide was useless because it wasn't square to the blade. I tried for ages to fettle it by adjusting the alignment of top and bottom wheels to get them in the same plane.

Then I watched the Snodgrass video which explained how tracking changes the alignment of the blade.

Nowadays I have the blade aligned to the table slots and cut joinery using the mitre slide without worrying about drift.

Two steps to do this. First get a new blade and use this only for square cuts. The Snodgrass video was very clear that using a blade for curved cuts abrades the set unevenly which will twist the blade in any cut.

Secondly when changing the blade I don't worry about getting it running perfectly central on the wheels, as long as it stays on I'm happy.
Above was mentioned a bandsaw buddy, basically a stick on a magnet which holds it clear of the teeth so that you can see the alignment of the blade to the table slot. I just use a small steel rule on the table, pressed against the blade between the teeth so that it's against the blade body and not the teeth. Very small adjustments of the tracking can be seen to have an effect on the blade alignment. I check the alignment, make a very small adjustment to the tracking(moving the wheel rim 1/8" is a lot), run it for a few seconds and check again. The change in alignment tells me if I'm moving the right way or not.

Of course this is done with the guides backed off, once the blade is square to the slots I move in the blade guides.
 
@Eric the Viking ... thanks Eric, I thoroughly enjoyed reading your comment... It echoes much of my thinking on 'this' bandsaw - even to welding (or bolting?) a strip of ⅛" by 2" steel strip down the side/back of the 'spine/frame' - tempting as it is...

I've been fortunate with it over the past 4 years of having it - until now... with the thread damage (maybe I need to put up a photo?)

The thing most likely that's crept up on me is that it didn't arrive in 'perfect' condition when I got it. LOTS of them in the shipment had issues... many with damaged frames. Mine wasn't that apparent but - after reading of other's issues with theirs - I rea.ly checked mine and found it leaning in *slightly* from about mid way of the 'spine' (the upright that supports the top wheel... for want of a better description 🤔). I did manage to sort it but... thinking once weakened etc...

Seems it's a 'rebadged' Sheppach model... but... Sheppach seem to be better than these - or this one anyway!

If it gets to be too much of a hassle to me I'll *review* my options and maybe replace it. This is just a hobby for me... and at (approaching ) 75 I don't feel I can justify spending oodles on a good quality cast frame etc., etc. SWMBO wouldn't be "supportive" for me doing so 😉🤣
 
The only new blade I have at present is a ¼" x 10/14 m42 from Tuffsaws.
I think you might be asking too much of the bandsaw with this blade. According to Ian at Tuff Saws, the M42 blades require significantly more tension than the equivalent sized carbon blades. I doubt the Aldi saw can handle the extra force.

I have a Record Power BS350S bandsaw (14-inch) and had similar problems you described. I struggled to cut 15mm plywood without the OEM blades wandering. The BS350S manual states the saw can accommodate a 19mm (3/4-inch) blade. While the 19mm carbon blade will fit, it is not possible to properly tension it enough to remove the blade flutter.

I made several modifications to my saw. The first upgrade before the modifications started with quality blades from Tuff Saws before he stopped shipping to the EU. For resawing with my saw, Ian recommended the 1/2-inch 3TPI M42 blade, which required the same tension as the 5/8-inch carbon blade. I don't have a strain guage, but slowly adjust the tension knob until the blade flutter stops without bottoming out the springs. I also release the tension on the blade when the saw is not being used.

In addition to the many YouTube videos about bandsaw tuning, the best resource I have is the three-DVD set "The Complete Bandsaw" from @Steve Maskery. In my troubleshooting, it never occurred to me to check the tracking of the lower wheel, as Steve recommends, and it was not aligned with the upper wheel. After a few minor adjustments, the blade was tracking properly on both wheels.
 
Thanks @Mike 😊. You may have misunderstood my mentioning of the ¼" blade... I've not set the saw up for using this blade - it is the *only* new/unused blade I have at the moment. I bought it four years ago and have never got round to trying it. I feel I'd be wasting my time trying to use it to 'solve' (?) my issues if I used it... and I don't want to ruin it in trying to solve the issue I'm having.

I've a new Premium ½" 3/4 vari-tooth blade (after asking Ian's advise) on order and it won't be here until late next week with having ordered this late in the week.

I've a few things to consider looking at... wheel alignment for sure - I've most likely done something with the top wheel as it's the one that's got some 'wiggle' *when tension is taken off* with the tracking adjustment knob at the back.

I've tensioned more but still have vibration on the blade. It seems strange that, in ripping a test piece, it 'drifts' to the right for about ¾"/20mm at the start of the cut but will then cut straight for the rest of the length - even 'veneer' type thickness... 1mm and under...

I'll take a look at the link you've shared for the adjustments you made - thanks for sharing 👍
 
Thanks @Mike 😊. You may have misunderstood my mentioning of the ¼" blade... I've not set the saw up for using this blade - it is the *only* new/unused blade I have at the moment. I bought it four years ago and have never got round to trying it. I feel I'd be wasting my time trying to use it to 'solve' (?) my issues if I used it... and I don't want to ruin it in trying to solve the issue I'm having.

I've a new Premium ½" 3/4 vari-tooth blade (after asking Ian's advise) on order and it won't be here until late next week with having ordered this late in the week.
I didn't think you were using the new blade yet, but was using the blade that came with the bandsaw. My intention was to let you know the M42 blades need more tension than you might expect or your bandsaw might be able to accommodate.

I've a few things to consider looking at... wheel alignment for sure - I've most likely done something with the top wheel as it's the one that's got some 'wiggle' *when tension is taken off* with the tracking adjustment knob at the back.
The top wheel of my bandsaw also has a lot of movement when there is no tension. This is normal, as the top wheel assembly has to be free to move for the tension adjustment.

I've tensioned more but still have vibration on the blade. It seems strange that, in ripping a test piece, it 'drifts' to the right for about ¾"/20mm at the start of the cut but will then cut straight for the rest of the length - even 'veneer' type thickness... 1mm and under...

I'll take a look at the link you've shared for the adjustments you made - thanks for sharing 👍
Before I replaced the OEM blades, prior to the chassis modifications, my bandsaw was great for cutting random curves no matter how much I wrestled with the wood. A great quality blade tamed the bandsaw.
 
Misunderstanding on my part then @Mike 🙏.

I've had this bandsaw since from 2021~22 and it's cut well with the supplied OEM blades and the two (of the three) blades purchased and used from Tuffsaw - ½" and ⅜".

It's only been a PITR since the thread stripping on the top tension bolt and attempting to reset it after replacing the bolt twice. During that process I'm now coming round to the conclusion, from discussions, that I've messed up the back knob for the tracking settings section. I'll need to get round to checking it over sometime next week as I've other things to now concentrate on. Appreciate your input 👍
 
@Accipiter I didn't mention that I am quickly wearing out the tension adjuster on my machine - it's the 8mm thread that's going, despite me greasing it thoroughly last time I stripped and cleaned it.

Although it ought to be something strong, e.g. Acme thread, it's just plain-Jane M8 coarse pitch, and nickel plated. I suspect the plating is causing galling, which in turn is weakening the thread.

It's not a complex mech, so I've a mind to rebuild it in a better way. I'll at least add a thrust bearing at the top, where it goes through the case, but that of itself won't help the leadscrew. Meanwhile it needs more grease, although on its own that can't be a permanent solution.

I think, if you're handy with a MIG welder, strengthening the frame is a jolly good idea.

And, if you're getting blades from Ian, you're in very good hands.
 
Hi @Eric the Viking ... this is a photo of the original bolt. (#1) , a replacement (pk of 2) (#2) and one for 'plan b' (#3)... the plan b one would be used by putting it in from the top (large washer to cover opening) to then go into a nut (where the original is put in from) and a spanner (ratchet type) used to tighten it up... That was before tapping the thread in the 'socket/barrel' - as in the other 2 photos showing the parts inside. The last photo shows more of the stripped thread.

I don't have a mig welder... but may be able to find someone that would help 🙂
 

Attachments

  • 20260116_172428.jpg
    20260116_172428.jpg
    83.5 KB · Views: 7
  • 20260116_121545.jpg
    20260116_121545.jpg
    158.2 KB · Views: 7
  • 20260116_121534.jpg
    20260116_121534.jpg
    156 KB · Views: 7
  • 20260116_172417.jpg
    20260116_172417.jpg
    137.5 KB · Views: 7
Looking at your photos, Has this machine worked properly with a different blade?
Or has this drifting happened from new?
Check the lenght of all the blades, carefully measure the machine, rather than believe the manual.
If a blade is too long, the tension knob will not have enough movement available to correctly tension the blade.
This leads to the thread failure both in the bolt and knob. Trying to wind the knob too far down the bolt, after the bolt has bottomed out in the knob.
2nd bolt may be a cheeper low quality item, using a strained thread knob, might just not work well.
Replacing the coach bolt with a good quality item, replacing the knob with a nut, will show how much thread has to go into a new knob, when correctly tensioned.

Bod1.
 
Looking at your photos, Has this machine worked properly with a different blade?
Yes. I've had the machine for 3 years + ...
Or has this drifting happened from new?
No...
Check the lenght of all the blades, carefully measure the machine, rather than believe the manual.
Blade is the correct size of 1790...
If a blade is too long, the tension knob will not have enough movement available to correctly tension the blade.
Noted 👍
This leads to the thread failure both in the bolt and knob. Trying to wind the knob too far down the bolt, after the bolt has bottomed out in the knob.
The section that the bolt fits in to raise/tension the blade had (somehow) unkowingly developed an issue with its thread. This has now been rectified by tapping it again.

I, and others, had difficulty getting a replacement bolt to run into it after approx ⅛" of starting - hence it was suggested it should be re- tapped to remove what ever the damaging particle was. I sought assistance from a local supplier dealing with all sorts of screws, nuts, bolts etc., etc., - in all types of thread, old and present.
2nd bolt may be a cheeper low quality item, using a strained thread knob, might just not work well.
The 1st replacement bolt was (I now realised) forced into the threaded section which put the same damage to it as with the original bolt. After tapping it again and using the 2nd replacement it ran properly in the threaded section...
Replacing the coach bolt with a good quality item, replacing the knob with a nut, will show how much thread has to go into a new knob, when correctly tensioned.

Bod1.
Time will tell... after I get the new replacement blade from Tuffsaws most likely by the end of next week, according to their website on turnaround for orders.

Everything you've mentioned is appreciated - as is everyone else's input... so, many thanks @Bod1 for your input 🙏🙂
 
Thanks Tom. I'm not sure about the blade... may sound daft but I can't quite make out the state of the teeth - even with my glasses on 😉. Im waiting for new blades but they won't be here until next week.
Hello again Accipiter, I mentioned a new blade or one in good condition, i.e not cracked,
to be sure the wobble wasn't because of that.
A blade with compressed set will still run perfectly...(I don't mean cutting)

Not sure what the max width (thin gauge) blade which that saw could run, I guess you may have found some videos on the matter, (edit: seems you might have such a blade on the way)

Having looked at that machine, surprisingly it seems a fair bit more honest than some machines out there.
With courtesy of Peter Millard's youtube video,
Two things noteworthy in this picture....
One being an adjustable lower wheel, as seen four bolts to adjust the shaft up/down, and also left/right.

Anything else, like the clam shell sandwich arrangement on the likes of those cheapo Laguna/Charnwood's for instance,
I'd not be convinced of such actually being possible, despite what they might mention on their promo photos?.

The next notable thing is the motor sitting on mounts, which could likely be fettled to suit the wheels.
i.e either by a tickle with a file, or with some shimming, or both.
(most modern saws sold, having motors directly mounted onto the chassis)


Screenshot-2026-1-16 Aldi Ferrex 10” Bandsaw 12 months on [video 475].png


In the next picture, which I read you've gotten familiar with, we can see that the upper wheel carriage is a
bolted on affair, which may indeed have some wiggle room for adjustment.
Likely not much, but to know how much play you have, you'll need to have the max width of thin gauge blade,
to see.
Between that, and the narrow blade you have, you may be able to note any fouling of the wheel and the guidepost,
should you decide to use the lower wheel as a datum.
i.e the lower wheel shaft centered in the hub, or very, very close to such,
with four bolts pressing centrally on the shaft.
Screenshot-2026-1-16 Aldi Ferrex 10” Bandsaw 12 months on [video 475](1).png


So you've got some choice here, compared to most modern bandsaws,
as the Italian saws (by and large) were the pioneers of the contemporary bandsaw what we see today.

Such manufacturers like Centauro, Meber, ACM, and about a dozen other Italian companies making bandsaws
(I'm too lazy to mention them)...
who took the leading role in the market, with a much better recipe, and it only took 20 years for the rest of the market to even think of catching up with them,
Their getting close, but most haven't got there yet!

And that's not even talking about the honest ones, most of which were being built during the 80's to the first half of the 90's.
It's worth studying those ones...featuring foot mounted motors, with lower wheel adjustment hub,
as it makes for an honest/foolproof design.
What also might be worth mentioning, just to be fair... Cantek made a specific era Meber SR themed saw,
which I thought was in the past, but seemingly still do so! (best get a look at the back to be sure)

Anything less is a gamble/lottery in terms of design.
The thing is, the contemporary Italian saws being more sturdy than the countless themed copies of such,
and the current state of affairs being a "jobs for the boys" game.
Can't blame them for that I suppose, keeps them in business.

Such information being necessary to illustrate the racket what's been going on since the 90's,
(excluding those specific Taiwanese saws mentioned above)

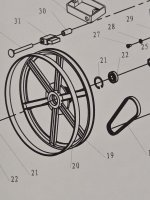
Time to cut to the chase, as a picture paints a thousand words.
Here's a look at an upper wheel carriage assembly from a contemporary Italian saw.
Note that shaft cannot be horizontally adjusted (i.e. tilted) or indeed moved/wriggled,
which makes such the datum.

SAM_7704.JPG


It might not be so with your machine, but just to mention it highlights the dishonesty of all present manufacturers
as there's ne'r been a mention of maximum or minimum tolerances regarding horizontal wheel alignment,
and as things stand nowadays, no way to adjust the flange or face mounted motors, to suit the upper wheel datum.
That is, without determined intervention.

In short, to believe that such contemporary machines from any company having wheels and motor within some sort of tolerance, is wishful thinking indeed.

Note the differences between those and your saw...
and you'll see why I said that little saw seems a fair bit more honest, than some machines out there.

I'll not bother posting the process setting up my saw, regarding wheel and motor alignment.
T'would be a bit long winded to explain it all, and besides, it's easily found with a google search,
since there's no other sureworthy documentation on such online, nor anywhere else for that matter...
that is, concerning the contemporary bandsaw design, which we see today.

All the best

Tom
 
Last edited:
Thanks Tom (@TomTrees ) for looking further by searching for the Ferrex bandsaw... Peter Millard's (and a couple of others nut mainly his) video on it was pretty much what sealed me committing to getting one. When it was announced (on another forum) that they'd be available there was a lot of discussion on them and pre-orders so I did a search for information about them, saw Peter's vid and ordered. That's somewhere about 3~4 years ago... sometime in 2022. I trust Peter's reviews...

Noted about the other bandsaws/makers... etc., but, yes, I'm aware of the 4 adjustment bolts at the back for the bottom wheel. I've never adjusted those in the 3~4 years of having it. Never saw a need to! Possibly there's been some loosening of one or more?... after the dropping of the tension on the top wheel... and tne blade coming off?... also (something that had slipped my mind) the rubber tyres - at different occurrences - came off and had to be refitted. Easily done - but unsure if I fitted correctly? One side is flat while the other has 'rims' on either side...? I refitted with the flat side to the wheel.

I feel I'd have to take a video (if I'm able to one handed) of that top wheel adjustment plate for tension and 'tracking'... to show you the amount of movement it has. Also dismantle the tension bolt/sleeve fixture assembly parts...

The widest blade it will take is ½" - 12mm... I'm now thinking the present blade could be one of the OEM supplied blades (it came with 2) which is⅜"... I don't recall the number of TPI...

The last time I had another go with the tension on the blade (getting a 'ping') I put a piece of 12mm/½" pine through the length. The first ½" / ¾" ofthe cut it drifted to the right then straightened up down the full lenght... same when 1mm width cut. Cross cut it wanted to 'curve' - as in my earlier photos. I did not expect it to cut straight down the length after the initial drift...

I've found the manual for it (such as the manual is) and will have to get a magnifying glass out to read the line drawing for the machine parts. Although "Made in China" for Aldi, any repairs (or replacement under warranty) is done by Sheppach.

Thanks again for your time and support 🙏🙂
 
Don't touch those axle bolts unless you know exactly what you are doing. They are factory set, so unless one is obviously loose, leave well alone
also (something that had slipped my mind) the rubber tyres - at different occurrences - came off and had to be refitted. Easily done - but unsure if I fitted correctly? One side is flat while the other has 'rims' on either side...? I refitted with the flat side to the wheel.
That doesn't sound right to me. Do you mean that the surface of the tyre has a couple of rims on the edges? If so, it is inside-out...
S
 
Don't touch those axle bolts unless you know exactly what you are doing. They are factory set, so unless one is obviously loose, leave well alone

That doesn't sound right to me. Do you mean that the surface of the tyre has a couple of rims on the edges? If so, it is inside-out...
S
Hi Steve... thanks for the comment on the rubber tyres... safest way to demonstrate is for me to take some photos. I'm not needing to use the bandsaw at present anyway so taking off the blade and rubber tyre/tyres wouldn't be a problem. If I removed both I'll then know if both tyres are exactly the same and you'll be able to confirm for me if I've messed things up with that adding to my issues 🙃
 
Okay... was going to give the bandsaw a break but...

Taking the photos of the upper bracket/internal gubbins, removing the top wheel to check the rubber tyre and to show the 'tracking' and tension bracket - taking photos (thread stripping on the replacement bolt could be seen) - and replacing it all it felt firmer. I reset with the blade (⅜" OEM one) and started another cut... started straight - no drift. Completed the cut then heard horrible noises - stopped the saw...
20260117_124828.jpg
20260117_131653.jpg

Opened both doors and found the blade had come off... also the rubber tyre on the bottom wheel. Put it back, tensioned it all back up, did another cut - ¼" drift at start... then some squeaking while cutting (VERY slowly), completed the cut then the start of the noises so stopped the saw again. Opened bottom door to find tyre almost off.
20260117_135852.jpg
20260117_135857.jpg

I'll be contacting CS of Sheppach for cost of replacement parts.
 

Attachments

  • 20260117_131646.jpg
    20260117_131646.jpg
    143.5 KB · Views: 1
Noted about the other bandsaws/makers... etc., but, yes, I'm aware of the 4 adjustment bolts at the back for the bottom wheel. I've never adjusted those in the 3~4 years of having it. Never saw a need to! Possibly there's been some loosening of one or more?... after the dropping of the tension on the top wheel... and tne blade coming of
I doubt they came loose, just that there is likely misalignment between the wheels or motor, and as Steve mentions rightly,
not to touch them, without being positive that is the only solution possible,
as things can go wrong in an instant.... i.e. destroyed motor,or worn wheel bore.

You'll have to lay down some masking tape to check both wheels and motor alignment,
as other methods for such concerning contemporary bandsaw are clueless.

This is why there are four bolts for the adjustment hub, and should you study the Italian saws mentioned,
you'll note two of those bolts are often painted red, to denote those being set, and not to be adjusted,
whilst the other opposite bolts are intended to be loosened, for drive belt changes.

I get the impression you may have confused blade alignment, i.e. tracking of the blade
and wheel and motor alignment.
Misleading terminology being another one of those things what's part of the racket what's been gone on for ages now.
(see earlier history lesson above regarding the contemporary bandsaw)

My posts are assuming, your intentions are to do things properly and be sure that all three lines are in alignment,
i.e parallel with each other.
Should you choose such, you will note that most "setup" or "wheel alignment" articles, won't actually involve any of that whatsoever, and are merely clickbait titles, for yet another blade tracking tutorial.

There could be scope here for other takes of scribing lines onto the masking tape, rather than the two I've mentioned
as it's a benchtop machine.
I wouldn't be keen on having to improve the tolerance of alloy wheel rims, should the test with a scribing beam of some sort
show up not to be trustworthy, (likely)
and once again, other articles on such use of a beam not being a sure thing,
unless such suggestions have been updated since then. (doubtful)

Lastly, I'd not be willing to spend money on parts without getting the basics sorted first,
as the same thing is likely to keep happening, such being a common theme, often ending with the owner getting sick of that
and ultimately splashing out on another machine, which may very well have the same issues.
No surprise there, due to what's mentioned above.
Best to study those machines with foolproof design, and save oneself the trouble, especially if considering the next cheapest or reasonable upgrade.

All the best.
Cheerio
Tom
 
Hi Tom... (@TomTrees )

No misunderstanding re alignment 🙂. As my last post/photos, after re-assembly of the top wheel there wasn't the 'wiggle' I'd had previously... that would indicate I'd not located it properly previously. Doing the 1st cut after putting it back and resetting the blade, tracking, guides, it cut without the drift. Then the bottom wheel tyre came off... The "new" bolt shows stripping/wear on the thread and re-tapping the threaded 'socket' was 'stressed'.

I've now emailed Sheppach GB to ask if the tyre (paet #20) and other (#40 & #42) parts are available - and the costs. Will await their response.
 

Attachments

  • 20260117_154134.jpg
    20260117_154134.jpg
    128.2 KB · Views: 0
  • 20260117_154343.jpg
    20260117_154343.jpg
    164 KB · Views: 0
Hello again, sorry to sound so pessimistic about things, but I would expect the new tyre to fly off aswell,
very quickly as per the usual bandsaw troubleshooting threads.
i.e. I would be very surprised if that doesn't happen.

Once again, worth studying the top Italian machines to see their tyres, and what they do to stop that from happening.
Also worth mentioning, when that happens, worth looking getting tyres with camber or indeed more pronounced
camber, for faster more trouble free/driftless cutting without wearing out thrust guides, due to excessive contact.
.
In other words, what's known as lack of "beam strength" from the blade, i.e acting like it's seemingly under-tensioned.

Though understandably, with a caveat that is!...
when the machine gets a once over thereafter the second set fails...
Otherwise such may indeed be even more dramatic than prior occurrences.

Good luck though.
All the best
Tom
 
p.s. Another thought which might not be so displeasing, an option should this happen being,
there's nothing stopping you from gluing the old ones, (should they be the loosest fit)
onto the new ones, and crowning them thereafter.
Though finding a suitable adhesive might prove to be quite difficult to obtain cheaply.
i.e. something like slow set 24hr epoxy, or rubber and gasket adhesive what's not contact cement....
as there's a knack to using that stuff, as you can see below.
Screenshot-2022-5-26 How It's Made Band Saws(2).png

Good luck
All the best
Tom
 
Thanks Tom... I did wonder about if it was possible to use a glue of some sort - to glue the existing bottom one. Not in too much of a hurry at this moment... other stuff to put my attention to - and I don't see me needing the bandsaw at the moment. It's 'handy' to have but I can do things in other ways.

Just curious as to what causes such to happen 🤔...

Thanks for the good wishes 👍🙏
 
I thought I'd update my thread to give an outcome to this... So...

After contact with Sheppach and the waits between replies made I've eventually got something sorted. I had to resort to sending a message via Messenger - to which the quick - well quicker than other attempts via online form/raising a ticket was - asked me to send to another address. So I did and copied ALL the previous communications I'd had.

The person who responded came back with information that didn't relate to what I'd said so I sent an email with the photos I'd shared here (above). Turns out that the manual for the bandsaw had been rewritten and part numbers were/are now different...

He sent me the new manual and parts drawing so I was able to confirm the (new) part numbers. *IMPORTANT INFORMATION* for anyone who needs the parts I did. The TENSIONING SLEEVE the the (old) turning handle goes into is replaced with an *all combined handle and threaded sleeve* - the "old" system is/was the bolt/internal threaded sleeve/handle. So we now have the bolt and internal threaded handle as in this photo:
20260319_144446.jpg

The THICK washer is *an additional part* added by me to try to assist turning to raise to tension the blade. Otherwise the handle turns on the top of the case!

I didn't get a new bolt from them as I'd have to have ordered it and paid for postage from Germany - costly enough for the now integrated handle at £4.43 +£8.00 delivery! I am able to get replacement bolts from a local store for 30p each if needed.

After fitting the new blade from Ian at Tuffsaws the saw now behaves as previously...

I'd upload the new manual but am not aware of how to do so to the Manuals Thread?
 
Sorry I haven't got back to this earlier - the bulk of the thread was posted while I was in hospital in late Jan. I may not be able to follow through, either, as I'm back there again in ten days or so <grrr>.

Several thoughts:
  • The blade you show in the picture of the dismounted bottom tyre is rather big for the saw. Might be irrelevant, but it will need a relatively huge amount of tension.

  • The tension mech is inadequate in that the coachbolt provided is quite wrong for the task, being too small and nickel plated (will gall the threads if you so much as frown at it). I'll come back to this...

  • It's a pretty standard small bandsaw wheel. The aluminium wheel is crowned so the tyre doesn't have to be. The tyre is a cushion and doesn't need to be glued on (and it would be a PITA when you inevitably need to change tyres - they do perish).

  • It looks like the blade is sitting too far back on the wheel. The bulk of the blade ought to be balancing on the crown so that, if you cut a cross-section through the wheel, it would be parallel to the wheel's axis. As long as both wheels are like that (and coplanar!), the blade should be parallel to the table's slots, and thus the sliding mitre fence.
I think you need to use Steve Maskery's process in his Compleat Bandsaw, as it's likely the adjustments for the bottom wheel axle have shifted/come loose. If the wheels start off as coplanar under some tension, the machine really shouldn't be dumping blades as it has been, and you've mostly eliminated other reasons for this. At least do his checks, ideally with a blade mounted under a little tension (if worried about fingers, fit it on backwards, just for this purpose!

But before you do, consider replacing the wheel bearings themselves. As supplied the machine will have the cheapest, nastiest bearings China can furnish the manufacturer with. Ywet they carry all the loads of a tensioned ripping blade, and the stresses of cutting and the motor drive belt. In my experience the bottom wheel ones go first, but they'll be so cheap all bets are off on that. They _will_ be a standard bearing size. They might be pressed in, which is annoying, but any friendly local garage can probably help with that for beer tokens. The shafts are probably 12mm, so there is room for a carefully home-made L-shaped drift down the centre if necessary. Mine has internal snap rings, which makes the job a bit easier.

Any bearing made in Japan will be vastly superior to the originals - stronger and tighter tolerances. Try "The Bearing Boys" for replacements when you've read the number on the bearing rim (with a hand lens if you're me!). Also get rubber sealed ones rather than the metal cage types fitted - makes the machine much less vulnerable to sawdust and rust (they're functionally identical). While you're at it you might do the guide bearings (sealed also), but probably only to save on postage and reduce machine running noise. There are several other really good UK bearing suppliers that sell 'retail' - I just can't remember all the names at the moment.

I ditched the tensioning knob on my saw (same fitting as your original) in favour of a proper handwheel, similar to this one below. In my case the wheel came from Axminster (they don't sell them any more!), and has a 12mm through-bore, which is the same as the slotted end on the shaft mechanism. I use an M12 bolt with the head cut off (to give a round shaft) that's bolted through the handwheel. I cross drilled the unthreaded bit for an M4 thread, secured with loctite. That provides the two 'keys'. I don't possess a lathe - this was all done with a drill press a vice and a hacksaw.

I haven't yet rebuilt the threaded bit inside the mech, but probably will. The bigger handwheel makes it easy to apply more torque, and the handle makes it easy to count revolutions - I de-tension between uses, and stick a note-to-self on saying "5 half-turns!" (or whatever). The next step might be for me to add a thrust bearing, and possibly replace the threaded shaft with a bigger-diameter one that's not plated (so no risk of galling).

I'll post a pic of my wheel when I can get out to the workshop later. This is very generic and similar to mine, but doesn't have a through-hole, obviously.
04b749c0a0ea459754683ccccdd055ff93ebc38606814187e9ae40e86a81a2f6.webp
 
Thanks for reading through and responding @Eric the Viking - and I sincerely give you my very best wishes on everything being sorted for you in the hospital stay... sorry to hear the spell in Jan didn't sort things.

I'm unsure which photo of the blade you're referring to re placement? If the one above in my update of 27th the photo isn't showing the proper placement because of the angle taken. It's a 12mm/½" blade which is the max that this machine will take and is cutting true.

I totally agree regarding the bolt used supplied with the machine - the threads did 'gall' as you call it - which I'm now of the opinion was the cause of the problem in the first place. Up till then I'd had no problems at all. With the drop of tension, while running and the then fitted blade coming off + the tyre, caused the teeth to go "offset" (which I'd not then realised) and attempting to refit that blade and trying to cut again gave the cuts I mentioned in my opening post.

I'll definitely take your advice regarding the bearings 👍😊. Some of them are not the easiest to get to and set correctly... bit of a *fiddle*...

The tension bolt for this bandsaw is an 8mm. I'll check to see if I can find a wheel type handle as in you photo that's suitable for 8mm.

I am wondering if I can make an offset handle, similar to as in your photo, that will fit on to the central rectangular *top* of the new knob to make turning it easier 🤔 Shouldn't be too complicated - looking at the flat sides on the top.

Thanks again Eric - and my sincerest best wishes regards your forthcoming hospital treatment.
 
Thanks for the kind thoughts. Not exactly looking forward to it, not least as it's another 6-8 weeks of doing nothing. I may have been responsible for needing this next op - lifting things I shouldn't. Still, the Domestic Controller gave me a brilliant birthday present, a subscription to "Elements" (online magazine for landscape photographers), including the back-issues to 2021. So I have a distraction :cool:

Pics of my handwheel:

handwheel2.jpeg handwheel1.jpeg
There was a bit of fettling involved to make it fit, and I've been expecting it to come undone for several years, or at least start slipping. It hasn't.
The wheel is actually cast alloy painted black, but plastic would do fine. The head of the 12mm bolt would be at the bottom end, were it still attached. I bet you can get 'cost effective' ones from Ali Express or eBay - it's a low precision application. If I ever redo it properly, I'll do the lot, including probably an M10 thread for the main adjustment and provision for some sort of thrust bearing.

On tensioning: I did bend the indicator straight etc. when I refurbed it a while ago, but it's pretty useless. So I usually go by the musical note I can get from twanging the blade, how much I can deform it to the side, and how well it cuts on scrap, before committing to cutting anything expensive.

One thought occurs: I've previously used lithium grease on it, but I do have a very old tube of anti-seize ("Coppaslip"), which ought to work better in the application. That might be a really cheap improvement!
 
Last edited:
Easily done to over do things *before* we should... guilty of such myself in the past. Even 'present' if I'm honest... not wanting 'age' to slow me down - but now admitting to myself it is. Still trying to sort out the little workshop and getting 'distracted' from one job to another as I do stuff...

I'll pass the name of that on line magazine on to my son... He's in to his landscape photography - astrophotography being a big part of it - and has some great images over on the Flickr website. Took a lot of courage for him to get to Falmouth University to do the MNHP course (Marine and Natural History Photography) as a mature student at 30 years old. This links to his account, rather than direct to his latest image:

https://www.flickr.com/photos/jamesetchellsphotography/
Cracking photos, well worth a follow.

My Flickr

Pete
 
Last edited:
Back
Top