

Malc2098
Sequoia
While I was milling the parts for the Keepsake box on my previous WIP, I was aware of just how accurate the Kapex was and with the many toothed blade how smooth it gets the end grain on a piece.
With end stops on a home made fence, you could cut pairs to length with their ends in a finished state, well, good enough for me, anyway.
But while putting the box together, there were times when I just wanted to nip an end a bit more, and as I haven't yet built the 'proper' bench for the workshop, I had to improvise a shooting/planing board on the temporary (probably long term again!) bench I built.
So having finished the box, I decided to make a shooting/planing board.
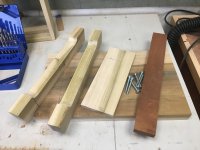
Here's nearly all the component parts. The feet were clamped together and the curves milled with a forstner bit and then the bandsaw joined the curves on each foot. The stock came from Coley's donation again, thanks Coley, I think it was the offcuts from a staircase, apart from the mahogany.
 The feet were bolted to the body from underneath with the body holes being tapped to take the bolts.
The sliding face was bolted to the feet in a similar fashion, and then adjusted to make a perfect right angle so that the sliding face and body were co-planar.

And this was the result. A bit of candlewax on the sliding face made the plane go easier.

With end stops on a home made fence, you could cut pairs to length with their ends in a finished state, well, good enough for me, anyway.
But while putting the box together, there were times when I just wanted to nip an end a bit more, and as I haven't yet built the 'proper' bench for the workshop, I had to improvise a shooting/planing board on the temporary (probably long term again!) bench I built.
So having finished the box, I decided to make a shooting/planing board.
Here's nearly all the component parts. The feet were clamped together and the curves milled with a forstner bit and then the bandsaw joined the curves on each foot. The stock came from Coley's donation again, thanks Coley, I think it was the offcuts from a staircase, apart from the mahogany.
The feet were bolted to the body from underneath with the body holes being tapped to take the bolts.The sliding face was bolted to the feet in a similar fashion, and then adjusted to make a perfect right angle so that the sliding face and body were co-planar.
And this was the result. A bit of candlewax on the sliding face made the plane go easier.

