• Hi all and welcome to TheWoodHaven2 brought into the 21st Century, kicking and screaming! We all have Alasdair to thank for the vast bulk of the heavy lifting to get us here, no more so than me because he's taken away a huge burden of responsibility from my shoulders and brought us to this new shiny home, with all your previous content (hopefully) still intact! Please peruse and feed back. There is still plenty to do, like changing the colour scheme, adding the banner graphic, tweaking the odd setting here and there so I have added a new thread in the 'Technical Issues, Bugs and Feature Requests' forum for you to add any issues you find, any missing settings or just anything you'd like to see added/removed from the feature set that Xenforo offers. We will get to everything over the coming weeks so please be patient, but add anything at all to the thread I mention above and we promise to get to them over the next few days/weeks/months. In the meantime, please enjoy!

Bog oak box

MY63

Old Oak
Joined
Oct 17, 2018
Messages
1,251
Reaction score
0
Location
North East England
My son and I are making a bog oak box for a gift, We bought some bog oak from MikeG and he advised that the checks and splits should be repaired with resin and I got some from his supplier.
This is our first resin project. This piece is the lid it has a cup but will flatten out easily with a little pressure.
My first question is do I just fill the cracks with resin or put a thin layer of resin across the top.
Thanks
 
I think you will need to overfill the cracks and then sand back when cured.
As you have a cup in the piece, I'd improvise a frame to hold it flat during the filling process to avoid the risk of a crack re-opening when you do pull it flat.

That said I've never used resin to fill voids but instead, used epoxy adhesive mixed with various cement pigments simply as I had it to hand but I expect behaviour would be similar.

Bob
 
Not my area of expertise here, but I would not pressurise the lid flat, I would fill it with resin and then when cured either plane or sand it flat.
 
MY63":1dvg5c1g said:
My son and I are making a bog oak box for a gift, We bought some bog oak from MikeG and he advised that the checks and splits should be repaired with resin and I got some from his supplier.
This is our first resin project. This piece is the lid it has a cup but will flatten out easily with a little pressure.
My first question is do I just fill the cracks with resin or put a thin layer of resin across the top.
Thanks
I’ve used a fair bit of Bog Oak for various bits n’peices. It’s great stuff but it’s very hard and very dirty and not at all like any oak you‘ve ever used before. I definitely wouldn’t try and flatten it out with pressure as it’s liable to simply crack in half - Rob
 
This is the lid piece it only has a minor cup and can be easliy flattened out by hand with little pressure.
The cracks are not huge which makes it difficult to get any araldite to flow into the gap on the test piece. I have some pouring resin which I am going to try as soon as the dye powder arrives.

2021-07-16_10-26-32 by my0771, on Flickr

My previous boxes have all been veneered or more recently wrapped in leather. I have never had to deal with end grain before.
I would like to ask the best way to fit the lid to the sides of the box. My first thought was to make a frame around the piece, then fit that to the sides.
 
Pouring resin sounds like the way forward, similar to the pore filling I've used on my recent ukuleles.

If you can find a silicone bowl scraper, from the likes of Lakeland or the big blue Swedish place, you'll find that's an efficient way of squeegeeing the resin into the grain. Squeegee in both directions along and finally across the grain with the squeegee at an angle.
 
You can frame it with more bog oak if you have enough, or a contrasting wood. Depends entirely on your finished plans.
Or, just leave the end grain as is. If you sand the end grain with a much finer grit than the flat top, then it will not stain a different colour.
 
MY63":2h7kmusp said:
This is the lid piece it only has a minor cup and can be easliy flattened out by hand with little pressure.

My previous boxes have all been veneered or more recently wrapped in leather. I have never had to deal with end grain before.
I would like to ask the best way to fit the lid to the sides of the box. My first thought was to make a frame around the piece, then fit that to the sides.

There’s only a slight bow there, so I’d be inclined to plane it flat rather that try and force it under pressure. The way I use a solid piece for the lid is to use it as a panel, so you’d need to make a groove in the box sides and a rebate all round in the lid.

Axminster do a rather nice little router table which should be just the ticket for this sort of job! :lol: :lol:

Glue the four sides of the box together with the solid lid in place then use a small bearing rebate cutter to make a recess for the base. Clean out the round corners to make them square and pop in a veneered ply base so you now have a completely solid, but hollow box.

You then saw off the lid using a bandsaw (which is the scary bit) and clean up the sawn edges using a large sheet of sandpaper(s) stuck to a dead flat surface (mdf will do). Pass the box and lid across the abrasive and it’s relatively easy to obtain an exact mating fit.

Personally, I wouldn’t bother to fill the cracks as they’re quite small and may disappear when the lid is machined for a rebate - Rob
 
I tought I would post an update on this box.
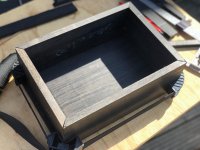
We did indeed use the little router table from Axminster to plane all of the edges and cut the grooves for the base.
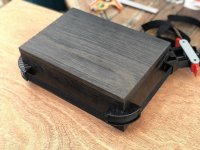
I cut all of the pieces and mitred them, using tape and a band clamp I glued the four pieces together.
When we clamped the lid piece in place it flattened out perfectly, so we glued it in place.
We decided that all of the filling with resin would be done after making the box.
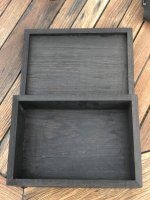
No finish has been applied as we plan to fill the cracks with resin first. I have made the lining panels to allow the tray to be made.
The pictures are reversed for some reason.

IMG_1097.jpeg

IMG_1082.jpeg

IMG_1066.jpeg

IMG_0938.jpeg
 
That's going to look pretty spectacular when you apply your finish, Michael.
 
Things have not gone to plan this year, nothing unusual there :) we are now at the point with this box where we are considering what finish to apply. Not glossy.
Any suggestions would be appreciated.
 
My goto finish is satin PU. a very slight preference tof spirit based diluted 2pt varnish to 1pt white spirit
Or if you prefer waterbased the screwfix no nonsense satin floor varnish brushed out to a thin coat.
Its fast dryijng and you could get 3 coats on in a day allowing for it to dry hard enough for de-nibbing between coats.

Bob
 
Thanks Bob, I dont have a lot of luck with finishing. I usually refer to wax of some description. I did buy some of the finish water based finished you recomended.

2021-12-27_05-47-06 by my0771, on Flickr

Here is the box with its catch and hinges fitted.
 
MY63":10rrhsvi said:
Thanks Bob, I dont have a lot of luck with finishing. I usually refer to wax of some description. I did buy some of the finish water based finished you recomended.

2021-12-27_05-47-06 by my0771, on Flickr

Here is the box with its catch and hinges fitted.

I was not sure if that photo was with the satin WB PU or raw.
It certainly look great with wax in your later photos but will be less durable I guess.
As you have some of the WBPU mybe try it out on a less critical job and see how you get on. Don't be put off by the milky white appearance in the tin.
Also if you have the 2.5 litre metal tin it will last for ages so I always decant into a plastic ex emulsion container scrupulously washed out with warm water to loosen any dried vinyl which avoid any risk of rust as well as permitting many opening/closing cycles still maintaining a good seal.

Good Luck
Bob
 
Thanks Bob as ever your advice is appreciated. The picture you mentioned was indeed the raw wood with a scraped finish.
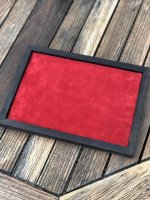
My son liked the wax finish so I have started the interior suede.
I did buy the 2.5l tin you reccomended previousley I will decant some into a suitable container.
 
I'm surprised at the (lack of) colour. I think you would see an astonishing difference if you tried a thinned oil & varnish mix, wiped off and repeated daily for a week.

Here's an excerpt from my bog oak coffee table thread:

Mike G":2lojo5cv said:
I then added a finish so that I could glue without worrying so much about cleaning up the squeeze out:

2yQMub4.png

JnJSHsD.png........
 
Thanks Mike, I have a little bit left and plan to make a small box. Could you be a little more specific about the oil varnish mix or point me to somewhere I can get the detail.
Thanks
 
Here you go:

Mike G":1nd1g5ze said:
This is the finish the legs got:

ddATGgx.png

The bog oak gets the same, but with a dark varnish rather than clear.

This 1:1:1 mixture is brushed on then wiped off after 5 to 10 minutes. That lot will dry overnight and the gluing up of the frame can happen tomorrow. If the legs seem like too much of a contrast to the bog-oak, then I'll rub them back fairly hard and apply the darker finish. Finally, the end of this drawn out build is in sight.

It has to be an oil-based varnish, not a water based one. It can be any oil, but these days I use Osmo to try to use up what I've got left. Slap the mixture on any old how, but you have to wipe it off before it goes tacky, and then leave it to dry for 24 hours. Build up as many coats as you like, but 3 for most things is enough......6 or 7 for a table top.

PS....there's a link to the original in the first "Here" of this post.
 
Mike G":fv4i2rax said:
This 1:1:1 mixture is brushed on then wiped off after 5 to 10 minutes. That lot will dry overnight and the gluing up of the frame can happen tomorrow. If the legs seem like too much of a contrast to the bog-oak, then I'll rub them back fairly hard and apply the darker finish. Finally, the end of this drawn out build is in sight.

It has to be an oil-based varnish, not a water based one. It can be any oil, but these days I use Osmo to try to use up what I've got left. Slap the mixture on any old how, but you have to wipe it off before it goes tacky, and then leave it to dry for 24 hours. Build up as many coats as you like, but 3 for most things is enough......6 or 7 for a table top.

I've just made up a small jam jar of this gloop as I had a very small amount of Osmo left in a pot. So it's one part Osmo, one part white spirits and one part part Liberon Finishing Oil (I have three tins of the stuff); stir thoroughly and apply. I've just used a cloth to put on a first thin coat with a couple more tomorrow - Rob
 
Woodbloke":18zakslw said:
Mike G":18zakslw said:
This 1:1:1 mixture is brushed on then wiped off after 5 to 10 minutes. That lot will dry overnight and the gluing up of the frame can happen tomorrow. If the legs seem like too much of a contrast to the bog-oak, then I'll rub them back fairly hard and apply the darker finish. Finally, the end of this drawn out build is in sight.

It has to be an oil-based varnish, not a water based one. It can be any oil, but these days I use Osmo to try to use up what I've got left. Slap the mixture on any old how, but you have to wipe it off before it goes tacky, and then leave it to dry for 24 hours. Build up as many coats as you like, but 3 for most things is enough......6 or 7 for a table top.

I've just made up a small jam jar of this gloop as I had a very small amount of Osmo left in a pot. So it's one part Osmo, one part white spirits and one part part Liberon Finishing Oil (I have three tins of the stuff); stir thoroughly and apply. I've just used a cloth to put on a first thin coat with a couple more tomorrow - Rob


I think these are all essentially variants of "Sam Maloof's Mixture" being 1 part solvents various and 2 parts varnish/oils various
I've used 1part white spirit and 2 parts oil based PU (rustins) very successfully on my lounge furniture projects in the last few years. I've applied by brush and brushed it out to very thin coats with a minimum of 3 coats, de-nibbing and tack clothing in between. I suspect it could have been a little faster drying if I'd wiped off the excess but I got quite adept at watching for any runs when brushing out.

Bob
 
9fingers":22i1vkux said:
I think these are all essentially variants of "Sam Maloof's Mixture" being 1 part solvents various and 2 parts varnish/oils various
I've used 1part white spirit and 2 parts oil based PU (rustins) very successfully on my lounge furniture projects in the last few years. I've applied by brush and brushed it out to very thin coats with a minimum of 3 coats, de-nibbing and tack clothing in between. I suspect it could have been a little faster drying if I'd wiped off the excess but I got quite adept at watching for any runs when brushing out.

Bob

It's just that I suddenly remembered that I had a very small amount of unused satin Osmo (the final dregs of a tin, probably half and egg cup) so I thought I'd mix up a trial batch and give it a go. The first thin coat on a gash bit of oak is already almost 'touch dry', so it looks promising - Rob
 
9fingers":1s0onwlt said:
......I think these are all essentially variants of "Sam Maloof's Mixture".....

Yes, indeed. However, I object to it being called Maloof's mixture (Americans do that all the time), on the grounds that it had been in woodworking text books a hundred years before he used it, and had probably been in common use for many years before that.
 
Mike G":8n7elbx9 said:
9fingers":8n7elbx9 said:
......I think these are all essentially variants of "Sam Maloof's Mixture".....

Yes, indeed. However, I object to it being called Maloof's mixture (Americans do that all the time), on the grounds that it had been in woodworking text books a hundred years before he used it, and had probably been in common use for many years before that.

Well I call it "Mike G's Magic Mix" as I'd never heard of Sam Maloof :lol:
 
I am a covert to this too, thanks Mike. I used the same varnish plus any old oil (tung I think) and white spirit and it built up to a lovely even finish. Just stop the coats when it looks right to your taste. Forums are great for learning stuff like this.
 
This is my little trial piece of oak, finished with four thin coats of MMM (Mike's Magic Mixture :D ), de-nibbled with some worn 600g Abranet and then give a coat of my 'go to' Swedish beeswax:
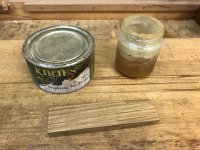
IMG_6370.jpeg

Seems to be a very pleasant, satin finish which I think I'll use a lot more in the future. As a 'Brucie Bonus', it would appear that the jar doesn't form a skin, which I found intensely irritating with pure Osmo. The jar is a very old one and the previous layers of Osmo can clearly be seen - Rob
 
Woodbloke":1pkm5evn said:
.....Seems to be a very pleasant, satin finish .......
I always reckon on the finish being one-down from the level of gloss in the original varnish. So if you use satin varnish in your mix, it will be pretty close to matt, and if, like you did, you use gloss then it will finish satin-ish. If you really want it to be glossy, then do the last coat as gloss varnish and white spirit 50/50.

The very biggest advantage in my view, Rob, is that it is pretty foolproof. It doesn't rely on brushing skill (no "tipping out"), and it doesn't need a perfectly dust-free atmosphere. So for those who have a real-world workshop rather than a separate finishing room, you can tackle this finish without worrying too much.

And yes, you're right, it doesn't skin over in the jar.
 
It keeps forever as well. I found a 20 year old jar of it in a cupboard. It was fine.
It is excellent for carvings as the last thing you want is a brush full of varnish filling up a detail.
 
Mike G":3gk3zj39 said:
... like you did, you use gloss then it will finish satin-ish.

And yes, you're right, it doesn't skin over in the jar.

I don't use gloss Osmo, so this was the last dregs of a satin tin and the finish came out satinish as well, so quite similar to the original Osmo. I also though, gave it a coat of wax over the top. The non-skinning jar is a definite 'plus point' as is the ease of application; slosh it on all over (like the great smell of 'Brute' :lol: ) wipe off the excess and repeat etc - Rob
 
No it's the varnish gloss level I was talking about Rob. I don't think the oil gloss makes any difference.
 
Woodbloke":zy6tj0k2 said:
Mike G":zy6tj0k2 said:
... like you did, you use gloss then it will finish satin-ish.

And yes, you're right, it doesn't skin over in the jar.

I don't use gloss Osmo, so this was the last dregs of a satin tin and the finish came out satinish as well, so quite similar to the original Osmo. I also though, gave it a coat of wax over the top. The non-skinning jar is a definite 'plus point' as is the ease of application; slosh it on all over (like the great smell of 'Brute' :lol: ) wipe off the excess and repeat etc - Rob
I would be interested in how the Osmo works. I still use linseed oil so if Osmo works without skinning over in the jar, that would give me more options.
 
Back
Top