• Hi all and welcome to TheWoodHaven2 brought into the 21st Century, kicking and screaming! We all have Alasdair to thank for the vast bulk of the heavy lifting to get us here, no more so than me because he's taken away a huge burden of responsibility from my shoulders and brought us to this new shiny home, with all your previous content (hopefully) still intact! Please peruse and feed back. There is still plenty to do, like changing the colour scheme, adding the banner graphic, tweaking the odd setting here and there so I have added a new thread in the 'Technical Issues, Bugs and Feature Requests' forum for you to add any issues you find, any missing settings or just anything you'd like to see added/removed from the feature set that Xenforo offers. We will get to everything over the coming weeks so please be patient, but add anything at all to the thread I mention above and we promise to get to them over the next few days/weeks/months. In the meantime, please enjoy!

Bookcase WIP - Dun

Woodbloke

Sequoia
Joined
Jul 22, 2014
Messages
7,526
Reaction score
1,648
Location
Salisbury, UK
The next big project will be a largish veneered bookcase in Oak to replace one made 35 years ago. It's a fairly straight forward build but as Mike G wanted see how to go about veneering, I'll include a blow by blow account including all the gory detail of how I go about it.

No pics as yet but I'll include some later as I'm part way through preparing the substrates - Rob
 
Great! Looking forward to this one!

Sent from my ONEPLUS A5010 using Tapatalk
 
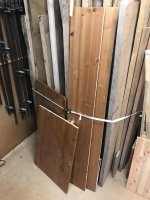
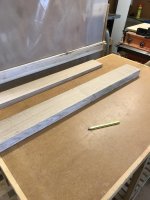
I decided on this project to use some pine boards salvaged from rubbishy old Argos bedroom furniture which I'd knocked apart last week:

IMG_2765.jpg

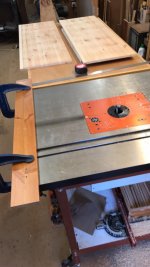
These long lengths of pine board are bone dry and pretty flat, but they were full of holes (staple & shelf pins) and it seemed a pity to waste them, so they were cut roughly to size and stuffed through the drum sander to remove the old finish and generally make them ready to accept the veneer. I removed the fence from the router table and each was milled to an exact width of 360m:

IMG_2764.jpg

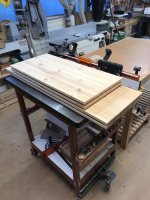
Each board was then shot in on the shooter so each pair was dead square and identical; on the top board you can see some the 'oles plugged with 6mm dowels:

IMG_2766.jpg

The short side substrate boards are then lipped with 10mm oak lippings...

IMG_2769.jpg

...and won't need lipping on the ends.

The long top and bottom boards though, do need lipping on all four edges. The first lipping is shown mitred and glued into position...

IMG_2770.jpg

...on a long side. It's much easier (though it takes longer) to glue each long side lipping individually as I can then ensure that the mitres pick up exactly on the corners of the substate - Rob
 
Andyp":23w2lsnw said:
Do you work from a sketch Rob or are you one of the CAD boys?

BTW this bookcase is gonna be huge ;) ;)
No Andy, this is a fairly straight forward project so just a sketch in my A4 pad, with a detailed cutting list. It's going to be fairly wide :shock: to accept all our really big 'coffee table' size books and our photo album cases, each of which is 33cm square. Then there's the allowance for the 6mm sliding door track, the back panel and a bit of slack in case of cock-ups :eusa-whistle: In actual fact it's not much bigger than...

IMG_2771.jpg

....than the original and will take up almost exactly the same amount of floor space as the teak one isn't pushed right into the corner of the lounge - Rob
 
The mitred end lippings are then applied individually; note that the mitre is supported on the long side as pressure is applied to the end piece. I use a good slathering of glue as long grain is being applied to end grain.

IMG_2772.jpg

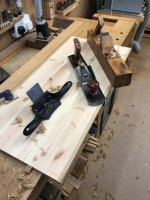
All the lippings are then cleaned up; my preferred method is a 2" wooden jack to munch off most of the material, followed by a LA bevel up and finally finishing with a No.60 scraper plane (with a cambered blade) to take of the last whispy shavings....

IMG_2773.jpg

No matter how it's done, all the lippings must end up dead level with the substrate - Rob
 
Ensure that one face and one side are planed true and square; these are the two faces that rest against the fence and the table. As each veneer is sliced off, it will then have one sawn face and one planed. Always use a new blade as well.

IMG_2774.jpg

Each time a veneer is sawn, these two faces need to be re-machined on the p/t, hence the widest veneer that can be accurately sawn is the width of the planer bed.

Check that the bs is set up accurately; blade properly aligned, as tight as it will go (max tension) square to the table and the fence also square to the table. Check also that there's no 'drift' in the fence, ie it should be parallel to the blade'

IMG_2775.jpg

IMG_2776.jpg

Take it very slow and steady when sawing; to much enthusiasm will cause the blade to go 'wibbly wobbly' and ruin the cut.

If needed, number the veneers as they're produced;

IMG_2777.jpg

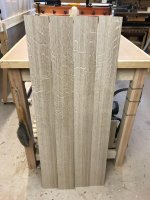
To do a really decent job, the veneers need to be drum sanded. The bandsaw will produce reasonable accurate veneers, but there's always some variation in thickness as the blade wears:

IMG_2778.jpg

Jointing next - Rob
 
I do like the rays in the cut veneers, very nice. :eusa-clap:

I think you may of typoed the scraper plane number, I think it is a number 80, a 60 in a block plane. :o
 
DaveL":23x7pgdu said:
I do like the rays in the cut veneers, very nice. :eusa-clap:

I think you may of typoed the scraper plane number, I think it is a number 80, a 60 in a block plane. :o
Indeed Dave...blame insomnia :( - Rob
 
There's been a 'hitch' :eusa-whistle: ...normal service resumed whenever :D Not bandsaw fodder quite yet - Rob
 
Just out of interest have you got movement in the old pine boards, I ask as I’ve found these to be a bugger for moving even old ones :(
 
Doug":109s0hda said:
Just out of interest have you got movement in the old pine boards, I ask as I’ve found these to be a bugger for moving even old ones :(
Nope, these were from an old Argos bedroom suite that I dismembered a couple of weeks ago. They'd been in the house for at least fifteen years and were as dry as a dry thing :D - Rob
 
Finally caught up with this (I've been abroad). Thanks for doing this WIP, Rod. So far, it's relatively straightforward, given a decent bandsaw blade. Given my lack of a sanding machine, Is the alternative to lay the planed face down, and plane the upper face afterwards (when the glue has dried)?
 
That’s what I do Mike, using double sided tape to hold it onto another board whilst passing through the PT . The “mother” board is put through the PT to get a good surface again before cutting a new veneer.

Rod
 
Mike G":3tmnafm4 said:
Finally caught up with this (I've been abroad). Thanks for doing this WIP, Rod. So far, it's relatively straightforward, given a decent bandsaw blade. Given my lack of a sanding machine, Is the alternative to lay the planed face down, and plane the upper face afterwards (when the glue has dried)?

I guess it depends on how big the piece is, but if you are using multiple veneers I can't see that working well. I used to prepare one face using the p/t and then place that against the fence on the bandsaw to cut a veneer. The remaining "mother" board would go through the p/t again to take off just enough to get another good surface and I'd cut another veneer until I had what I needed. When I had enough veneers cut for the job I'd put them on an mfc sled. That had a thin piece of veneer glued to the surface at 90 deg across one end as a "stop" and then I'd pass all the veneers through the p/t until I had a smooth surface. Remember that they all have to come down to the thickness of the thinnest veneer.

In practice, I found that anything much less than 2mm thick would sometimes break up in the p/t which would be a real bummer if you're book matching! With hindsight, I think a sled with one surface covered with (say) 160 grit alum oxide paper would have gripped the veneer better. Whilst I like the sound of Rod's double sided tape idea, I would be nervous about splitting the veneer when removing it from the sled. Once everything is glued down it was just a case of cleaning up the joints with a cabinet scraper and run a ROS over the whole thing.

As I mentioned in the sunburst table thread, a drum sander is a real "game changer" when you're veneering as this will take veneers down to 0.5mm if you're careful. Rob and I have Jet 16-32's which are fabulous bits of kit, and come up on Ebay and Gumtree reasonably regularly for around £750. With all the dosh you've saved on your "BIG BUILD" you must have earned one by now! :eusa-dance: :lol:
 
RogerM":1o60qwiy said:
............. a drum sander is a real "game changer" when you're veneering as this will take veneers down to 0.5mm if you're careful. Rob and I have Jet 16-32's which are fabulous bits of kit, and come up on Ebay and Gumtree reasonably regularly for around £750. With all the dosh you've saved on your "BIG BUILD" you must have earned one by now! :eusa-dance: :lol:

:lol: :lol: I like my workshop to have plenty of free floorspace. More kit? Not sure.......
 
Mike G":2z3jhk14 said:
RogerM":2z3jhk14 said:
............. a drum sander is a real "game changer" when you're veneering as this will take veneers down to 0.5mm if you're careful. Rob and I have Jet 16-32's which are fabulous bits of kit, and come up on Ebay and Gumtree reasonably regularly for around £750. With all the dosh you've saved on your "BIG BUILD" you must have earned one by now! :eusa-dance: :lol:

:lol: :lol: I like my workshop to have plenty of free floorspace. More kit? Not sure.......

Floorspace? Yeh - I'm goin' to get me one of them! Got about 450 sq ft at the moment. Another 800 sq ft would just about do it! :lol:
 
Mike G":pnij5xxa said:
RogerM":pnij5xxa said:
............. a drum sander is a real "game changer" when you're veneering as this will take veneers down to 0.5mm if you're careful. Rob and I have Jet 16-32's which are fabulous bits of kit, and come up on Ebay and Gumtree reasonably regularly for around £750. With all the dosh you've saved on your "BIG BUILD" you must have earned one by now! :eusa-dance: :lol:

:lol: :lol: I like my workshop to have plenty of free floorspace. More kit? Not sure.......
If you're going to get one more bit of kit, then a drum sander has GOT to be it. I don't know how the bloody hell I ever managed without one!

Edit - the gaff was in the support offered to the mdf baseboard inside the bag. It was insufficiently supported and was bowing under it's own weight; hence anything inside the bag was taking on the same shape as the baseboard. Reverse cramping the affected components has all but eliminated the 'bow'. I've spent the last 24hrs making a much more substantial supporting frame for the baseboard which ought to prevent it from bowing - Rob
 
Mike G":nb1zlnxu said:
Finally caught up with this (I've been abroad). Thanks for doing this WIP, Rod. So far, it's relatively straightforward, given a decent bandsaw blade. Given my lack of a sanding machine, Is the alternative to lay the planed face down, and plane the upper face afterwards (when the glue has dried)?
Yep, you can do that, but then you're a bit stuck if you want to bookmatch the veneers as one of them will have to go sawn side down. This isn't a grand idea 'cos there will be all sorts of cavities and spaces on the sawn face which may prevent a decent bond, but you can in some way circumvent this issue by using plenty of glue - Rob
 
Once you've sorted out the pattern for the veneers, use a cabinetmaker's triangle to indicate which way they're laid.
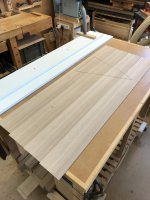
IMG_2779.jpg

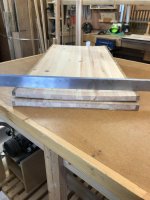
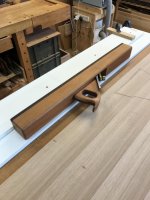
Each pair of mating edges then need to be made dead true, straight and square. I use a veneer shoot (two bits of melamine faced chipboard screwed together) and...
IMG_2780.jpg

...'Big Woody' with a 71cm Greenheart sole. Make sure the plane's cutter is dead square and true across the width of the sole...no camber! The other way to do this is to use a known straight edge (ie the edge of a bit of mdf fresh from a 'shed') and bearing cut the veneers with a router.

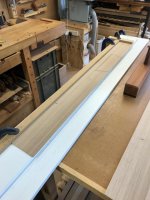
I cramp a couple of supports to the shoot to stabilise the veneer as the edge is being planed.
IMG_2782.jpg

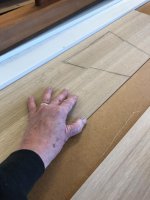
To test for a fit, lay one piece against the shoot and offer the second piece up to it, testing with finger pressure to check for a high spot (the two pieces will pivot) or a minute gap in the middle (MkI eyeball needed). Plane and adjust taking a fine shaving or two where required until the joint line is perfick :D. Repeat for all the joints in the lay-up.
IMG_2783.jpg

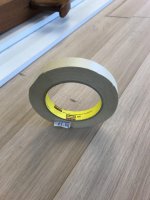
Use a really good quality, very stretchy tape to pull the joints together. I use Scotch...
IMG_2785.jpg

...which is great, but Tesa and 3M are equally as good. Do NOT under any circumstances attempt to use el cheapo, light tack, decorators tape...parsimonious is not what you need to be :D

Butt the first section against the shoot and stick a goodly piece of tape to the second, then really pull the tape towards the shoot, stretching it as far as it will go, stick down and then use a roller to make sure that the tape is fully down:

IMG_2786.jpg

Repeat the process all the way along the joint:
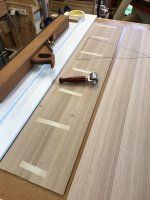
IMG_2788.jpg

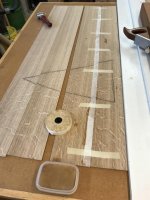
To complete the joint, use some proper gummed veneer tape along the length. This will shrink as it dries and pull the joint even more 'righty tighty'; the reason for using tape along the length will be shown in the next thrilling instalment :lol: Note the wet kitchen sponge in a plastic pot, used for wetting the sticky side of the veneer tape:
IMG_2789.jpg

Finally, repeat for all the joints in the lay-up:

IMG_2790.jpg

You can also use a single piece of 3M tape each time to pull all the leaves together in one 'hit' rather than do the joints individually as shown.

Gluing next - Rob
 
I know gluing comes next, so I'm jumping the gun a bit, but is there any glue on the joint between veneer pieces?
 
Mike G":byyv9t4s said:
I know gluing comes next, so I'm jumping the gun a bit, but is there any glue on the joint between veneer pieces?

Patience Mike, all will be revealed :lol: - Rob
 
Mike G":1uullw5g said:
I know gluing comes next, so I'm jumping the gun a bit, but is there any glue on the joint between veneer pieces?

:eusa-think: Knowing Rob's a keen reader of Mr Ingham, I'd say there's a VERY good chance Mike :D

It's an excellent method, particularly on the thin stuff around 0.5mm...no more tears, a perfect joint (assuming it's well shot).


Great stuff so far Rob 8-)
 
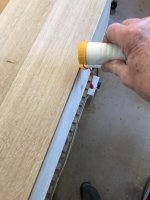
The glue-up is straightforward, provided as always that everything is organised before hand. Lay the veneer lay-up on the gluing table so that the first section hangs over the edge; the small Gluebot is ideal to run a tiny bead of glue along the joint, then repeat for all the others hanging each joint over the edge in turn:

IMG_2808.jpg

Next lay the complete lay-up on the table and apply a goodly coating of glue on the substrate, remembering to spread the glue over every part, especially the edges and corners:

IMG_2811.jpg

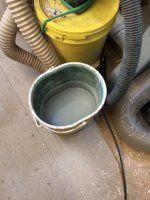
Drop whatever tool you've been using to spread the glue into a bucket of water on the floor; this means you've then got a fighting chance of removing the glue ready for the next lay-up:

IMG_2813.jpg

Slide the job into the vacuum bag, veneer side down. Note that I've used some blue tape to secure it at the corners; this stops the lay-up from sliding around as it's positioned in the bag. With my set up, I use an additional very large ordinary plastic bag inside the AirPress polyurethane one, which means that any 'squeeze out' is deposited on the plastic bag rather than the AirPress one. The 125micron thick plastic bag also gives an extra measure of protection on sharp corners. Not really needed though as the AirPress bag is 600microns thick:

IMG_2814.jpg

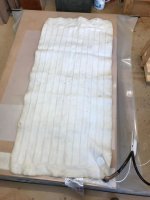
To speed up the curing time in the bag, I usually add a bit of top heat via a single 'leccy blanket:

IMG_2797.jpg

...and to make it extra toasty, one of the kid's old duvet's goes over the top as well:

IMG_2798.jpg

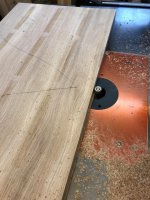
I generally leave it in the bag under full suckage for around two hours, after which the job is removed, most of the excess veneer is trimmed off on the bandsaw and the remainder is bearing cut on the router table:

IMG_2799.jpg

The masking tape can be peeled off and the easiest way to remove the veneer tape is to wet it with a sponge and then scrape off with a card scraper, provided you've used a fully waterproof glue!

When the first couple of bits came out the bag, they'd taken on an alarming bow :shock:, which was caused by the baseboard inside the bag bowing due to lack of support:

IMG_2800.jpg

With very careful and gradual reverse cramping over some 36 hours, the bowing was straightened out but in order to ensure the baseboard was adequately supported for further work, I made a much more substantial support for the bag:

IMG_2817.jpg

Cleaning up and glass runner grooves next - Rob
 
Great stuff Rob! What glue are you using for sticking down the veneer? If one of the TBs, do you find it difficult to work quickly enough without it "skinning" over?

Also what is your reason for placing the workpiece in the bag veneer down. I have always gone veneer side up so that I can see that nothing has moved, and it also gives me one last chance to run over the joins with a small roller just in case one or more of the veneers is not "flush" with its neighbour.
 
9fingers":2br5yza0 said:
Rob,
Do you think any of your "warpage" is down to an impervious layer of glue on one face of the substrate and open to the "elephants" on the other face?

Bob

Nb endeavouring to pose the question in your style of writing :lol:

:lol: Possibly Bob, but I put a straight edge across the the baseboard and it had more or less the same amount of bowage as the job when it came out, so being good at sums, I put 2+2 together and assumed that this was the cause of the warpage

RogerM":2br5yza0 said:
Great stuff Rob! What glue are you using for sticking down the veneer? If one of the TBs, do you find it difficult to work quickly enough without it "skinning" over?

Also what is your reason for placing the workpiece in the bag veneer down. I have always gone veneer side up so that I can see that nothing has moved, and it also gives me one last chance to run over the joins with a small roller just in case one or more of the veneers is not "flush" with its neighbour.

Forget that 'murrican TB crap Rog, Everbuild D4 is the stuff you need. Fully waterproof, equally as good as TB3 and I can buy a litre locally for less than a fiver. If the veneer is placed 'upside' in the bag, the vacuum generated inside the bag will pull the veneer down over the edge and crack (you literally do hear a loud 'crack') great big chunks off along the lipping. I suspect that if you're able to lay them veneer side up in your bag it probably isn't pulling enough suckage...dunno. The AirPress pump pulls an incredible vacuum and the needle on the gauge goes way past the max setting. If you've pulled the joints together 'righty tighty' with good quality masking tape and used veneer tape along the joint, the glue line will be (assuming the veneers have been shot in correctly) invisible - Rob
 
Woodbloke":195f4vma said:
Everbuild D4 is the stuff you need. Fully waterproof, equally as good as TB3 and I can buy a litre locally for less than a fiver.

Thanks for the glue tip Rob. I'll get some.

Woodbloke":195f4vma said:
If the veneer is placed 'upside' in the bag, the vacuum generated inside the bag will pull the veneer down over the edge and crack (you literally do hear a loud 'crack') great big chunks off along the lipping. I suspect that if you're able to lay them veneer side up in your bag it probably isn't pulling enough suckage...dunno. The AirPress pump pulls an incredible vacuum and the needle on the gauge goes way past the max setting. If you've pulled the joints together 'righty tighty' with good quality masking tape and used veneer tape along the joint, the glue line will be (assuming the veneers have been shot in correctly) invisible - Rob

I don't think I have a pump problem. The bag compresses the breather fabric as tight as a ducks bum. :lol: I've been veneering my substrate before cutting it to its' final size, so the veneer has never overhung the edge. I can see that if it did, placing it upside down on a board inside the bag as you have done is the way to go. In fairness, I've never really had a problem with veneer gluelines failing, but I get paranoid about these things, particularly when there are a lot of them.
 
Interesting, Rod.

I wouldn't be surprised if the cupping were to do with heat and wet glue being applied to one side of the board and not to the other. An experiment where you varnish the underside first, then sandwich the work between 2 electric blankets, would give a bit more of a clue, I guess.
 
RogerM":3j3iy3pa said:
[I've been veneering my substrate before cutting it to its' final size, so the veneer has never overhung the edge.

In that case you're braver than wot I am Rog :D Even if it overhangs by the merest few mm or so, it'll crack off. There is a simple way to apply pressure veneer side up and have some overhang, which I may do for the shelf later, but having some spare veneer which is bearing cut away means that you can be a lot more accurate with where the board edge should be. If your veneer is even slightly inside the edge and the lipping is showing when it comes out the bag, you're somewhat 'fubar'd' :(

Mike G":3j3iy3pa said:
I wouldn't be surprised if the cupping were to do with heat and wet glue being applied to one side of the board and not to the other

It could be but this sort of thing hasn't happened in the past; it's too much of a coincidence that the baseboard had a noticeable bend in it which the new stand has now corrected - Rob
 
Woodbloke":2by6ingi said:
RogerM":2by6ingi said:
[I've been veneering my substrate before cutting it to its' final size, so the veneer has never overhung the edge.

In that case you're braver than wot I am Rog .......

If I'm following what Roger is saying, then I don't think he is. He seems to me to be using an over-sized substrate, and applying oversized veneers, and is simply cutting back afterwards.
 
Mike G":2393t3mn said:
Woodbloke":2393t3mn said:
RogerM":2393t3mn said:
[I've been veneering my substrate before cutting it to its' final size, so the veneer has never overhung the edge.

In that case you're braver than wot I am Rog .......

If I'm following what Roger is saying, then I don't think he is. He seems to me to be using an over-sized substrate, and applying oversized veneers, and is simply cutting back afterwards.

Yes, I see where you're at Mike; that would work but on a couple of these panels (top n'bottom) they've been lipped and mitred at the corners to pretty much the size required (bar a few shavings to clean up) so it's much trickier to make them oversize and then cut them back to the required dimension as I then may loose the definition on the mitred corners.
FWIW, it's 'normal' practice to make the substrate the required size, veneer top and bottom, then clean up - Rob
 
Woodbloke":2hltmqxc said:
FWIW, it's 'normal' practice to make the substrate the required size, veneer top and bottom, then clean up - Rob

Since when have you ever known me to approach things the "normal" way Rob?! :lol:

With mitred corners I can see why you veneer on top of a completed substrate, apart from the final clean up. When I'm confronted with a similar problem I'll go back to scratching my head. It just goes to show though that there are always several ways to approach a problem, and if yours works for you - why fix it? :eusa-dance:

Great thread, this, Rob. I love the learning process!
 
RogerM":1uao4pb9 said:
Woodbloke":1uao4pb9 said:
FWIW, it's 'normal' practice to make the substrate the required size, veneer top and bottom, then clean up - Rob

Since when have you ever known me to approach things the "normal" way Rob?! :lol:

That's why I writ normal as 'normal' Rog :lol: - Rob
 
Woodbloke":2xm7gp6v said:
........FWIW, it's 'normal' practice to make the substrate the required size, veneer top and bottom, then clean up - Rob

I guess you could support the overhangs on scraps from the substrate, maybe wrapped in plastic or tape.

Tell me, with this enormous clamping pressure is squeeze-out a big issue? I mean, if glue found its way out through a weakness in a veneer, or through a join, it could make something of a mess, couldn't it.
 
Mike G":1xdvi9hi said:
Woodbloke":1xdvi9hi said:
........FWIW, it's 'normal' practice to make the substrate the required size, veneer top and bottom, then clean up - Rob

I guess you could support the overhangs on scraps from the substrate, maybe wrapped in plastic or tape.

Tell me, with this enormous clamping pressure is squeeze-out a big issue? I mean, if glue found its way out through a weakness in a veneer, or through a join, it could make something of a mess, couldn't it.

Mike - I don't think support from scraps would really work. Best to do as Rob recommends and place the work veneer down on to a larger board, all within the vacuum bag and with a sheet of plastic separating them, to act as support all the way around. Or do as I have done and have an oversize substrate and cut to size after the veneering has been done so that there is no overhang.

A vacuum bag will exert around 10 tons of pressure per sq metre, so if there is excess adhesive it will squeeze out! Spreading adhesive evenly is the key. I have used a foam roller for PVA type glues, or a fine toothed spreader when using Epoxy Resin as in my Sunburst Table thread. If the squeeze out is around the edges it is not usually a problem. If it squeezes out through small knot holes or pores in the wood then it can be a problem, depending on the finish planned. If your joints are good, it shouldn't squeeze out at that point - but if there is a lot of excess glue it will find a way!
 
Back
Top