• Hi all and welcome to TheWoodHaven2 brought into the 21st Century, kicking and screaming! We all have Alasdair to thank for the vast bulk of the heavy lifting to get us here, no more so than me because he's taken away a huge burden of responsibility from my shoulders and brought us to this new shiny home, with all your previous content (hopefully) still intact! Please peruse and feed back. There is still plenty to do, like changing the colour scheme, adding the banner graphic, tweaking the odd setting here and there so I have added a new thread in the 'Technical Issues, Bugs and Feature Requests' forum for you to add any issues you find, any missing settings or just anything you'd like to see added/removed from the feature set that Xenforo offers. We will get to everything over the coming weeks so please be patient, but add anything at all to the thread I mention above and we promise to get to them over the next few days/weeks/months. In the meantime, please enjoy!

Box help please

MY63

Old Oak
Joined
Oct 17, 2018
Messages
1,251
Reaction score
0
Location
North East England
I like making boxes but had to stop a few years ago now I have a workshop and more importantly a bandsaw I can make them again.
As it is sometime since I made one I have started with a practice box.
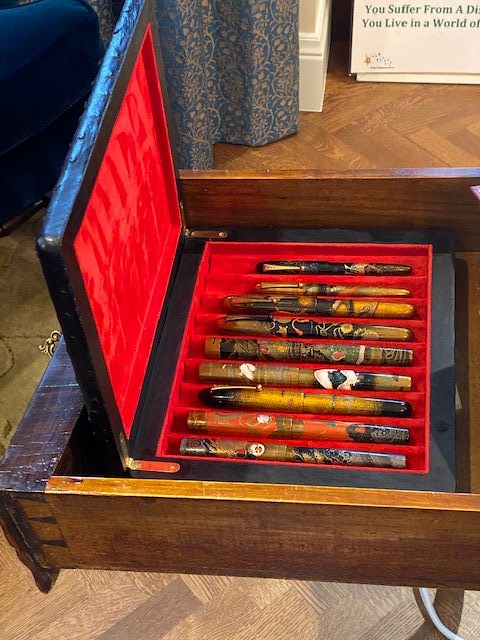
This one is quite unusual it is for some special Japanese fountain pens called Namiki Emperor's.

2019-11-20_03-31-39 by my0771, on Flickr

This is where I am at the box is made and the lid is covered.

2019-11-20_03-31-58 by my0771, on Flickr

The leather is ostrich hide from South Africa the orange is an off cut so I am using it to test its forming properties.
The leather has been soaked and stretched around the shaped lid and glued in place this is where I could use some help.
I want to cover the MDF frame and the edge of the leather with some oak I needed 15mm x 2mm but could not find any so I cut some as thin as possible on my bandsaw 3mm x 15mm was as thin as I could get it to cut.

2019-11-20_10-13-01 by my0771, on Flickr

I now need to fit the oak cover pieces to the MDF no screws or nails just glue BUT and there is always a but I cant put any pressure on the leather as it marks easily.
Obviously it would have been better to fit the oak first but I needed to pull the leather over the inside of the lid to get the corners without any rucks or folds.
Any advice on glue and methods of holding it all together while the glue goes off.
Thanks
Michael
 
No mechanical fixing, and no clamping. Boy, Michael, you've set quite a challenge there.

In the real thing, you could make that whole lipping/ edge piece out of oak, which should get rid of this detail altogether. But for this version, if you glue it and weight it down from above uniformly, would that be OK? The alternative is a vacuum bag. Sticky tape, such as Duck tape, can be surprisingly effective as a clamp, but you'd have to test whether it damaged the leather.

Your ostrich skin will almost certainly have originated in or around Oudtshoorn (pronounced oats horn) in the Little Karoo, in the Western Cape of SA, the world centre for ostrich farming. When feather boas were a thing this place was very rich indeed.
 
Thanks Mike I realise this is quite difficult.
The way this leather is applied means the lip cannot be there when the leather is applied it is pulled tight over the edges to allow the contact adhesive to dry. This leather is quite flexible when wet when it dries out it will hold the shape.

2019-11-21_07-28-09 by my0771, on Flickr

2019-11-21_07-27-53 by my0771, on Flickr

As with all leather now I can trace the country of origin by the label I only have 2 partial hides as this stuff is really expensive.

2019-11-21_07-25-41 by my0771, on Flickr

I have been thinking overnight do you think if I screwed some small strips across the inside of the lid to hold the pieces in place while the glue dries.
Contact adhesive or tight bond type glue ?
 
But that would leave holes in your leather. But you can apply the same idea secured in a different way.

Folding wedges are your friend.

folding wedge.jpg

Glue up and fit your leather as appropriate. Tighten it by using some small lengths of wood (A) inside the box and keep them in place (and pressure applied) by another piece or pieces (B) at right angles and wedged to apply outward pressure forcing (A) to keep the leather in place while the glue goes off. Even one wedge at each end would probably suffice.

If you make (B) thin enough (but still strong enough not to flex too much as the wedges are put in place) then you a have a second set of (A) to apply pressure to the other two sides of the box.
 
Personally I’d fix the Oak with 23 gauge headless pins, you can get them as short as 10mm & are barely visible once fired in, they will hold it while the glue goes off & would be the quickest way I could think of doing this.
 
Get a bay of dry sand - play sand is good as it is very fine. Place the lid upside down on the bag of sand, which will adapt to the shape of the lid and allow even pressure. You can then glue the lipping and add weight from above to compress the lipping while the glue sets. Should not mark the leather as the pressure is even and over the entire surface.
 
How about...? A combination of 'Mitre mate' (super glue + activator) for the initial grab and PVA (or other) for long term security. Applied to the same piece, but not mixed - iykwim

This is what I might do if I can't use a clamp

Jim
 
Thanks everyone some great ideas.
Normally I would thin down the leather to a feather edge and fold it around.
This leather will not do that it is full of feather follicles and is very uneven, trying to thin it down just makes holes.
I am going to buy a bag of play sand this morning I think this will help with lots of projects especially if I add some thin goat skin over the top.

I am now thinking maybe I should think about this in a different way. This is purely decorative to cover the edges of the leather I am thinking veneer might be sufficient.
 
Hi Andy
The leather is glued to the lid of the box the veneer is purely decorative. This leather has been drum dyed so both sides are orange however the inside is undyed if you looked at it closely you would see the natural leather colour in the centre of the orange.
So the veneer covers the edge of the MDF and also covers the unfinished edge of the leather.

I would like to get hold of some thicker veneer maybe 1mm thick as close to black as possible for the next box which is going to be covered in black ostrich leather.
If anyone could suggest a supplier.
 
I thought I would share the final stages of this box making project. I think I ended up with three trial or maybe four. Anyway with the last trial box I discovered the hinges were not going to fit partly because the wood was too thin and my radiused corners were too round if that makes sense.
So I started over with thicker MDF and a smaller radius.
This is where I am now.

2019-12-05_08-52-26 by my0771, on Flickr

Ostrich leather glued firmly in place ready for trimming.
 
Absolutely fascinating work, Michael. I can't even begin to think how you do that wonderful leather work. :eusa-clap: :eusa-clap:
 
Thanks guys

These are my preferred hinges www.fineboxhardware.com are the supplier although they are having some supply issues at the moment.
The hinges have a built in stop and look great if anyone knows a supplier of similar hinges with stock pleas let me know.

2019-12-04_07-36-46 by my0771, on Flickr

This is my issue the corner of the hinge sticks out past the curve of the corner and obviously there is not enough wood for the size of the hinge.

2019-12-06_07-45-03 by my0771, on Flickr

I have had an offer for this box and would like to find a hinge with a built in stop I have considered a piano hinge but I would need to create something to stop the lid opening too far.
 
MY63":1k5j7e83 said:
...... I would need to create something to stop the lid opening too far.

A strip of leather, perhaps?
 
Clearly those type of hinges from Ian Hawthorne can't be used on this type of box. For info, I believe Andrew Crawford first made this type of hinge which was copied shortly after by Ian...both are very good indeed. For this application, have a look at the small Brusso brass butt hinges on the Classic Hand Tools site.
You'll need to part with an arm and a leg, but they're worth it...don't though, use the nasty brassish screws that they're supplied with.

If the corner was square, you would definitely have enough thickness of wood to fit Ian's hinges.

For a 'stop' simply plane a small chamfer on the back of the lid/box and inset the hinge a fraction - Rob
 
Thanks Mike suede is my usual go to for boxes but not for this one as I was asked to do something different.

IMG_3748 by my0771, on Flickr

@woodbloke I have followed Andrew for many years unfortunately he to seems to have issues with stock as well. I don't know which one was first but I would agree they are very similar. Especially as they are both unavailable.
I will look closely at the Brusso hinges thank you the price is about what I was expecting to pay I appreciate the advice on the screws do you have a supplier for good quality brass screws ?

Thanks AndyP I will have a look at barrel hinges thanks.

Thanks StevieB I am not to worried about the price for this job have you seen how much ostrich leather is compared to that the hinges seem quite reasonable :D
 
MY63":19l8ij72 said:
....
I will look closely at the Brusso hinges thank you the price is about what I was expecting to pay I appreciate the advice on the screws do you have a supplier for good quality brass screws ?

....

Michael, I'm probably teaching grandma to suck eggs but do you drill pilot holes especially in hardwood first or, better still, create a thread using a steel screw of same size etc first ?
 
MY63":1g5i5syv said:
Thanks Roger I knew about pilot holes but using a metal screw before the brass makes sense.
When I worked for Ax a few years ago I penned this little missive on brass screws which you might find useful. Or not, as the case may be - Rob
 
Woodbloke":3717yt5d said:
MY63":3717yt5d said:
Thanks Roger I knew about pilot holes but using a metal screw before the brass makes sense.
When I worked for Ax a few years ago I penned this little missive on brass screws which you might find useful. Or not, as the case may be - Rob


:text-goodpost:

Bookmarked.
 
RogerS":2uf4o732 said:
Woodbloke":2uf4o732 said:
MY63":2uf4o732 said:
Thanks Roger I knew about pilot holes but using a metal screw before the brass makes sense.
When I worked for Ax a few years ago I penned this little missive on brass screws which you might find useful. Or not, as the case may be - Rob


:text-goodpost:

Bookmarked.
Thanks Rog - Rob
 
I haven’t used slotted screws for many years. Sadly I’ve got too many in stock to ignore at times but I dislike both Philips and Pozidrive screws as well. I much prefer using Robertson Screws.
 
I thought I would share some pictures of this box in its final stages.
The inside is the last part of this project artists gray board around 0.5 mm thick is cut into strips and wrapped in suede before being glued in place. I should be using double sided tape rather than glue but I find the tape difficult to use.

2019-12-18_09-17-51 by my0771, on Flickr

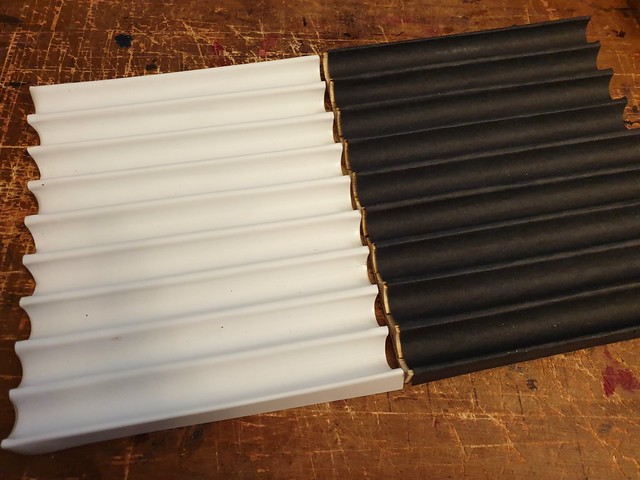
When I started this project I made the slots for the pens then built the box around it.

2019-11-14_02-15-40 by my0771, on Flickr

This is a fairly expensive and time consuming method of making these trays. I now have an adapter to use my Makita palm router with my guide rails so my plan is to use that in future.
As I need to wrap the wood in suede it needs to be smooth rather than spend hours sanding I just cover the wood with a light card.

2019-12-19_07-47-56 by my0771, on Flickr

My plan is now to use a high impact polystyrene which I can mould which will save me a lot of time and is 25% of the cost.

2019-12-19_07-48-09 by my0771, on Flickr

This is what it looks like when it is wrapped in suede and fixed in place.

2019-12-18_09-18-55 by my0771, on Flickr

The Lady who does the turning demonstrations at my local Axminster store made the pen blank for me so I can make sure they fit. Unfortunately I cannot afford the actual pen so the blank will do.
I have added a link to the mid price fountain pen those of a nervous disposition should be seated :)

https://www.gouletpens.com/collections/ ... 7442605099
 
Woodster":1vtkqjwy said:
I haven’t used slotted screws for many years. Sadly I’ve got too many in stock to ignore at times but I dislike both Philips and Pozidrive screws as well. I much prefer using Robertson Screws.
I've not seen any steel slotted screws either, but I do hoard a 'baccy tin of odd sizes. I dislike Pozidrive as well but I've got too many to chuck away but my preference is for Torx - Rob
 
Woodbloke":1kmr8f6c said:
MY63":1kmr8f6c said:
I have added a link to the mid price fountain pen those of a nervous disposition should be seated :)

https://www.gouletpens.com/collections/ ... 7442605099
Sound advice...and I thought Montblanc were spendy! - Rob

Thanks Rob

Maybe you are looking at the wrong Montblanc pens I made a case for a pair of these a year or two ago they come in coral and noir a really dark brown.
 
Back
Top