
-
Hi all and welcome to TheWoodHaven2 brought into the 21st Century, kicking and screaming! We all have Alasdair to thank for the vast bulk of the heavy lifting to get us here, no more so than me because he's taken away a huge burden of responsibility from my shoulders and brought us to this new shiny home, with all your previous content (hopefully) still intact! Please peruse and feed back. There is still plenty to do, like changing the colour scheme, adding the banner graphic, tweaking the odd setting here and there so I have added a new thread in the 'Technical Issues, Bugs and Feature Requests' forum for you to add any issues you find, any missing settings or just anything you'd like to see added/removed from the feature set that Xenforo offers. We will get to everything over the coming weeks so please be patient, but add anything at all to the thread I mention above and we promise to get to them over the next few days/weeks/months. In the meantime, please enjoy!
You are using an out of date browser. It may not display this or other websites correctly.
You should upgrade or use an alternative browser.
You should upgrade or use an alternative browser.
Box help please
- Thread starter MY63
- Start date


chataigner
Old Oak
- Joined
- Jul 23, 2014
- Messages
- 1,127
- Reaction score
- 55
Woodbloke":m3jqs66a said:...edited...
If the corner was square, you would definitely have enough thickness of wood to fit Ian's hinges.
For a 'stop' simply plane a small chamfer on the back of the lid/box and inset the hinge a fraction - Rob
Yes........but the screw hole at the pivot end tends to land in the mitre joint - not advisable. The hinges are great, but I would hesitate on a mitred box.
MY63
Old Oak
My friend is a pen dealer and wants some new boxes to transport his wares around the world.
 2020-01-03_10-08-43 by my0771, on Flickr
This is what he currently uses which work well but are difficult to get hold of. The tray has a lip top and bottom so they are stackable.
I usually make trays from hardwood and mitre the corners joining them with glue, However my trays are usually for indoor use as opposed to travel.
I am seeking advice on which wood to use hardwood or maybe mdf I had considered laminating a 3mm piece and a 6 mm piece offset to create the lip at the top and bottom which would save a few hours with the router.
As weight is an issue I plan to paint them do you think the Bedec barn paint would be suitable as a rugged finish is required.
Thanks in advance.
2020-01-03_10-08-43 by my0771, on FlickrThis is what he currently uses which work well but are difficult to get hold of. The tray has a lip top and bottom so they are stackable.
I usually make trays from hardwood and mitre the corners joining them with glue, However my trays are usually for indoor use as opposed to travel.
I am seeking advice on which wood to use hardwood or maybe mdf I had considered laminating a 3mm piece and a 6 mm piece offset to create the lip at the top and bottom which would save a few hours with the router.
As weight is an issue I plan to paint them do you think the Bedec barn paint would be suitable as a rugged finish is required.
Thanks in advance.
StevieB
Nordic Pine
My gut reaction would be no. If these are being sold around the world, and we have seen from links the price of some of these pens, then toting them round in an MDF painted tray is not going to show them off in their best light. Just my opinion, but something in nice hardwood would be much more preferable. Even if you are just making a transport carrier, the whole package needs to reflect the quality of the merchandise inside (unless you are deliberately trying to disguise this fact)
MY63
Old Oak
Thanks StevieB
I think you are right they should be made from a hardwood. this is a mates rates so I need to keep the cost in mind.
I would love to make little dovetail joints but I think that maybe beyond my abilities at this time.
Box joints look like a possibility can they be cut with a router table ?
I think you are right they should be made from a hardwood. this is a mates rates so I need to keep the cost in mind.
I would love to make little dovetail joints but I think that maybe beyond my abilities at this time.
Box joints look like a possibility can they be cut with a router table ?
MY63
Old Oak
I am having a rethink on these trays I will try to explain the total height is 33 mm I need a 5 mm grove top and bottom to allow them to stack and 3 mm in the bottom for the base.
This should give me 25 mm inside height. When I have tried making box joints I have had to mitre the top 5 mm and bottom 8mm leaving the 20 mm to get the box joints in which I have found very difficult to do.
So I am going back to mitres with slots for horizontal pieces of wood cut into them.
I usually make my tray moulds from scotia moulding but it works out expensive. I have glued some ply together to cut slots in but the ply is spitting can anyone tell me if MDF would be better.
 2019-11-02_06-41-36 by my0771, on Flickr
This should give me 25 mm inside height. When I have tried making box joints I have had to mitre the top 5 mm and bottom 8mm leaving the 20 mm to get the box joints in which I have found very difficult to do.
So I am going back to mitres with slots for horizontal pieces of wood cut into them.
I usually make my tray moulds from scotia moulding but it works out expensive. I have glued some ply together to cut slots in but the ply is spitting can anyone tell me if MDF would be better.
2019-11-02_06-41-36 by my0771, on Flickr
- Joined
- Jul 21, 2014
- Messages
- 10,414
- Reaction score
- 164
Those inserts are going to be quite tricky to make in almost any timber as they are so thin at the bottom of the channel.
I'd make them in pairs back to back to keep the strength up whilst routing the semi circle. Finally rip along the length.
Another thought would be to make the insert profile and the box base as the same item. This gives you much more strength at the bottom of the channel.
With a bit of care and planning, gluing two thin strips across the end grain of the base will complete the tray.
Bob
I'd make them in pairs back to back to keep the strength up whilst routing the semi circle. Finally rip along the length.
Another thought would be to make the insert profile and the box base as the same item. This gives you much more strength at the bottom of the channel.
With a bit of care and planning, gluing two thin strips across the end grain of the base will complete the tray.
Bob
MY63
Old Oak
Sorry Bob I don't think I have given you enough information the wood is the mould I have just been out to get a picture.
The actual piece that goes in the tray will be formed in plastic.
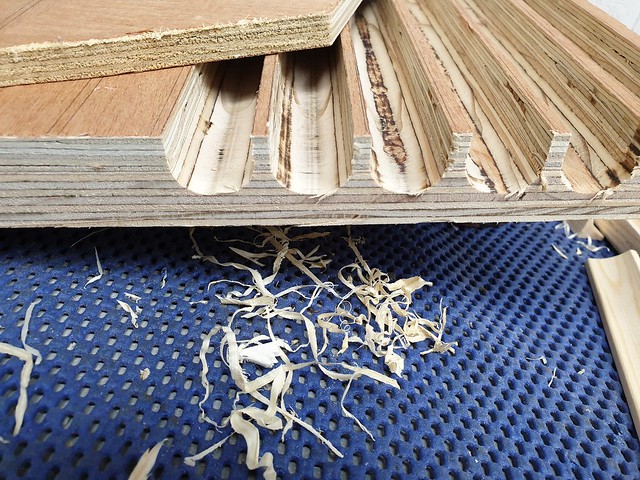 2020-01-15_09-53-58 by my0771, on Flickr
I glued two pieces of ply together I may have not put enough glue in the joint this may be the cause of the splitting.
The actual piece that goes in the tray will be formed in plastic.
2020-01-15_09-53-58 by my0771, on FlickrI glued two pieces of ply together I may have not put enough glue in the joint this may be the cause of the splitting.

DaveL
Old Oak
If you try to cut MDF to the same shape as the ply, the upright bits will have no strength and with the slightest pressure they will snap.
If the moulding you have been using was working but you ruled out due to the cost, could you make your own using just square edge red wood stock on your router table. The normal way to do that is cut the profile on the edge of a wide board, that gives room to hold it while passing in across the router table, then rip the moulded strip off the board on the table saw. If you start with quite a wide board you can safely cut 3 or 4 from the board.
If the moulding you have been using was working but you ruled out due to the cost, could you make your own using just square edge red wood stock on your router table. The normal way to do that is cut the profile on the edge of a wide board, that gives room to hold it while passing in across the router table, then rip the moulded strip off the board on the table saw. If you start with quite a wide board you can safely cut 3 or 4 from the board.
- Joined
- Jul 21, 2014
- Messages
- 10,414
- Reaction score
- 164
MY63":3ql3uv0m said:Sorry Bob I don't think I have given you enough information the wood is the mould I have just been out to get a picture.
The actual piece that goes in the tray will be formed in plastic.
I glued two pieces of ply together I may have not put enough glue in the joint this may be the cause of the splitting.
If the wood is the mould, then is cost really an issue as presumably it can be used many times over?
If it will in fact be the support under the plastic and be delivered with the box then making from real tree wood on the router table as DaveL suggests and designing them as the main body of the box seems the way to go.
Bob
MY63
Old Oak
Thanks Dave and Bob the scotia moulding is quite expensive and has to be altered to get what I need. I had assumed that making them with a router would be quicker and more cost effective but now you have made me think about it the router bit was more expensive than the scotia.
The other reason to change to the routed version was to raise the sides or deepen the slot depending on your point of view. I am thinking I should try to adapt my current method rather than spending anymore time on this.
 2020-01-16_04-43-41 by my0771, on Flickr
I am sharing my plan to make the whole project clearer to everyone including myself. I am going to cut a groove top and bottom on opposite sides to allow the trays to stack in threes. The trays for the pens will be 25 mm high as you can see from the drawing the gap is 28mm this will allow the bottom of the middle and top bases to have a pad underneath, this will stop the pens moving around in transit.
Another question does adding the spline to the mitre increase the strength of the joint.
The other reason to change to the routed version was to raise the sides or deepen the slot depending on your point of view. I am thinking I should try to adapt my current method rather than spending anymore time on this.
2020-01-16_04-43-41 by my0771, on FlickrI am sharing my plan to make the whole project clearer to everyone including myself. I am going to cut a groove top and bottom on opposite sides to allow the trays to stack in threes. The trays for the pens will be 25 mm high as you can see from the drawing the gap is 28mm this will allow the bottom of the middle and top bases to have a pad underneath, this will stop the pens moving around in transit.
Another question does adding the spline to the mitre increase the strength of the joint.
- Joined
- Jul 21, 2014
- Messages
- 10,414
- Reaction score
- 164
OK that helps and gives me an idea of how I would do it.
Cut stock 31 x 5 mm. Make box joints with 5mm fingers and with glue clearance. This should fit nicely in 31mm
Glue and clamp square and flat to dry.
Cut stock 28 x 5. Mitre ends and line the frames made above. Using some 8mm spacers wrapped in parcel tape, glue the inner linings in place.
Fit the base and the job's a good un.
Bob
Cut stock 31 x 5 mm. Make box joints with 5mm fingers and with glue clearance. This should fit nicely in 31mm
Glue and clamp square and flat to dry.
Cut stock 28 x 5. Mitre ends and line the frames made above. Using some 8mm spacers wrapped in parcel tape, glue the inner linings in place.
Fit the base and the job's a good un.
Bob
MY63
Old Oak
Thanks Bob I appreciate you taking the time to help me with this.
I don't have a table saw and my timber yard are reluctant to cut 5mm strips on their machine 10mm is about as thin as they will cut for me. With that in mind I have already bought a load of Sapele 10 mm x 35 mm.
I have a small router table which I have used to cut groves for bases on other projects so I am fairly confident I can cut the required shape.
As I am having a total rethink is the router the best tool for the job or would a track saw work better ? I have 3 lengths 2.4 m long.
I don't have a table saw and my timber yard are reluctant to cut 5mm strips on their machine 10mm is about as thin as they will cut for me. With that in mind I have already bought a load of Sapele 10 mm x 35 mm.
I have a small router table which I have used to cut groves for bases on other projects so I am fairly confident I can cut the required shape.
As I am having a total rethink is the router the best tool for the job or would a track saw work better ? I have 3 lengths 2.4 m long.
- Joined
- Jul 21, 2014
- Messages
- 10,414
- Reaction score
- 164
The track saw will be fine for the base and with a bit of care the cross cuts although your bandsaw could be easier for final trim of parts.
Router table for the external rebates and with some stops, the internal rebate too. A sharp chisel to square off the internal radii of the corners.
I don’t think I’d use splines on such small joints. Too fiddly. But instead derive strength from all round gluing of the base board. Fitting the base as you assemble should be a good way of holding everything square. There is a slight risk of wood movement with this approach so try and get an all over coat of finish on ASAP.
HTH
Bob
Router table for the external rebates and with some stops, the internal rebate too. A sharp chisel to square off the internal radii of the corners.
I don’t think I’d use splines on such small joints. Too fiddly. But instead derive strength from all round gluing of the base board. Fitting the base as you assemble should be a good way of holding everything square. There is a slight risk of wood movement with this approach so try and get an all over coat of finish on ASAP.
HTH
Bob

Michael, you're a man after my own heart with your elegant designs. Thin is good in my book, as well!
With small mouldings - I have long given up messing about with making them if I can get away with buying stuff off the shelf. I value my fingers too much although I do have the luxury of a small power feed on my router for when I do.
Don't forget, if you're stuck you're always more than welcome to come on over.
With small mouldings - I have long given up messing about with making them if I can get away with buying stuff off the shelf. I value my fingers too much although I do have the luxury of a small power feed on my router for when I do.
Don't forget, if you're stuck you're always more than welcome to come on over.
MY63
Old Oak
Thanks Bob
My plan was to use the router to cut the rebates top and bottom before I cut the wood to size which is where I thought I could use the track saw instead. This worked quite well on my previous project.
I have cut the bases with my CMS which I will also use to cut the mitres.
Roger I always appreciate your support and offers of practical help and invites I am not sure if I would describe them as elegant but thanks.
I went and bought some more scotia moulding this morning and then visited Bay Plastics to ask their advice about the issue with their help I have some new plastic pieces that will help me to create my new plan.
My new plan is to trim the scotia mould and when I glue them together back to back I will add a vertical piece in between them this will give me the additional height I am looking for.
They also had some adjustable corner moulding that I thought I would find useful so I bought 5 metres.
This mock up may give the idea
 2020-01-17_08-05-11 by my0771, on Flickr
Maybe laminating some grey board together will be my best option as it sands easily and takes glue really well.
My plan was to use the router to cut the rebates top and bottom before I cut the wood to size which is where I thought I could use the track saw instead. This worked quite well on my previous project.
I have cut the bases with my CMS which I will also use to cut the mitres.
Roger I always appreciate your support and offers of practical help and invites I am not sure if I would describe them as elegant but thanks.
I went and bought some more scotia moulding this morning and then visited Bay Plastics to ask their advice about the issue with their help I have some new plastic pieces that will help me to create my new plan.
My new plan is to trim the scotia mould and when I glue them together back to back I will add a vertical piece in between them this will give me the additional height I am looking for.
They also had some adjustable corner moulding that I thought I would find useful so I bought 5 metres.
This mock up may give the idea
2020-01-17_08-05-11 by my0771, on FlickrMaybe laminating some grey board together will be my best option as it sands easily and takes glue really well.
MY63
Old Oak
Ok here we go with the next attempt at the stacking tray. I bought some new scotia moulding and set the bandsaw to trim one edge to allow it to lie flush with the gray board.
 2020-01-18_04-48-41 by my0771, on Flickr
Unfortunately it took me most of the day to get to this point. the dividing pieces are intended to go up to the top of the sides of the tray.
 2020-01-18_04-36-57 by my0771, on Flickr
Still not sure it is right.
2020-01-18_04-48-41 by my0771, on FlickrUnfortunately it took me most of the day to get to this point. the dividing pieces are intended to go up to the top of the sides of the tray.
2020-01-18_04-36-57 by my0771, on FlickrStill not sure it is right.
MY63
Old Oak
Everything I did over the last few days has led to producing this.
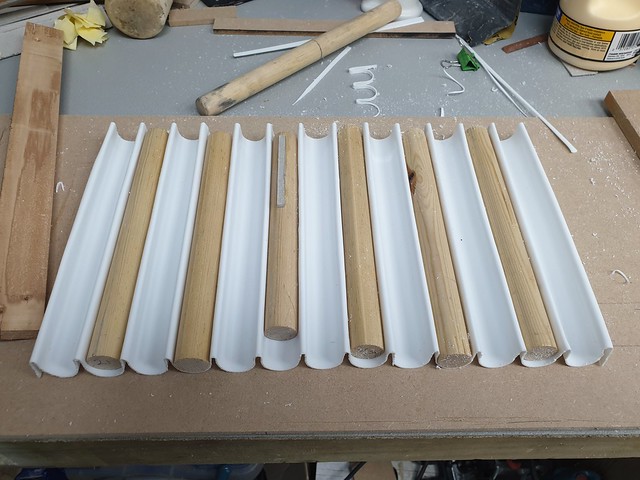 2020-01-19_05-08-59 by my0771, on Flickr
Only 5 more to make now.
2020-01-19_05-08-59 by my0771, on FlickrOnly 5 more to make now.
DaveL
Old Oak
So a question, is that white 'tray' plastic or leather?
How did you form it over your mould?
Well that's two questions!
How did you form it over your mould?
Well that's two questions!
MY63
Old Oak
Hi Dave the white stuff is HIPS high impact polystyrene I heat it with a hot air gun and use a dowel to push it into place.
I usually cover these in suede however in this situation where weight is a key factor I will use a synthetic suede which is lighter than real suede. Unfortunately it is also much more difficult to glue spray adhesive is one of the few options.
I usually cover these in suede however in this situation where weight is a key factor I will use a synthetic suede which is lighter than real suede. Unfortunately it is also much more difficult to glue spray adhesive is one of the few options.
DaveL
Old Oak
Thanks for that information, the only way I have seen things like that done before is with heat and vacuum forming.
StevieB
Nordic Pine
Could you use flocking rather than suede?
MY63
Old Oak
You are welcome Dave I appreciate your help, I think vacuum forming would be an option if I can ever find a pump.
MY63
Old Oak
StevieB":2sqot7yj said:Could you use flocking rather than suede?
Hi StevieB I have seen people on youtube use flocking but to be honest I prefer suede although on this project I am planning on using a synthetic suede similar to Alcantara but a fraction of the price.
 2020-01-22_08-15-02 by my0771, on Flickr
I set up my little router table to shape the Sapele I am not going to use this wood again as it splinters easily
 2020-01-22_08-20-02 by my0771, on Flickr
After cutting and mitering I started assembly.
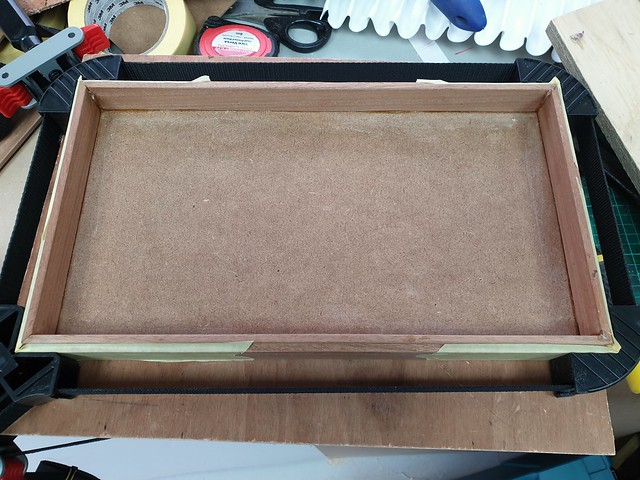 2020-01-23_03-05-26 by my0771, on Flickr
The first 3 trays are assembled as I only have 3 clamps I am doing them in two batches.
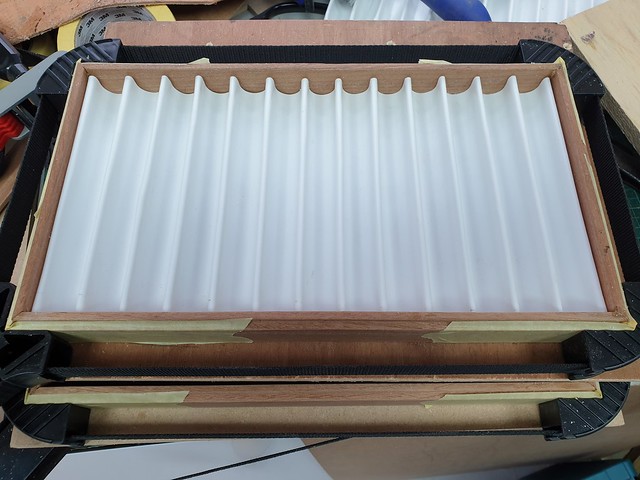 2020-01-23_03-05-13 by my0771, on Flickr
Test fitting the insert after gluing the frame together I inserted the base and glued it in place As you can see the insert is too big as it needs to be wrapped and edge pieces need fitting
- Joined
- Jul 21, 2014
- Messages
- 10,414
- Reaction score
- 164
Good progress!
Yes sapele does splinter easily.
Beech is usually quite well behaved in smaller sections but can burn if you dilly-dally pushing it through the router.
Bob
Yes sapele does splinter easily.
Beech is usually quite well behaved in smaller sections but can burn if you dilly-dally pushing it through the router.
Bob
MY63
Old Oak
Thanks Bob I will try Beech next time I will try to find a supplier who can give me two thinner pieces so I can glue them together as suggested earlier. which will save me all the work with the router.
- Joined
- Jul 21, 2014
- Messages
- 10,414
- Reaction score
- 164
Your average wood yard wont be too keen on producing 5mm thick stock but I was reading this thread earlier today https://www.ukworkshop.co.uk/forums/topic121087.html
The suggestion there was ebay in the craft section.
Bob
The suggestion there was ebay in the craft section.
Bob
MY63
Old Oak
Thanks Bob I used 7.2 m of 35 mm x 10 mm I guess I might be better off sticking to the router and finding a better timber like the Beech you suggested.
I think an upgrade of router table may be in my future
I think an upgrade of router table may be in my future
MY63
Old Oak
It took me forever to get these bl**dy trays to stack I had clearly not taken enough off with the router a total nightmare. But they now stack.
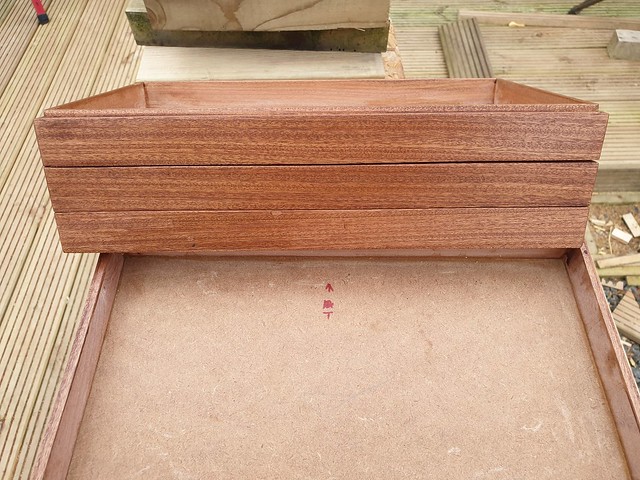 2020-01-28_05-35-39 by my0771, on Flickr
My next problem was the lids I made them from MDF and needed to do something with them we decided to paint them. On the day I painted them it got really cold very quickly and even with my new heater it would not dry.
 2020-01-28_05-35-06 by my0771, on Flickr
After 2 days we decided drastic action was required so I rubbed it down and added some veneer.
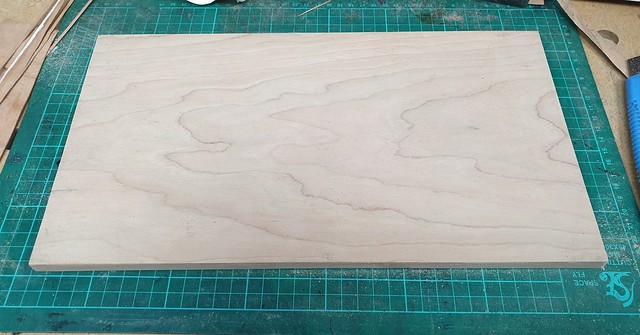 2020-01-29_09-51-29 by my0771, on Flickr
The first one is great the second not so good so I pulled it off and will have another go tomorrow.
2020-01-28_05-35-39 by my0771, on FlickrMy next problem was the lids I made them from MDF and needed to do something with them we decided to paint them. On the day I painted them it got really cold very quickly and even with my new heater it would not dry.
2020-01-28_05-35-06 by my0771, on FlickrAfter 2 days we decided drastic action was required so I rubbed it down and added some veneer.
2020-01-29_09-51-29 by my0771, on FlickrThe first one is great the second not so good so I pulled it off and will have another go tomorrow.