• Hi all and welcome to TheWoodHaven2 brought into the 21st Century, kicking and screaming! We all have Alasdair to thank for the vast bulk of the heavy lifting to get us here, no more so than me because he's taken away a huge burden of responsibility from my shoulders and brought us to this new shiny home, with all your previous content (hopefully) still intact! Please peruse and feed back. There is still plenty to do, like changing the colour scheme, adding the banner graphic, tweaking the odd setting here and there so I have added a new thread in the 'Technical Issues, Bugs and Feature Requests' forum for you to add any issues you find, any missing settings or just anything you'd like to see added/removed from the feature set that Xenforo offers. We will get to everything over the coming weeks so please be patient, but add anything at all to the thread I mention above and we promise to get to them over the next few days/weeks/months. In the meantime, please enjoy!

Chairs - Done!

It is worth doing a mock up including the joints the angles and positioning takes a lot of working out. The positioning seriously changes the tenon length and strength. For instance changing your rear seat rail depth and tenon position can add a lot of rigidity.
 
It is worth doing a mock up including the joints the angles and positioning takes a lot of working out. The positioning seriously changes the tenon length and strength. For instance changing your rear seat rail depth and tenon position can add a lot of rigidity.
I've just upped my seat rail depths all round to 95mm for precisely that reason. Keeping them close to the outside of the legs adds good length to the tenons.
 
When I dug out the parts for my chairs, it was obvious that the back rails were wrong, so I made new back rails and moved the tenons back. It made a massive difference. I would like to make the side rails through tenons at the back and wedge them! As well as pin them. Looking at old designs that was done. Again another massive strength improvement but aesthetically a negative step.
 
When I dug out the parts for my chairs, it was obvious that the back rails were wrong, so I made new back rails and moved the tenons back. It made a massive difference. I would like to make the side rails through tenons at the back and wedge them! As well as pin them. Looking at old designs that was done. Again another massive strength improvement but aesthetically a negative step.

I'm not so sure it would be a negative, aesthetically. At least, not in the sort of chair I'm proposing. I've been contemplating wedged through tenons from day one.
 
I'm not so sure it would be a negative, aesthetically. At least, not in the sort of chair I'm proposing. I've been contemplating wedged through tenons from day one.
Yes for your chairs it is a design addition for mine both the through tenon and wedges are aesthetically unacceptable. But when I look at good designers work they have through tenons as they recognise the need for strength. I am currently looking at pinning the tenons from the inside face so they are hidden. For yours I would make dowels a design statement and either set them proud or square/ diamond to make a feature of the joint.
 
Yes for your chairs it is a design addition for mine both the through tenon and wedges are aesthetically unacceptable. But when I look at good designers work they have through tenons as they recognise the need for strength. I am currently looking at pinning the tenons from the inside face so they are hidden. For yours I would make dowels a design statement and either set them proud or square/ diamond to make a feature of the joint.
You could have them nearly all the way through and Fox wedge them, if you want to risk it!!
 
You could have them nearly all the way through and Fox wedge them, if you want to risk it!!
The problem with fox wedged joints is they are not designed to be repaired. You get one go at it and if it fails it is firewood.
 
I'm thinking wedged through tenons for my side rail to back leg joint. I think it would be a strong option (seems to have been used on chairs back in the day) and the aesthetic matches some other things I've made in our kitchen, including stools which we use at the same table.

However, I need to work out how that works - eg angled tenon v angled mortise. It's complicated by the tilt on the legs too! I'll do a separate post on that at some point, hopefully with some CAD drawings of the proposed joinery.
 
The problem with fox wedged joints is they are not designed to be repaired. You get one go at it and if it fails it is firewood.
True, but this takes us into the realms of philosophy :cool: Is a joint that is designed to be repaired, made in the expectation of failure?
 
True, but this takes us into the realms of philosophy :cool: Is a joint that is designed to be repaired, made in the expectation of failure?
Swap "repaired" with "repairable" and I think you get a more useful question. And it's a philosophical and logical leap to go from "designed to be repairable" to "made in the expectation of failure".

Use fox tenons and you are making an irrepairable item, so why not just dowel butt-joints? Make a joint which could be repaired in future, and you are making something which could last centuries, whether or not it is ever broken.
 
My tongue was in my cheek Mike :ROFLMAO:

If you could see the way our customers (a few) treat chairs, and have no semblance of control over their young children, then like me you would be contemplating chairs with steel frames!!
 
My woody mate, Roger, and I went for a pie and pint in a Cotswold pub. On sitting down at a table Roger's chair collapsed; rear leg gave way at the usual joint. Roger fell on his back but no harm done. It could have been worse, it was right next to the open fire! The landlord came over offering his apologies and in mitigation explained he'd just had them all inspected. As furniture makers we opined that it was an accident waiting for to happen and ridiculed the recent safety check.
The compensation was half a pint on the house, miserable bu......er.
Brian
 
My woody mate, Roger, and I went for a pie and pint in a Cotswold pub. On sitting down at a table Roger's chair collapsed; rear leg gave way at the usual joint. Roger fell on his back but no harm done. It could have been worse, it was right next to the open fire! The landlord came over offering his apologies and in mitigation explained he'd just had them all inspected. As furniture makers we opined that it was an accident waiting for to happen and ridiculed the recent safety check.
The compensation was half a pint on the house, miserable bu......er.
Brian
Hopefully the offending chair was fed straight into the open fire so you could at least get some warmth from it!?
 
My woody mate, Roger, and I went for a pie and pint in a Cotswold pub. On sitting down at a table Roger's chair collapsed; rear leg gave way at the usual joint. Roger fell on his back but no harm done. It could have been worse, it was right next to the open fire! The landlord came over offering his apologies and in mitigation explained he'd just had them all inspected. As furniture makers we opined that it was an accident waiting for to happen and ridiculed the recent safety check.
The compensation was half a pint on the house, miserable bu......er.
Brian
Cheap bugger!
 
I'm not sure why that would be stronger. It's the same amount of wood removed.
I was thinking from the perspective of the tenon. Angling the tenon runs the risk of short grain in the tenon. (I appreciate the tenon wasn't the problem in this case though.)
 
The ammount of wood left in the leg is the problem once the mortices are chopped out.

Pete
Agreed. As per my response to Mike, I was thinking about the tenon and the fact that an angled mortise is usually a better solution.

(I probably will be doing angled tenons on my chairs though!)
 
When I made my set, I used dominoes. It meant I could cut all my joints as butts, then cut the mortices. Although the tenons were not angled, they were still straight grained. I'm very pleased with the end result.
It's all on YouTube if you can't sleep...
S
 
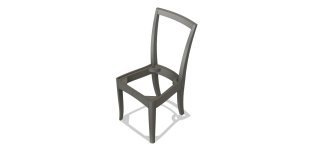
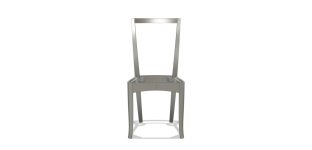
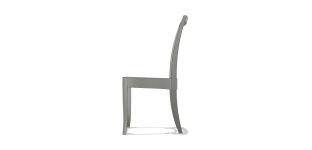
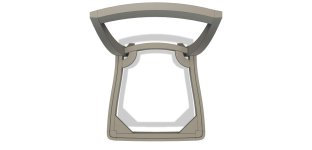
I've been doing some more CAD work. I've reflected some changes I want to make based on the mock-up and have also shown the joinery. This is the new version:

Kitchen Chair 4 - 3D.jpg

Kitchen Chair 4 - Front.jpg

Kitchen Chair 4 - Side.jpg

Kitchen Chair 4 - Top.jpg

Dimensionally, the chair is a bit taller and the seat is a bit shorter.

Aesthetically, I have:
  1. Tilted the legs out a little bit more (an extra half degree). That has been offset a little by reducing the front-to-back seat taper a bit so the footprint is the same as it is on the mock-up.
  2. Attempted to make the crest rail look a bit more elegant. My idea here is to build in a "twist" in the upper portion of the back legs so that, at the top of the leg, the curve of the crest rail continues into the leg. I managed to model the back of the legs pretty well, but the front defeated me so you'll have to use your imagination! I think this will be a big improvement. I've always found that the chair looks "clunky" in that area.
  3. The crest rail is narrower than it was before.
  4. All of the taper in the upper portion of the rear legs is now on the inside. Visually, I think this makes the splay of the legs look better.
I'll do a separate post on the joinery side of things.
 
Based on the drawing, the top rail joining the two back legs at the very top, looks to have the rail at the same angle as the legs, resulting in a sharp edge (the lower one) against one's back. This may or may not be an issue in practice.

Is there any benefit in the extra work occasioned by the curved rear braces?
 
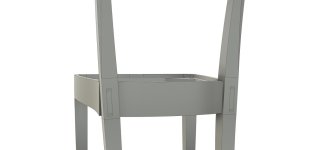
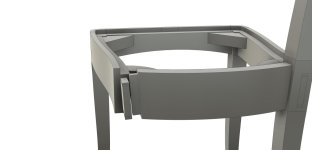
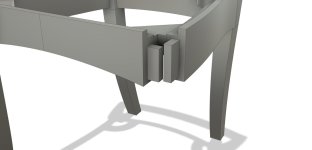
Here are some pictures showing the joinery.

Chair Drawing.jpeg

Kitchen Chair 4 - Rear Tenons.jpg

Kitchen Chair 4 - Rear Tenon View.jpg

Kitchen Chair 4 - Front Tenons 2.jpg

Kitchen Chair 4 - Front Leg Mortises.jpg

I'd be interested in any thoughts.

A few points to note:
  1. I've gone with angled tenons. That does run a risk of short grain weakening the tenon, but I think it will be OK because the angle isn't too great. Where possible, I'll try to select timber which minimises that. I just think this will be an easier approach than angled mortises.
  2. Tenons are 12mm thick to match a suitable mortise chisel I have. I think 12 is thick enough. Looking at some older chair plans I've seen (e.g. Chippendale), they were only 3/8". 16mm (the next size chisel I have) would be too thick I think.
  3. In terms of tenon length, I've prioritised the side rail tenons as those joints have more stress on them.
  4. I've avoided tenons interacting with each other in the legs.
  5. The front rail to front leg tenon sits under the seat rebate which runs through the rails and the top of the leg. As a result, I've made that tenon a bit narrower (i.e. lower) to give more wood in the leg above the mortise. I haven't done that with the side rail to front leg tenon because that one is only partly under the rebate. However, I might change that a bit as it does look a weak in the picture because most of the tenon is under the rebate.
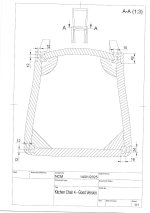
  6. The through tenon on the side rail to rear leg joint is on a strange tilt so that the mortise is parallel to the rear leg (I think it would look very odd otherwise). Tilting the tenon in that direction shouldn't create short grain issues. The location of that tenon leaves 10mm on the outside of the mortise. I think that's OK. I could perhaps increase that to 12mm, but couldn't do more than that without the tenon falling off the side rail (unless I made the tenon narrower or thinner). Doing that would also leave less room for the rear rail to rear leg tenon.
  7. On the rear view, you'll see the side rail isn't flush with the leg. This is because of the tilt of the legs. I will need to shape in some twist in that rail to remove that mismatch. I haven't attempted to do that in the CAD model as I can't find the spokeshave tool in Fusion 360!
  8. Finally, you'll see that I had to scan the cross-sectional drawing I created in Fusion 360. It's not because I'm a tech luddite (unlike a person I used to work with in the late 1990s who often printed out e-mails and faxed them to me!). That's because my free, non-commercial, version of F360 doesn't let me export drawings. That could be a pain, as I'm contemplating getting some A0-size drawings printed which would be very helpful when I make the chairs. I'm looking at a workaround for this...
 
Based on the drawing, the top rail joining the two back legs at the very top, looks to have the rail at the same angle as the legs, resulting in a sharp edge (the lower one) against one's back. This may or may not be an issue in practice.

Is there any benefit in the extra work occasioned by the curved rear braces?
That might be an optical illusion. The 12mm ply base for the seat cushion will be flush with the rear rail. It doesn't have a rebate because it needs to be thicker to accommodate the back bars. I could have a rebate, but the rail would need to be thicker as a result. The seat can sit on the side rail rebates and the rear corner blocks.

(Having said this, I need to think about the location of that rear rail. I moved it back a bit to leave the tenons in a better place in the leg. However, where it is at the moment, the back bars might sit too far back relative to the rear legs.)
 
I think the chair looks very smart and am interested to learn how you make them.

Can I ask a numpty question for my own education? The corner bracing at the front of the seat goes up tight against the front leg. At the back the bracing has a deliberate gap round the rear leg. Why the difference?

Thanks
Mark
 
I think the chair looks very smart and am interested to learn how you make them.

Can I ask a numpty question for my own education? The corner bracing at the front of the seat goes up tight against the front leg. At the back the bracing has a deliberate gap round the rear leg. Why the difference?

Thanks
Mark
Good question, and I don't have a good answer! It's just what I've seen on some other chairs. I'm not sure what I'll actually do yet.
 
That is not going to be the simplest woodworking you've ever done, Nick. I'll be fascinated to see your approach.
 
Looking very good Nick, with a couple of comments.
Glad to hear that you’re fairing the side rails to the back legs, when I saw it I was a bit shocked.
I do feel the tenons on the front and back rails are a little short, is there a reason why you don’t want the tenons “mingling”?
Ian
 
........ is there a reason why you don’t want the tenons “mingling”?
Ian

I'm going to suggest that it's because the side rails are through-tenons, and thus have to be complete tenons, rather than finger-jointing with the back rail tenon.
 
Looking good. Three things to consider or discard as you wish:
1. Consider making the rails wider. They look about 25mm wide. Given you need to taper the rails flush with the back legs the bottom edge at the back will be thin. You could do about 32mm and just make the rebate wider so the face looks the same. It would not change anything else except the weight. The extra shoulder would resist racking a bit more
2. A full size drawing or as I have done a a half drawing to the centre line is essential.
3. I know you are not on the back support yet but one idea might be to borrow from rocking chair designs and laminate the bars so that they can spring a bit. Then rather than tenons with shoulders and glue sit them in a full size mortice that is say 5mm deeper than needed at the top then the bar can straighten slightly under the pressure of the sitter and give a slightly less hard back support. The down side is they rattle but they are more comfortable. Take a look at what Hal Taylor does https://www.rockingchairuniversity.com/
 
I do feel the tenons on the front and back rails are a little short, is there a reason why you don’t want the tenons “mingling”?

I'm going to suggest that it's because the side rails are through-tenons, and thus have to be complete tenons, rather than finger-jointing with the back rail tenon.

Thanks both. Mike is spot on for the back tenons. For the front, I just think it adds complexity and takes more wood out of the leg. I'm not sure it would add a great deal of strength.

They seem more or less commensurate with some other designs I've seen.

I'll think about making the back legs a little bit thicker which might allow me to move the through tenon outboard a bit leaving room for a longer tenon on the back rail.

Well fitted corner blocks will hugely add to the strength.
 
Looking good. Three things to consider or discard as you wish:
1. Consider making the rails wider. They look about 25mm wide. Given you need to taper the rails flush with the back legs the bottom edge at the back will be thin. You could do about 32mm and just make the rebate wider so the face looks the same. It would not change anything else except the weight. The extra shoulder would resist racking a bit more
The front and side rails are 30mm. One consideration (and I haven't checked this yet) is that I need to be able to get the curved side rails out of the thickness of timber I buy (e.g. out of a 50mm board).
2. A full size drawing or as I have done a a half drawing to the centre line is essential.
Yes. I think it's the only way when you're doing something like this with so many angles. I'm hoping to get a full size print, but I will also be doing full size drawings.
3. I know you are not on the back support yet but one idea might be to borrow from rocking chair designs and laminate the bars so that they can spring a bit. Then rather than tenons with shoulders and glue sit them in a full size mortice that is say 5mm deeper than needed at the top then the bar can straighten slightly under the pressure of the sitter and give a slightly less hard back support. The down side is they rattle but they are more comfortable. Take a look at what Hal Taylor does https://www.rockingchairuniversity.com/
Thanks. Laminated back bars is what I have in mind. I'll have a think about allowing them to slide, but I think that might be more appropriate/relevant for something like a rocking chair or easy chair where you'd put your full weight on the chair back.

Thanks for taking the time to share your thoughts.
 
I'm going to suggest that it's because the side rails are through-tenons, and thus have to be complete tenons, rather than finger-jointing with the back rail tenon.
I don't see why the rail tenon going through precludes it interdigitating with the back rail tenon. Maybe I'm not visualizing it properly.
 
I don't see why the rail tenon going through precludes it interdigitating with the back rail tenon. Maybe I'm not visualizing it properly.
It doesn't prevent it, but it would be complicated. I know you love a challenging joint, but this is already complicated enough for me! If it didn't go right through, then I could, for example, mitre the ends of the tenons.

One thing I could do if I'm worried about the length of the back rail tenons, is to add a couple of dowels to the tenon which go through the side rail tenon. I did some research on UKW and I think that's what Custard did on his Edward Barnsley style chairs. I think it should be OK though.
 
Well fitted corner blocks will hugely add to the strength.
Ercol do a nice detail where they glue tenons on the ends of their corner clocks into grooves in the rails, which is much better than end-grain gluing and a screw, the usual solution. Mke sure that they're made from dry-as-a-bone wood, otherwise they'll lose contact with the legs.
 
I don't see why the rail tenon going through precludes it interdigitating with the back rail tenon. Maybe I'm not visualizing it properly.
Picture a wedged through-tenon. Now, picture the same joint but with a chunk or two missing due to interdigitisation. :)
 
Back
Top