• Hi all and welcome to TheWoodHaven2 brought into the 21st Century, kicking and screaming! We all have Alasdair to thank for the vast bulk of the heavy lifting to get us here, no more so than me because he's taken away a huge burden of responsibility from my shoulders and brought us to this new shiny home, with all your previous content (hopefully) still intact! Please peruse and feed back. There is still plenty to do, like changing the colour scheme, adding the banner graphic, tweaking the odd setting here and there so I have added a new thread in the 'Technical Issues, Bugs and Feature Requests' forum for you to add any issues you find, any missing settings or just anything you'd like to see added/removed from the feature set that Xenforo offers. We will get to everything over the coming weeks so please be patient, but add anything at all to the thread I mention above and we promise to get to them over the next few days/weeks/months. In the meantime, please enjoy!

Chairs - Done!

Well fitted corner blocks will hugely add to the strength.
It puzzles me why chairs use fitted corner blocks rather than (either in addition or instead) corner to corner cross braces when there is going to Obviously the latter uses more wood but it does not have to be premium material.
 
It puzzles me why chairs use fitted corner blocks rather than (either in addition or instead) corner to corner cross braces when there is going to Obviously the latter uses more wood but it does not have to be premium material.
I can't comment on the strength, but it would be harder to attach the braces perhaps?

I was interested to read in Jeff Miller's "Chairmaking and Design" that corner blocks are much more important strength-wise than stretchers between the legs due to the small tenons you have on the stretchers. I don't want stretchers but was worried about the impact on the strength of the chair, so I was pleased to read that.
 
I can't comment on the strength, but it would be harder to attach the braces perhaps?

I was interested to read in Jeff Miller's "Chairmaking and Design" that corner blocks are much more important strength-wise than stretchers between the legs due to the small tenons you have on the stretchers. I don't want stretchers but was worried about the impact on the strength of the chair, so I was pleased to read that.
I have been thinking about domino(ing) the corner blocks to give even more strength😱
 
I have been thinking about domino(ing) the corner blocks to give even more strength😱
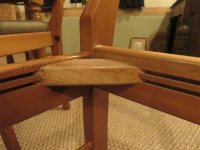
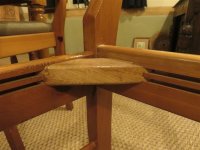
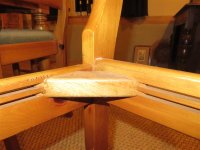
Mike's comment about Ercol tenoning their corner blocks into a groove got me thinking the same! I think I'd still be inclined to screw them as well.
 
IMG_7851.jpgThis is how Ercol did (do?) it.
 

Attachments

  • IMG_7852.jpg
    IMG_7852.jpg
    131.2 KB · Views: 4
  • IMG_7853.jpg
    IMG_7853.jpg
    154.7 KB · Views: 4
That is interesting - two grooves. I have only ever seen one groove or the traditional rub joint and screws.
 
I was interested to read in Jeff Miller's "Chairmaking and Design" that corner blocks are much more important strength-wise than stretchers between the legs due to the small tenons you have on the stretchers. .....

I'm struggling with this. Stretchers keep legs in the right relationship with each other. By that I mean, they keep them the right distance apart. I can't for the life of me work out what bearing corner blocks have on leg stability, positioned, as they are, at (or even above) the pivot point of the un-stretchered legs. If you tested a chair to destruction by leaning it at 45 degrees (in any direction), and getting your pet elephant to sit on the high point of the seat, I'd bet good money that the legs would break at the joint with the apron, and that the corner blocks would survive in place.
 
I'm struggling with this. Stretchers keep legs in the right relationship with each other. By that I mean, they keep them the right distance apart. I can't for the life of me work out what bearing corner blocks have on leg stability, positioned, as they are, at (or even above) the pivot point of the un-stretchered legs. If you tested a chair to destruction by leaning it at 45 degrees (in any direction), and getting your pet elephant to sit on the high point of the seat, I'd bet good money that the legs would break at the joint with the apron, and that the corner blocks would survive in place.
Don’t the corner blocks just keep the trapezoid formed by the four rails/ aprons rigid?
 
I'm struggling with this. Stretchers keep legs in the right relationship with each other. By that I mean, they keep them the right distance apart. I can't for the life of me work out what bearing corner blocks have on leg stability, positioned, as they are, at (or even above) the pivot point of the un-stretchered legs. If you tested a chair to destruction by leaning it at 45 degrees (in any direction), and getting your pet elephant to sit on the high point of the seat, I'd bet good money that the legs would break at the joint with the apron, and that the corner blocks would survive in place.
Watch how people abuse chairs. Some people just tilt back. Others rock the chair backwards by putting weight on one back leg and then the other, several times, like a pivot. This has happened to our outdoor and indoor chairs. We've had hundreds of bums on seats, and only a few do it, but when they do it is a big stress on a corner joint.

Obviously we are an unusual case as we have quite a few visitors for charitable events and customers for paid events. It colours my view obviously. In a normal domestic environment most dining chairs would be used infrequently and with more respect. But....plan for the worst.
 
Tipping back on chairs...
Does anyone else recognise the term "kiddling"?
I can't remember the number of time we were chastised as children for kiddling on the chairs.
"Stop kiddling!"
I've yet to find anyone else who recognises the word.
S
 
Don’t the corner blocks just keep the trapezoid formed by the four rails/ aprons rigid?
Exactly. The claim was, however, that they were more important than stretchers for the strength of a chair, as though there was some sort of comparison between the jobs they do.
 
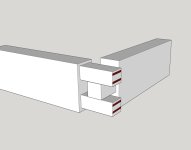
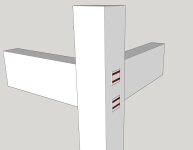
I guess most aprons are around 70mm wide (high). Take off 5mm for a shoulder top and bottom, and that's 60mm. Divide by 3, and that's 20mm height per tenon. That's not much to A/ get 2 wedges into, and B/ for the entire size of the blind tenon of the back rail. The stresses on the side rail joint are wracking and shear, but on the back rail, it's shear only. I'd be worried that 20mm wasn't enough for that job over decades........but I'd also be worried that that small a tenon would allow the back rail to twist. Insetting the back rail shoulder into the leg would help with shear, and obviate twisting altogether, but would come at the cost of leg strength.

I know that's just a quick sketch. The double tenons of the side rail would start off as a single big one until the point they needed to be cut away for the back rail tenon.
 
All good points. I'm not concerned about the wedges (a single wedge per tenon would be fine) but that small tenon on the back rail does bother me. Starting off the back rail tenon full height as you suggested for the side rail would also mitigate twisting.

Perhaps simpler would be an over-under arrangement of two half-height tenons.
 
When I was at primary school, I was certainly made aware that adults didn't like us getting more comfortable by tipping back. (We didn't call it kiddling, but I'm just a soft southerner ;))

So I designed a chair with extra legs at the back that I thought could be stable in either position.

I'm sorry to say that I never built one and there are no photos. It was a long time ago and the world is still waiting!
 
When I was at primary school, I was certainly made aware that adults didn't like us getting more comfortable by tipping back. (We didn't call it kiddling, but I'm just a soft southerner ;))

So I designed a chair with extra legs at the back that I thought could be stable in either position.

I'm sorry to say that I never built one and there are no photos. It was a long time ago and the world is still waiting!
You can buy an extra pair of legs for some chairs: one brand is Rokzi Legz. They fit to the rear legs and prevent children or others from tilting the chair and cracking their head on the floor. Commonly found in some special schools.
 
The back legs on mine will be slightly behind the chair which will make it harder to rock back on. I'm away for a couple of days but will give it a try on the mock-up! I'll report back. Probably from a hospital bed...
 
I'm planning an altogether different approach to the rocking issue: the chairs are going to be too heavy to rock! :)
 
You can buy an extra pair of legs for some chairs: one brand is Rokzi Legz. They fit to the rear legs and prevent children or others from tilting the chair and cracking their head on the floor. Commonly found in some special schools.
I want my royalties!:)
 
When I was was at secondary school one of the maths teachers had a chair with no front legs which you were made to sit on if you were caught leaning back. Doubt it would be allowed now.
 
Things have been progressing a bit.

I'm happy with the latest design but want to make a proper prototype to check I can make the thing, practise the joinery and shaping, and decide if there are any final tweaks I need to make to the design.

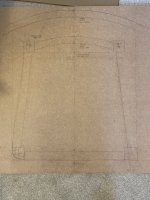
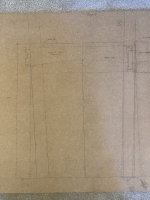
I've done full size drawings of the plan, front and side views.
IMG_3561.jpeg

IMG_3562.jpeg

IMG_3563.jpeg

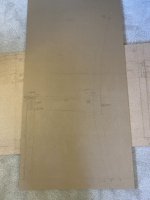
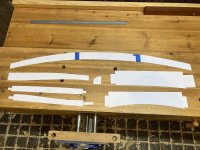
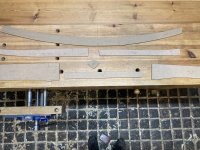
From these, I could use tracing paper to make card templates and from those, because I wanted something a bit more substantial, I made MDF templates.
IMG_3573.jpeg

IMG_3575.jpeg

These will be used both for figuring out how to get the components out of the raw timber, and for laying out the shapes on the parts. I won't use them for laying out exact dimensions or joinery. I'll make a rod with key dimensions knifed into it for that.

As I encounter the various angles, I'm making templates which will help me accurately set a mortise gauge (I find it hard to do it accurately from a line on a drawing). I'll also make paring guides for chopping angled mortises or shoulders.
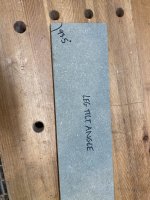
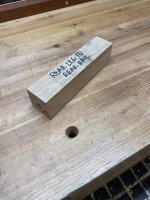
IMG_3577.jpeg

IMG_3576.jpeg

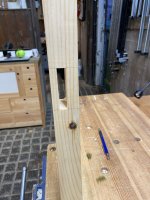
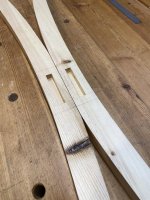
I'm using pine for the prototype. The back legs have been partly shaped. The curved faces have been done but I haven't cut any tapers yet. I've done the mortises for the tear rail. Those need to be done before the through mortise for the side rail to avoid chopping through into that. I did these by hand with a mortise chisel, but on subsequent ones I might drill them and pare to the lines (I've done that on the front legs and it take about the same amount of time, gives easier depth control and perhaps makes it easier to keep things square). The ends of the mortise are sloped to account for the tilt of the legs.
IMG_3578.jpeg

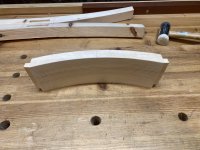
I've made the curved rear rail.

IMG_3579.jpeg

I didn't take any photos, but started with a "square" 50mm thick block and cut the tenons before doing the curves. The shoulders are sloped to account for the angle of the legs. The curves were done by bandsawing off most of the waste and then suing a block plane and spoke shave. There is some grain run out in this part, but I think it will be plenty strong enough.

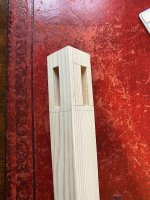
I then turned my attention to the front legs and front rail. I didn't take a full set of photos, but the process was to chop the mortises for the front and side rails before doing any shaping. I did these mortises by drilling out the bulk and then paring to the lines. As you can see, I initially laid out one mortise in completely the wrong place, but realised before I started chopping it out.
IMG_3583.jpeg

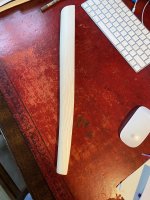
I'm unsure on the best approach for doing the shaping. For the first attempt, I rounded the outside corner of the leg before doing the other curves. The rounding just involved planing facets down to a pencil line before refining the curve.
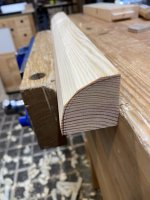

IMG_3581.jpeg

Then I started shaping the other curves (using chisels and spoke shave), using a template to check progress. As you can see, I made a little cradle to hold the leg.
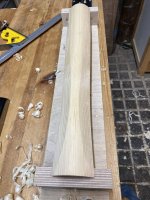
IMG_3582.jpeg

This is the end result:

IMG_3584.jpeg

IMG_3585.jpeg

I think this method worked, but I felt like I was flying a bit blind at times. Today, I'll trying bandsawing and refining the curves before I do the rounding over. I think I can mark on the facets for the rounding over at various points on the leg and work to those to get a repeatable process.

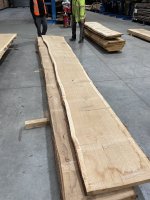
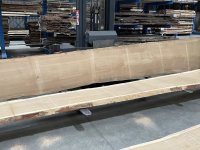
In the meantime, I went down to English Woodland Timbers and bought some oak:
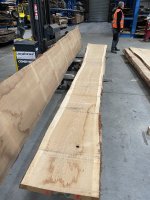
IMG_6213.jpeg

IMG_6214.jpeg

IMG_6215.jpeg

There is one true quarter-sawn board and the two "up" from that one. I'm hoping this will give me what I need to find quarter-sawn rails and rift sawn legs. There is also hopefully enough to make a smallish top for some kitchen units for my parents-in-law.
 

Attachments

  • IMG_3585.jpeg
    IMG_3585.jpeg
    298.8 KB · Views: 4
I'd just like to make a prediction.
By the time you have finished these chairs, this thread will serve as a brilliant, detailed introduction to the level of sensible preparation that chairs demand, and how to actually make them.

I'm very unlikely to attempt anything similar, but I am definitely enjoying the ride.
 
These will be used both for figuring out how to get the components out of the raw timber, and for laying out the shapes on the parts. I won't use them for laying out exact dimensions or joinery. I'll make a rod with key dimensions knifed into it for that.
I'm curious about this, Nick. Why not work direct from the templates? I made my mock up from the templates, and couldn't see anything in the process that wouldn't transfer to the real thing.
 
I'm curious about this, Nick. Why not work direct from the templates? I made my mock up from the templates, and couldn't see anything in the process that wouldn't transfer to the real thing.
It might work Mike, but the truth is that I don't think I've made them accurately enough!
 
I did a bit more yesterday, starting with the other front leg.

This time I bandsawed the curves first. This is the leg with the curves marked on the faces:

IMG_3586.jpeg

First cut done:

IMG_3587.jpeg

I then taped the offcuts back on so I had support and also had the lines to cut to:

IMG_3588.jpeg

I then refined the faces with a spokeshave. Because of the curved faces, it isn't possible to use a square to check the faces are true. An alternative is to use winding sticks to compare with a known surface - in this case the top 80mm of the leg which was square and hasn't been touched. I should probably knock up some smaller winding sticks for doing this...

IMG_3589.jpeg
That left me at this stage:

IMG_3590.jpeg

IMG_3592.jpeg

The next task was doing the round over. These are marked on the ends and I drew the first facet on the end as well:

IMG_3593.jpeg

I also tried to mark some reference points along the length of the leg, but I need to think about the numbers as they didn't seem quite right. It's not helped by the fact that the curve isn't an arc of a circle.

IMG_3594.jpeg

I hogged off a lot of the waste by taking satisfyingly heavy cuts with a chisel before moving to a spokeshave.

IMG_3595.jpeg

I didn't take any photos of the final steps. I think this method works better than doing the rounding over first but I need to come up with a better way of doing reference lines for the rounding over phase.

The front rail has a curved underside which was done with a bandsaw and spokeshave. This is part way through. I think all of the curves on this chair are shallow enough that I'll only need to use a flat bottom spokeshave which is good news as I find them a lot easier to use than the round bottom version.

IMG_3596.jpeg

The front face of the rail has a very subtle curve. Before shaping that curve, there is a step between the legs and the rail:

IMG_3597.jpeg

IMG_3598.jpeg

That curve was quickly done with the spokeshave and refined with some sandpaper (I'll probably use a scraper when I'm doing this in oak, but I don't find pine scrapes very well).

One issue I discovered is that it's difficult to clamp this for gluing. The rounded legs mean the clamping pressure is behind the front rail and clamping pressure therefore opens a gap at the front:

IMG_3599.jpeg

I'm not currently planning to glue the prototype together as I'd like to have the individual components available to sanity check things when I'm making the real chairs. However, for the real thing, I think I'll solve this by leaving the rounding of the outside faces until after gluing the front assembly together.

This is the completed front:

IMG_3600.jpeg

IMG_3601.jpeg

I think it looks alright.

I also found time yesterday to chop the through mortises for the join between the side rails and the back legs. The sides of the mortises are very unforgiving as any gap will look ugly (the ends are easier because the wedging will fill any gaps - in fact, I'll need to flair the mortises to make a gap for the wedges to take up). This requires the wood to be absolutely square and flat so that there are no errors when transferring the mortise layout from one side to the other. I also spent a bit of time with a small square checking that everything is lined up. At this stage it's possible to correct any errors because even if the mortise is opened up a little bit, the tenon can be sized accordingly.

IMG_3602.jpeg

I'm hoping to find some time today to start on the side rails. This is where the angles start to get really interesting because I have to deal with both the taper and rake of the seat. Wish me luck...
 
And this is just the mock up/proof of concept. You have to do this 6 more times in oak. I am in awe of the discipline and patience required to do this, the repetition would, I am sure, drive me insane . From what I can see you have all the attributes required not to need luck to complete this.
 
And this is just the mock up/proof of concept. You have to do this 6 more times in oak. I am in awe of the discipline and patience required to do this, the repetition would, I am sure, drive me insane . From what I can see you have all the attributes required not to need luck to complete this.
That is interesting. I like the repetition. You just follow the steps already proved. Whereas the first makes me nervous. Working out the correct order and technique for each step I tend to over think the steps which creates delay. So once I know what to do I can just get on.
Obviously if it were hundreds rather than six it would get to boring or insanity
 
I agree. Repetition is satisfying. Try learning piano! The legs look really good.
 
Re: clamping curved surfaces: you could also try making clamping blocks with a complementary curve against the leg but a square face to the clamp.

I'm with you on trying a new project out on scraps before the real thing.
 
I've made two sets of dining chairs in my time. In both cases, mockups and prototypes were worth their weight in gold.
Incidentally, in both cases I avoided the intersecting tenon challenges by offsetting the rails. In the first set, the back rail was moved forward so that it ran between the side rails rather than between the legs, and in my curret set they are positioned further down, between the legs but lower than the seat.
S
 
Years ago in the now defunct ' Furniture & Cabinet Making' magazine (was that the title?) they ran a series of articles on the business side of running a small furniture making enterprise. It was a very good series. One article covered pricing and in it the author (Ian Robertson???) gave the following anecdote:-
A lady asked me for a quote for making a chair.
The design and price was agreed (let's say £250)
The chair was duelly finished to the lady's satisfaction.
She then asked for a quote for a set of 6
Certainly madam, that will be £2500.
Good grief. Why so expensive?
I enjoyed making the first one!

Brian
 
Back
Top