• Hi all and welcome to TheWoodHaven2 brought into the 21st Century, kicking and screaming! We all have Alasdair to thank for the vast bulk of the heavy lifting to get us here, no more so than me because he's taken away a huge burden of responsibility from my shoulders and brought us to this new shiny home, with all your previous content (hopefully) still intact! Please peruse and feed back. There is still plenty to do, like changing the colour scheme, adding the banner graphic, tweaking the odd setting here and there so I have added a new thread in the 'Technical Issues, Bugs and Feature Requests' forum for you to add any issues you find, any missing settings or just anything you'd like to see added/removed from the feature set that Xenforo offers. We will get to everything over the coming weeks so please be patient, but add anything at all to the thread I mention above and we promise to get to them over the next few days/weeks/months. In the meantime, please enjoy!

Chest of Drawers

johnward

Sapling
Joined
Jul 22, 2014
Messages
391
Reaction score
66
Location
Near Oxford
IMG_9623.JPG

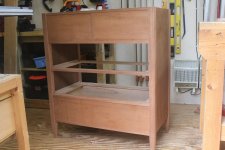
I started this project well over a year ago but it has been delayed due to one thing and another. I'm now well on with the drawers so should be finished by Christmas (ha ha).
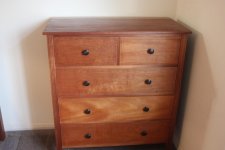
One fundamental error - I should have made the top drawers slightly narrower than the others

John
 
What is the timber John? Looks a bit like cherry or maybe steamed beech.

I remember Steve Maskery telling me a formula or a layout method for progressive size reduction of drawer heights but that was so long ago the detail other than meeting him, has faded from memory.

Bob
 
9fingers":1w3vhhbo said:
What is the timber John? Looks a bit like cherry or maybe steamed beech.

I remember Steve Maskery telling me a formula or a layout method for progressive size reduction of drawer heights but that was so long ago the detail other than meeting him, has faded from memory.

Bob
As well as reducing drawer heights, the handle or pull distance from the centre also has to be reduced, so highest on the bottom drawer and centre on the top - Rob
 
9fingers":494eenlw said:
What is the timber John? Looks a bit like cherry or maybe steamed beech.

I remember Steve Maskery telling me a formula or a layout method for progressive size reduction of drawer heights but that was so long ago the detail other than meeting him, has faded from memory.

Bob

Was it in ascending order each one a third smaller than the last?
 
Andyp":1tedkbf2 said:
9fingers":1tedkbf2 said:
What is the timber John? Looks a bit like cherry or maybe steamed beech.

I remember Steve Maskery telling me a formula or a layout method for progressive size reduction of drawer heights but that was so long ago the detail other than meeting him, has faded from memory.

Bob

Was it in ascending order each one a third smaller than the last?

I don’t think it was that simple otherwise I should have remembered it. Maybe Steve will see this and remind me?
Bob
 
9fingers":2eoksbiw said:
What is the timber John? Looks a bit like cherry or maybe steamed beech.

I remember Steve Maskery telling me a formula or a layout method for progressive size reduction of drawer heights but that was so long ago the detail other than meeting him, has faded from memory.

Bob

Bob, The legs are Iroko from Tyler Hardwoods near Hungerford, the rest of the dark wood including the top is West African ''Mahogany'' recovered from a recycled gate-leg table. The lighter pieces for drawer runners, sides and backs of drawers are mostly beech, and the drawer bottoms are Cedar of Lebanon.
John
 
Thanks Andyp and Woodbloke. What you say sounds correct. Too late now I'm afraid. I'm very lazy at making full layout drawings and sometimes get caught out!!
The piece is for my bedroom so won't be seen by many critical eyes and I'll learn to live with it.
John
 
johnward":l9sxb6qv said:
9fingers":l9sxb6qv said:
What is the timber John? Looks a bit like cherry or maybe steamed beech.

I remember Steve Maskery telling me a formula or a layout method for progressive size reduction of drawer heights but that was so long ago the detail other than meeting him, has faded from memory.

Bob

Bob, The legs are Iroko from Tyler Hardwoods near Hungerford, the rest of the dark wood including the top is West African ''Mahogany'' recovered from a recycled gate-leg table. The lighter pieces for drawer runners, sides and backs of drawers are mostly beech, and the drawer bottoms are Cedar of Lebanon.
John

OOps I got that a bit wrong then lol certainly look a good colour match.
I like Tylers - I don't think I've ever had any duff timber from them.

Bob
 
Did someone call? :)

There are a number of ways of laying out the proportion of drawers. The three I know a bit about are called the Arithmetic Progression, the Geometric Progression and Hambridge Rectangles.

1. Arithmetic Progressions
This is when each drawer is a fixed size bigger than the one above it. So if the top drawer is 125mm deep, the one below it might be 150mm, the one below that 175mm, and so on.

arithmetic.png

2. Geometric Progressions
This is when each drawer is fixed FRACTION of the one above it. So starting with our 100mm top drawer, the one below it might be 20% deeper at 120mm, the one below that 20% deeper than that at 144, the next at 173mm, then 207mm etc.
geometric.png

They both have their advantages, but if you have many tiers, the bottom drawer can become very deep very quickly with a geometric progression.

3. My favourite is the Hambridge Rectangle or modifications of it. It's easier to do than to describe, but I'll have a go.
i) Start with a square the width of your chest of drawers. This square will be erased at the end of this but we need it as a starting point. The BL corner of this square is a pivot point and that pivot point never changes. Extend the L and RH sides of the square upwards - these will be the sides of your COD.

ii) With you compasses set to the diagonal, swing an arc from the TR corner of that square anti-clockwise until it is vertically above the LH side of drawers. Draw a line horizontally across to the RH side to give you the bottom drawer of your chest.

iii) Now reset you compasses to the diagonal from the Pivot point to the TR corner of your new rectangle and repeat; swing CCW, draw horizontal line to give second drawer, and so on.

When you have as many drawers as you want, remove the original square.

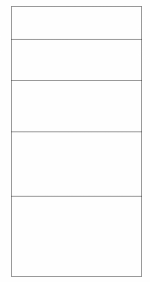
You can, if you wish, use Hambridge to define the vertical spacing, but adjust the horizontal dimension afterwards to suit a narrow chest of drawers (RH image)

hambridge.png

I have a bedroom COD on the TUIT list to complement my Mackintosh wardrobe I made 18 months ago. I shall use Hambridge for that.
 
Many thanks Steve for describing your three options for increasing drawer height. You can't imagine how hard I'm kicking myself!
John
 
9fingers":3cg4e9iv said:
Thanks Steve.

It was the Hambridge one that you showed me when I visited you all those years ago.

Cheers
Bob

I’ve never heard of that method but it looks to me to be a gud’n. Easy enough to do if you were to make an exact scale drawing which then produces the final height of the piece (sans stand, if fitted)

Suppose though, you were to turn it on it’s head and a fictional client were to say, propose a brief where the height of five drawers were to be 1010mm (for arguments sake) how do you then split that distance up to obtain pleasing drawer sizes; one of the first two methods I assume (or a variation thereof?) - Rob
 
Thanks for that Steve, I particularly liked the Hamdbridge method. I haven’t made a huge number of chest of drawers but I’ve always just done it by eye When drawing it up, my theory being if it looks right it probably is right.
 
Cabinetman":1zf5gg2t said:
Thanks for that Steve, I particularly liked the Hamdbridge method. I haven’t made a huge number of chest of drawers but I’ve always just done it by eye When drawing it up, my theory being if it looks right it probably is right.
Same here, more or less; adding a bit here, taking orf a bit there ‘til it looks about right, which is the way that old skool boat builders used to (and probably still do) make boats. I’ve made three chest of drawers so far and they all look to be fairly respectable, even SWIMBO’s ‘Makepeace’ thingie - Rob
 
I can’t help thinking that the last two examples of a chest of drawers on Steve’s last image appear to show each draw a third smaller than the previous which is a lot easier to remember than the other methods described. Probably just my eyes and my over simplification though.
 
IMG_2776.JPG IMG_2778.JPGIMG_0748.JPG

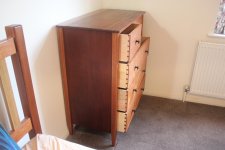
I have finally finished this piece of furniture, much much later than I had forecast. I'm very pleased with the overall carpentry side of the piece but there a few cosmetic things that aren't right. Firstly the height of the top drawers which has been discussed at length. then the colour of the 80mm make-up strip at the back of the top - I thought the Osmo oil would blend it in but it hasn't! - any thoughts on how I can darken it now. And lastly the shade of colour to the drawer fronts doesn't match very well.
Anyway despite the above I now have plenty of room for my shirts, pants and socks!!

John
 
I can’t offer a solution to your colour matching issue, but I think it’s a lovely piece of furniture.it looks beautifully made.
 
I see nothing wrong at all with the proportions. Looks like a fine piece of furniture that I would have in my house.
 
Woodbloke":2htacxhd said:
9fingers":2htacxhd said:
What is the timber John? Looks a bit like cherry or maybe steamed beech.

I remember Steve Maskery telling me a formula or a layout method for progressive size reduction of drawer heights but that was so long ago the detail other than meeting him, has faded from memory.

Bob
As well as reducing drawer heights, the handle or pull distance from the centre also has to be reduced, so highest on the bottom drawer and centre on the top - Rob

Can you explain a little bit more, please, Rob.
 
Reading back through this thread.....

I derive my drawer heights in a number of ways, but often dictated by the size of the available timber. This can make any theory redundant. Typically, I would decide my top drawer height around its useage, and I would decide my bottom drawer height around the breadth of my stock. I would then do an arithmetic stepping for the intermediate drawers. In other words, fill in the gap with an equal change between each drawer.

It's worth remembering that it can also look great to have a slim top drawer and the lower drawers all the same height, and that works particularly well if you divide the top drawer in half (ie two drawers).

Decades ago, I remember seeing a method which was called something like "Little Piggy". As I can neither remember the name nor the method, it really was hardly worth mentioning. :lol:
 
RogerS":9ca4r2eo said:
As well as reducing drawer heights, the handle or pull distance from the centre also has to be reduced, so highest on the bottom drawer and centre on the top - Rob

Can you explain a little bit more, please, Rob.

Without wishing in any way to hijack John's excellent job, this is my huge Korean style chest of drawers which I snapped 'square on' so the drawer pulls can be seen:

IMG_6495.jpeg

In the top two rows with the smaller drawers, the pulls are dead centre. In the remaining bigger drawers the pulls are around 4mm higher each time, so on the third drawer, it's 4mm above centre, the fourth drawer it's 8mm above centre and and on the bottom two very big drawers it's around 12mm above centre. It's very subtle, but it's there.

The reason this is done is that when you're standing directly in front of the piece, handles which are dead centre on each drawer don't look right, so they need to be slightly higher as your eye's track down towards the bottom. In theory :eusa-whistle: - Rob
 
Just looked at a commercial piece here with five drawers
Top smallest, next one done a bit larger and final 3 a bit larger again but all the same and central knobs

I guess that’s commercial pressures of only needing three set ups for all drawers?
Bob
 
Back
Top