• Hi all and welcome to TheWoodHaven2 brought into the 21st Century, kicking and screaming! We all have Alasdair to thank for the vast bulk of the heavy lifting to get us here, no more so than me because he's taken away a huge burden of responsibility from my shoulders and brought us to this new shiny home, with all your previous content (hopefully) still intact! Please peruse and feed back. There is still plenty to do, like changing the colour scheme, adding the banner graphic, tweaking the odd setting here and there so I have added a new thread in the 'Technical Issues, Bugs and Feature Requests' forum for you to add any issues you find, any missing settings or just anything you'd like to see added/removed from the feature set that Xenforo offers. We will get to everything over the coming weeks so please be patient, but add anything at all to the thread I mention above and we promise to get to them over the next few days/weeks/months. In the meantime, please enjoy!

Chisel rack

Malc2098

Sequoia
Joined
Jul 3, 2016
Messages
8,322
Reaction score
1,367
Location
Tiverton
Name
Malcolm
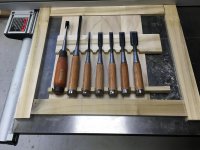
I've had my chisels stuck to a magnetic strip on a French cleat for a while and I don't like them like that with blades exposed, so I've decided to make a chisel rack. As they're mostly Japanese chisels, I chose the Japanese style by Adrian Preda, with through tenons and wedges for the corner joints.

I have tried to use up the remnants of tulip wood offcuts that Coley gave me. Some of the wood looks really nice, and some has some defects in it which I haven't found until working it.

I started by thickness some strips on the P/T to quite thin by using the melamine board with sandpaper stuck to it and passing them through sitting on the sandpaper. I then glued them together to make the back of the rack.

The sander is another generous donation by my lovely uncle.

IMG_3319.JPG
 
I then laid out the sides and top and bottom with the chisels in and drilled the holes for the handle rests and then cut that down the middle to make two of them and also to get the lengths required for top and bottom.

fullsizeoutput_81b.jpeg
IMG_3321.JPG

I'll see if the hammer will fit, too, and if a couple of magnets might hold it.

fullsizeoutput_81c.jpeg

I then did the mortice and tenons, the mortices with the mortiser and the tenons on the bandsaw. The tulip wood didn't like the mortiser cutting through even with an oak board backing it and tore out. It all went together well, but I may look for some different wood to use on the sides and top and bottom.

fullsizeoutput_81d.jpeg

Just the magnets, the tenons' wedges, the back and the French cleat hook to be fitted and that should be it.
 
Andyp":139kskm8 said:
Very neat Malc, are you not tempted to put some doors on it?

Thanks, Andy.

I'm hoping rare earth magnets are going to stop them falling out. :)
 
Malc2098":36dqvct7 said:
Andyp":36dqvct7 said:
Very neat Malc, are you not tempted to put some doors on it?

Thanks, Andy.

I'm hoping rare earth magnets are going to stop them falling out. :)

I am sure they will. I was thinking of keeping dust out.

Is there also the chance that the chisels will become magnetised?
 
Andyp":21esfaw6 said:
Malc2098":21esfaw6 said:
Andyp":21esfaw6 said:
Very neat Malc, are you not tempted to put some doors on it?

Thanks, Andy.

I'm hoping rare earth magnets are going to stop them falling out. :)

I am sure they will. I was thinking of keeping dust out.

Is there also the chance that the chisels will become magnetised?

Ha! If I use them often enough, the dust won't settle!

Would magnetising the blades create problems when sharpening?
 
Dunno Malc, but that was always my fear. Swarf from sharpening contaminating the workpiece perhaps? A quick wipe would solve that though. :eusa-think:

I use magnets to hold spanners and chuck keys to machines but that’s all.
 
That looks good. I have a morbid fear of nasty sharp chisel blades etc when they're racked out on the Tool Wall, so each chisel has it's own partitioned space (to stop them 'clonking' against one another) and the blades are covered in a bit of clear acrylic so pink fleshy bits can't get anywhere near the edges - Rob
 
Today, I marked out and forstnered (is there such a verb?!) the recesses for the magnets.

fullsizeoutput_81e.jpeg
I made and fitted the wedges to pull the tenons tight.

IMG_3329.JPG
I routed and chiselled the round corners square to accept the back.

fullsizeoutput_81f.jpeg
I glued and clamped the back in place.

IMG_3331.JPG
 
Finished and French Cleated.

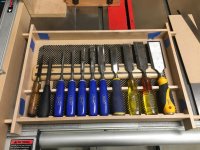
Now to start another for all the rest. This time I'm using some recycled cherry from my old kitchen cupboard doors.

IMG_3333.JPG
 
Woodbloke":2ulr2id2 said:
That looks good. I have a morbid fear of nasty sharp chisel blades etc when they're racked out on the Tool Wall, so each chisel has it's own partitioned space (to stop them 'clonking' against one another) and the blades are covered in a bit of clear acrylic so pink fleshy bits can't get anywhere near the edges - Rob

I agree. It’s surprising how many Woodturning tool racks I’ve seen with the sharp edges pointing upwards.
 
Just run a dry fit for for the second one. Using 3mm mdf for the backing this time.

That cherry is nice to work.

fullsizeoutput_824.jpeg
 
Andyp":3p7ju1p0 said:
Is that anti slip mat on the back Malc?

Yes, Andy. I've just been using it while moving the chisels around to get the measurements.

I wasn't proposing to use it while it was vertical on the wall.
 
fiveeyes":30ps7lh7 said:
smartly done...could you not angle the rack, so as to not have 'falling out' ? perhaps no room tho.

Thanks.

I don't think there's a need. The magnets do their job well. The larger chisels have two magnets behind them. When I put the chisels back, there's a reassuring clunk as the magnet pulls them back.
 
Back
Top