• Hi all and welcome to TheWoodHaven2 brought into the 21st Century, kicking and screaming! We all have Alasdair to thank for the vast bulk of the heavy lifting to get us here, no more so than me because he's taken away a huge burden of responsibility from my shoulders and brought us to this new shiny home, with all your previous content (hopefully) still intact! Please peruse and feed back. There is still plenty to do, like changing the colour scheme, adding the banner graphic, tweaking the odd setting here and there so I have added a new thread in the 'Technical Issues, Bugs and Feature Requests' forum for you to add any issues you find, any missing settings or just anything you'd like to see added/removed from the feature set that Xenforo offers. We will get to everything over the coming weeks so please be patient, but add anything at all to the thread I mention above and we promise to get to them over the next few days/weeks/months. In the meantime, please enjoy!

Chris' Workshop Construction

Chris Bates

New Shoots
Joined
Apr 9, 2016
Messages
56
Reaction score
0
Hi Mike,

Thanks.

The base is completed I don't have any photos of the completed base at present. Below should be some sketches of the proposed shed and the guys constructing the base.

I intend to clad with Fortex.

Chris


Hi Chris and welcome to the forum.

Rather than merge with Mike's thread, would you like to suggest a title for your own project and I'll create it for you and transfer your posts over.

Your links should become visible once you've gone over the anti=spam threshold (one more post!)

ATB

Roger
 
RogerS":25himb9y said:
Hi Chris and welcome to the forum.

Rather than merge with Mike's thread, would you like to suggest a title for your own project and I'll create it for you and transfer your posts over.

Your links should become visible once you've gone over the anti=spam threshold (one more post!)

ATB

Roger

Hello Roger,

We'll go with

"Chris' Workshop Construction"

Thanks


Chris
 
New thread started and posts extracted from Mike G's thread.
 
Chris,

Welcome to the forum.

I've edited your picture links so that they now show ok

It seems that the trick with Photobucket is to use their image tag in its entirety rather than use our IMG button and insert the direct link.
Hope this helps

Bob
 
9fingers":248hw2f4 said:
Chris,

Welcome to the forum.

I've edited your picture links so that they now show ok

It seems that the trick with Photobucket is to use their image tag in its entirety rather than use our IMG button and insert the direct link.
Hope this helps

Bob


Thanks

Chris
 
Hi Chris,

Welcome to the forum.

Looking good now I can see the pictures, that mini digger must of made short work of the site prep.
 
Looking good, Chris.

Just a couple of things. With the Onduline roofing, I suggest you stick to the black colour, because all the other colours fade to black in a matter of 5 years or so anyway, and don't look quite as good as the black ones in the process. Also, the Fortex cladding (a PVC feather-edge board look-alike, for those who don't know) needs a little care in planning because of the vertical junctions. They should be staggered randomly across the facade, if possible.

Like the others, I look forward to some more photos.

Mike
 
DaveL":fhy9ii1v said:
Hi Chris,

Welcome to the forum.

Looking good now I can see the pictures, that mini digger must of made short work of the site prep.

Yes... The design is based on Mike G's original in 2010 on the UK workshop forum.

The concrete base is complete, but unfortunately I don't have any photo's of that with me (I'm on an oil rig in the middle of the North Sea and the photo's are at home).

I decided to let someone else do the ground work and I'll do the timber construction. I've never tackled a project on this scale before. I made the design mono pitch and quite tall to avoid being overlooked by the flats behind me. There were conifers there originally, and the Worksop height matches the conifer height.

Chris
 
Mike G":2sj55j2a said:
Looking good, Chris.

Just a couple of things. With the Onduline roofing, I suggest you stick to the black colour, because all the other colours fade to black in a matter of 5 years or so anyway, and don't look quite as good as the black ones in the process. Also, the Fortex cladding (a PVC feather-edge board look-alike, for those who don't know) needs a little care in planning because of the vertical junctions. They should be staggered randomly across the facade, if possible.

Like the others, I look forward to some more photos.

Mike


Thanks Mike,

Yes I had planned for black roof for that reason.

Back to the Fortex Cladding. I have managed to eliminate all joints on the visible facades, but joints on the non visable facades, which I planned "non staggered" .

Is your advice purly for cosmetic reasons ? or have I missed something ?

Chris
 
Yes, it was for aesthetics only, so if non-visible it won't matter.
 
Hello Mike G, and anyone else that wishes to comment. I would be please to here views.

I’ve got a few questions if you would be so good as to give your opinion

Going back to the treated timer you used in your workshop frame construction. How did you protect the cut ends ? A coat of preservative prior to fixing the frame together ?

The OSB you used in your workshop construction was it OSB2 or OSB3. How much moisture will this stuff take ? I am concerned that the OSB will be damaged by rain if not covered up quickly during construction.

I recall reading in a previous post somewhere you used silicon sealer to seal between the sole plate and brickwork. My two courses of brickwork are engineering blues. I’m considering using silicon sealer between the blues and soleplate with no further DPC. Would this be acceptable ?

Your original sketch proposed a “50mm minimum vented void” between the Kingspan roof insulation and roof covering was proposed. I am proposing to using 6x2” rafters, filled mostly with 140mm kingspan. The oduline roofing sheets will then be supported on 2x2” purlins. I am proposing to use a breather membrane between the rafters and purlins to act a secondary barrier. I am concerned that there will minimal free space between the kingspan and breather membrane, leading to moisture problems. Should I forgo the breather membrane ?

http://s1096.photobucket.com/user/chrisxbates1/media/scan0012_zpsfwfb02au.jpg.html

Thanks

Chris
 
Hi Chris.

Best practice regarding preservative and cut ends is to dip your cuts into a bucket of preservative (such as "Protim End Cut") for 30 seconds or a minute. It is seldom done. Personally, I don't worry unless the cut timber is exposed (for instance, rafter feet).

I have no idea what grade of OSB I used. There is only one grade available from my Builder's Merchant. I'm visiting tomorrow: I'll ask what they stock. I can report that it has remained flat and true, without the major bowing that my previous workshop suffered from. I can also tell you that OSB has so much glue that getting it very wet for many months seems to have no significant effect. However, I would avoid standing it on the ground. Once it is fixed in place to your building it is fine for months of exposure.

So long as you maintain air flow at the eaves and ridge, your roof build-up should be fine.

Oops, forgot the DPC.....

Engineering blues are water-resistant, but your mortar isn't. I would still put in a DPC, personally. It costs pennies, and takes just seconds. I can't see why anyone would compromise on this.
 
Mike G":3f42h4pb said:
Hi Chris.

Best practice regarding preservative and cut ends is to dip your cuts into a bucket of preservative (such as "Protim End Cut") for 30 seconds or a minute. It is seldom done. Personally, I don't worry unless the cut timber is exposed (for instance, rafter feet).

I have no idea what grade of OSB I used. There is only one grade available from my Builder's Merchant. I'm visiting tomorrow: I'll ask what they stock. I can report that it has remained flat and true, without the major bowing that my previous workshop suffered from. I can also tell you that OSB has so much glue that getting it very wet for many months seems to have no significant effect. However, I would avoid standing it on the ground. Once it is fixed in place to your building it is fine for months of exposure.

So long as you maintain air flow at the eaves and ridge, your roof build-up should be fine.

Oops, forgot the DPC.....

Engineering blues are water-resistant, but your mortar isn't. I would still put in a DPC, personally. It costs pennies, and takes just seconds. I can't see why anyone would compromise on this.

Thanks Mike, that all makes sense.

I spoke to my Timber Merchants today and I have been quoted for OSB3. So i'll be using that.
 
Back home now. Here's the base.

IMG_14621_zpsr8dqjysw.jpg


I will post more photos as construction progresses.

Chris
 
13256490_10207097442374308_8253009443226088925_n_zpsevp3cml1.jpg


All 5 frames constructed today. I decided to put the frames in position on a "trail run". Final fixing of frames hopefully tomorrow.

Chris
 
Hello All,

I believe I have made good progress over the last couple of days. I think all of these are self explanatory.

IMG_1481_zpsdj404rrn.jpg

IMG_1482_zpspodnz6cj.jpg

IMG_1483_zpsbww6a3gm.jpg

IMG_1485_zpsjvzis9ie.jpg

It generally went to plan, and as far I can tell everything is fairly square and plumb.

I cut a rafter too short hence the ply.

IMG_1484_zpsmfmqaasy.jpg


Some of the mortar between the fame and bricks is better than others. This was primary due to the frame moment whilst the mortar was curing. I regret not checking it sooner, but at the time I was concerned about the woodwork being true. I intend to point up to the best I can unless anyone else has ideas. This picture is probably the worst area

IMG_1473_zpszjzo46yr.jpg


Also I notched the frame slightly so the OSB is not held proud by the strap.

IMG_1471_zpsu27ru1rc.jpg


I intend to use these Screwfix to hold the rafters plumb. Any views anyone ?

IMG_1475_zpsllmhtjeu.jpg


There is a small frame to the right of the door aperture( as viewed externally). It wasn't supported at the bottom so I "rawl bolted" it down.

IMG_1480_zpsauvhdnky.jpg


IMG_0611_zpsdxr3abgn.jpg


Next job fix all the components held together by cramps (or is it clamps)
 
The white drain pipe in the corner is a ducting, for low voltage cable. Alarm, landline etc.
 
Nice work Chris, you seem to be going great guns, do you have the 2 weeks on 2 weeks off pattern to help you? I have changed my job and have substantially less time now. On a separate note I wonder how many people have worked from Mike's plans. I don't think I could have done it without. He has spawned a rash of outbuildings that will last for years hopefully! :D
 
Hello Dan,

Thanks.

2 weeks away, 3 weeks off. Back on with the shed tomorrow. I had someone helping for a few days, but from now on I'm on my own.

I was going to tackle the roof next but have decided to fit the OSB as Mike did, for various reasons.

I agree if I didn't have Mike's advice, I'd be guessing and experimenting far more.

Chris
 
Hello All,

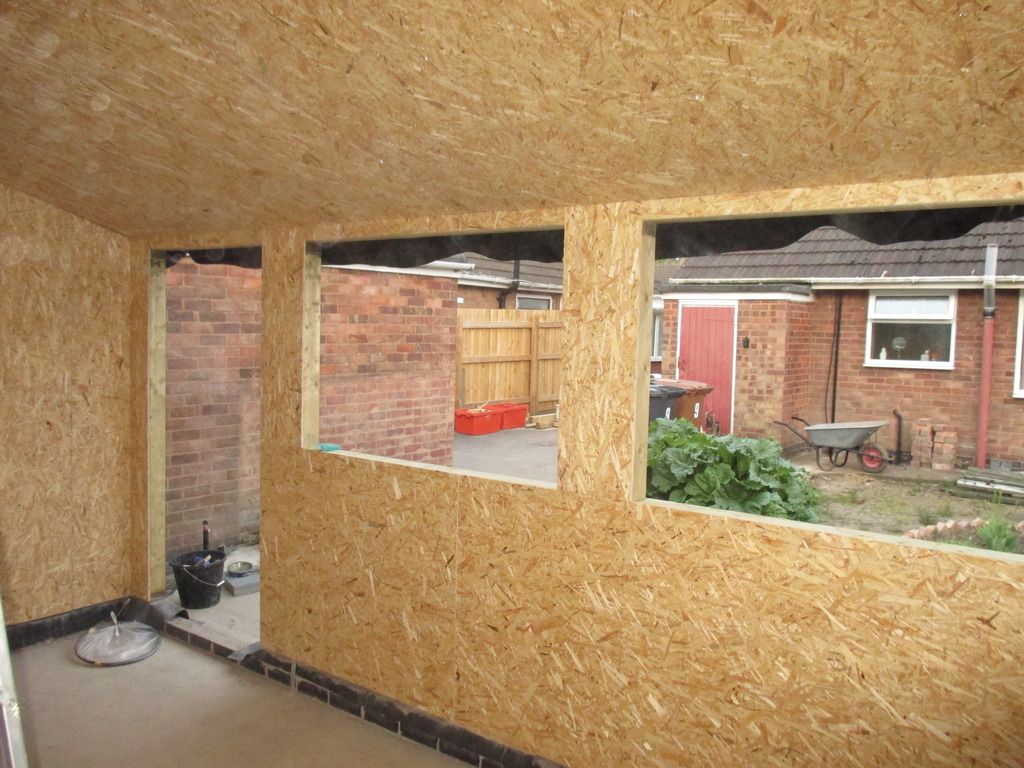
I've covered the roof in a sheet of polythene to help keep the worst of the weather off temporarily and made a start with OSB lining. I'm impressed how the OSB stiffens the structure.

IMG_1486_zps9zgogzvx.jpg


Sole plate straps, Showing notched sole plate.

IMG_1487_zpsv90hhrqq.jpg


I've managed to get one sheet of OSB on the ceiling myself, by clamping two of these to the frame.

IMG_1490_zpslghvsjtn.jpg


And this to a rafter. Easy peasy !

IMG_1489_zpsbgbevsku.jpg


The remainder of the OSB is due to be delivered tomorrow.

Thant's about it for today.....

Chris
 
I meant to ask. Have others supported the OSB when two sheets are butted together ? As shown below.

IMG_1492_zpsmj6diuqh.jpg


Have others fixed a piece of 2 x 4 to the fame to support the join ? Or should I just butt the two pieces of OSB together with no support.The walls will be filled with 'kingspan'.


Also I have finished the OSB at the same height as the frame. I intend to have an insulated floor and complete the gap between OSB and floor with skirting board.

IMG_1496_zpsnrid17bg.jpg


Thanks

Chris
 
9fingers":1jqlcl0z said:
I'd suggest ripping offcuts from your 4x2 into 4 off 1ish x2 and using those as stiffeners across the joints. Screw through the osb into the stiffeners.

Bob

Thanks Bob,

I was toying with that sort of thing, using a bit of roofing lath or similar.

Chris
 
Hello to all my followers,

I've now fitted all of the large OSB pieces to the walls and ceilings. Some sheets need more screws, but at least their up. The boards are fitted with a gap of 2mm approx between them.

IMG_1498_zpspi1zomhf.jpg

IMG_1500_zps6rhjuxlj.jpg

IMG_1504_zpstetq2zwm.jpg


Chris
 
9fingers":9vpbek4b said:
Coming along nicely Chris!

With those two openings in the front, I can visualise you selling teas, coffees and ice creams from there. :lol:


Bob

Thanks, That thought has also crossed my mind


Chris
 
:eusa-drool:
Crispylettuce":29lbwseq said:
Have you got windows/doors sourced?

Sent from my MotoG3 using Tapatalk

Hello Chris,

In a word no. I require white standard UPVC and have some budget prices off the internet.

Chris
 
Hello to all my followers,

The weather has been good here (on and off) over the last few, so I've been doing more pleasurable things, but progress has been made.

All of the OSB has now been cut and attached to the walls.

IMG_1508_zpszdfeahvc.jpg

IMG_1506_zpsyskvnnnk.jpg

IMG_1510_zpsh9fy2m0x.jpg


And today the internal walls and ceiling have been given the 1st coat of paint. I used Screwfix No-nonsense masonry paint applied with a roller.

IMG_1511_zpsa9pywdsc.jpg

IMG_1517_zpsnaokjwr0.jpg


It needs at least another coat, but looking good.

Chris
 
I have found cheap white wall paper to be much quicker for a decent finish.
Wickes used to do the embossed stuff for cheap.. and it only takes one coat of paper :D
 
ScotlandtheDave":3gcbcrp4 said:
Thats a nice neat job with the OSB! I'll be watching with interest how it takes a further coat of paint as i'm planning OSB inside my shed and i'm not a huge fan of the look of the stuff as it is.

cheers

I gave a small area a second coat yesterday evening. The coverage is good but the OSB stands can clearly be seen. I agree this is not the best look. For my intended use this is more than satisfactory. The prime factor is it's white to allow plenty of light.

Chris

IMG_1518_zpsmw2n68co.jpg
 
Tusses":ihs4cfi6 said:
I have found cheap white wall paper to be much quicker for a decent finish.
Wickes used to do the embossed stuff for cheap.. and it only takes one coat of paper :D

Thanks, I'll consider for future projects.
 
Chris Bates":38ejeura said:
The coverage is good but the OSB stands can clearly be seen

That looks a lot better after a second coat and like you say its primary function is to bounce light around, not grace the cover of good housekeeping :)

The wallpaper idea is intriguing- feature wall in the shed! [emoji1]
 
ScotlandtheDave":1r0sq7eg said:
......
The wallpaper idea is intriguing- feature wall in the shed! [emoji1]

You'll never be short of paper for jotting things down!
 
Back
Top