• Hi all and welcome to TheWoodHaven2 brought into the 21st Century, kicking and screaming! We all have Alasdair to thank for the vast bulk of the heavy lifting to get us here, no more so than me because he's taken away a huge burden of responsibility from my shoulders and brought us to this new shiny home, with all your previous content (hopefully) still intact! Please peruse and feed back. There is still plenty to do, like changing the colour scheme, adding the banner graphic, tweaking the odd setting here and there so I have added a new thread in the 'Technical Issues, Bugs and Feature Requests' forum for you to add any issues you find, any missing settings or just anything you'd like to see added/removed from the feature set that Xenforo offers. We will get to everything over the coming weeks so please be patient, but add anything at all to the thread I mention above and we promise to get to them over the next few days/weeks/months. In the meantime, please enjoy!

Cleaning up lipping

Mike G

Petrified Pine
Joined
Jul 30, 2014
Messages
12,481
Reaction score
3,033
Location
Suffolk
Name
Mike
How do you guys do it? I've hardly done any projects which involve lipping a veneered board, but I'll soon be tackling a big desk for my study which will involve oak faced MDF with a lip. Is it a question of just sneaking up on it with a hand plane then finishing with a scraper? One slip and you're straight through the veneer, though, because it's about as thin as paper.

Oh, and before anyone suggests a Domino, I have Carruthers standing by with a bull whip. ;) :lol:
 
Hi Mike, I’ve done a few bits exactly like you’re describing and never really had a problem obviously your blade needs to be sharp and the closer you get the more you wind the blade back until It’s just a whisper and that’s it, I don’t bother with a scraper it’s strange it’s almost as if the veneer is harder than the surround and it takes the suround more easily – I know it isn’t that but that’s how it feels sometimes, the blade just doesn’t want to seem to want to cut into the veneer, perhaps experiment with an offcut. Ian
 
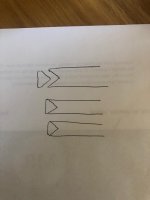
I've done it a couple of ways Mike. My favourite is routing a V shaped groove along the length of the board edge, then the lipping has a matching V to slot into it. Leave a little extending from the V on the lipping, then you can chamfer that up to the edge of your veneer.

See pic.

IMG_3992.jpg

If you're talking about oversize lipping and just planting it on then bringing down to the face then there are loads of videos of how to do it using a straight cutter in a router from the top/bottom face, using the bottom of the cutter, leaving a quick sand to finish.
 
Spindle moulder with a false bed attached to the bed so the lipping can protrude downwards, powerfeed running in reverse and a rebate block with scriber knives taking off the lipping flush with the veneer.

No Domino needed :D
 
Trevanion":l9iynz3i said:
Spindle moulder with a false bed attached to the bed so the lipping can protrude downwards, powerfeed running in reverse and a rebate block with scriber knives taking off the lipping flush with the veneer.

No Domino needed :D

:lol: :lol: So, I need to borrow a spindle moulder and cutter with power feed, and big enough infeed and outfeed tables to take a piece of board 2.4m x 600. Or.....

Cabinetman":l9iynz3i said:
I’ll stick with my trusty number four thank you.
 
TrimTheKing":38ic0dbs said:
I've done it a couple of ways Mike. My favourite is routing a V shaped groove along the length of the board edge, then the lipping has a matching V to slot into it. Leave a little extending from the V on the lipping, then you can chamfer that up to the edge of your veneer.

See pic.


I'm looking at showing 15 or 20mm of lipping in front of the board. Yours is a nice solution if you want to do the equivalent of edge-banding.

If you're talking about oversize lipping and just planting it on then bringing down to the face then there are loads of videos of how to do it using a straight cutter in a router from the top/bottom face, using the bottom of the cutter, leaving a quick sand to finish.

I can't see how this can work, because the router base would have to ride up on the high part of the lipping. I'll have a look around Youtube. It's getting the top flush which is my issue. The front edge will probably project some 15 or 20mm, and the lipping will be wider than the board (probably 40+ mm on a 19mm board).
 
novocaine":3e6jcbm7 said:
https://www.toolstation.com/trend-14-trimmer-router-cutter-900/p23917?utm_source=googleshopping&utm_medium=feed&utm_campaign=googleshoppingfeed&gclid=CjwKCAiAudD_BRBXEiwAudakX-l-0i3sbhb_xXJfueW65Ra245DZv_O2ETJezZT4jr0uUxY8Qf8QvhoCB30QAvD_BwE

set the bearing to ride just on the veneer.

Damn, that means planing the front edge of the lipping somewhere near square. I'll have to up my game, as the vernacular apparently has it.
 
Mike G":11tnrgvv said:
I'm looking at showing 15 or 20mm of lipping in front of the board. Yours is a nice solution if you want to do the equivalent of edge-banding.

You can leave any amount you want in front of the board...

Mike G":11tnrgvv said:
I can't see how this can work, because the router base would have to ride up on the high part of the lipping. I'll have a look around Youtube. It's getting the top flush which is my issue. The front edge will probably project some 15 or 20mm, and the lipping will be wider than the board (probably 40+ mm on a 19mm board).

I missed off a critical part, the router is on a raised half base to allow the base to be above. The other way is to do it on edge, with a support for the base and using a bearing guided cutter.
 
9fingers":20w7g7ji said:
......Stop this hand tool nonsense.......

Too late Bob. I'm too far down that road to go back again.
 
Mike G":1al1vg2s said:
novocaine":1al1vg2s said:
https://www.toolstation.com/trend-14-trimmer-router-cutter-900/p23917?utm_source=googleshopping&utm_medium=feed&utm_campaign=googleshoppingfeed&gclid=CjwKCAiAudD_BRBXEiwAudakX-l-0i3sbhb_xXJfueW65Ra245DZv_O2ETJezZT4jr0uUxY8Qf8QvhoCB30QAvD_BwE

set the bearing to ride just on the veneer.

Damn, that means planing the front edge of the lipping somewhere near square. I'll have to up my game, as the vernacular apparently has it.
sod that, use a fake edge, I usually have a bit of nice flat MDF that I can sit on the bench for the router to ride on and the shelf sits on the vice end on. :)
 
How bizarre, a carpentry thread I can actually comment on from experience.... :shock: 8-)

I recently real wood edged a couple of wardrobe doors that were beech veneered chipboard, after the original edges were damaged.

I used the T section method as suggested by t'other Bob.

With the router, cut a slot across the edge of the board about 6 mm thick (depending on overall thickness, but just less than a third.
On the plank of wood that has been thicknessed to the same as the wood to lipped, use the router to cut the equivalent of a Tongue the same size as the groove in the donor plank. then using the table saw slice off the thickness of lipping you want. Repeat until the work is complete. 8-) 8-)
Seems there were a lot of comments as I was typing, but hey.
 
As you know Mike, a lot of my stuff is veneered but I rarely use the wafer thin, 0.6mm :shock: commercial stuff anymore. However, you can quite easily use a No.4 or 5 (ideally with a cambered blade) to come within a whisker of the veneered surface, laying the heel of the plane on the veneer and taking a skewed cut. I always look carefully at the mouth of the plane so that it's quite easy to see when you just touch the veneer. Then stop!!
If you leave the lipping very slightly proud, a couple of strokes with a sharp card scraper will then bring it dead level with the veneer.

Using 2 or 3mm thick bandsawn veneer is considerably easier :eusa-whistle: - Rob
 
Mike G":38eagwaz said:
This is the idea:

2PQaueM.png

For that section, I'd be inclined to just use a rebate cutter in a router table and adjust by trial, error, and plenty of scrap pieces until it lined up perfectly. As much as I'd generally prefer to do things by hand, very long, very straight cuts are one of the places where machines are worth the effort to set them up.
 
spb":18vfoy5e said:
For that section, I'd be inclined to just use a rebate cutter in a router table and adjust by trial, error, and plenty of scrap pieces until it lined up perfectly. As much as I'd generally prefer to do things by hand, very long, very straight cuts are one of the places where machines are worth the effort to set them up.
To get the top surface flush with the lipping as Mike wants, I'd suggest the router table approach simply isn't accurate or delicate enough. The veneer is a mere 0.6mm thick; one slight miscalculation, sneeze or hiccup and you're through it!

Mike would then exclaim ''goodness me, what a silly billy" and then have to go cap in hand to SWIMBO. Not a pretty situation :lol: - Rob
 
Woodbloke":y30rns3j said:
To get the top surface flush with the lipping as Mike wants, I'd suggest the router table approach simply isn't accurate or delicate enough. The veneer is a mere 0.6mm thick; one slight miscalculation, sneeze or hiccup and you're through it!
Yes, I wouldn't want to try to flush-trim against a veneer like that for just that reason. I'd just be relying on the MDF being of consistent thickness, and homing in on the router setting that matches it. Only the solid timber would go near the router cutter.
 
I am not sure I would use a factory veneered MDF for that job. I would be looking for 1-2mm veneer and veneer the panel myself. Then when it comes to finishing the lipping you can plane away. Or even better pre-lip the MDF and veneer over the lipping
More important I think it would create a far more substantial/ satisfactory/ durable writing area and desk. It would not take much to go through 0.6mm factory veneer.
The method TrimtheKing referred is excellent for cupboard doors etc I used it on some Rosewood Bathroom cabinets I made several years ago, but not suitable for a desk top.
 
PAC1":278zxjmw said:
I am not sure I would use a factory veneered MDF for that job........

OK, that's got me curious. Why not?

I would be looking for 1-2mm veneer and veneer the panel myself..........

I'm simply not geared up for that sort of thing. I can't cut or thickness veneer (certainly not for 8' x 2'), and I don't have a vacuum bag. I also have never done any veneering at all, and a monster like this doesn't strike me as a good place to start.
 
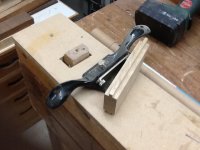
image.jpgimage.jpg

Two for the price of here. The Stanley No 80 is much safer than a plane for the last half millimetre.
The block you see is the way I prefer to get round the corners, the sheet material is cropped at 45 degrees and the block used to form a rounded corner.
 
I use a lot of oak veneered MDF and my experience is it damages easily so I would not use it as a desk surface or any work surface. Also I think it will look wrong. It is great for bookcases and radiator covers etc. I use it for extra wide window boards, it is ok but it just is not quite right. It might do for someone in a modern house but in what you are building it will just look wrong.

OK 8' by 2' without a press is a challenge.
If you do not fancy veneering your own have a look at veneered birch ply I have seen some with quite a thick oak veneer 1mm + somewhere! Sorry, if I remember I will let you know.
If you got some good quarter sawn 1" planks and gave it a long time to acclimatise, I would bet it would stay true so long as there is sufficient support underneath.
 
Hi Mike,
Can I ask why you want to use a veneered sheet? Thin veneer is not a very forgiving material for a desk top and odd scratches will be almost inevitable over the life of the desk.

I've made quite a few bookcases using veneered mdf or ply with 20x40mm lipping and finishing is pretty straightforward using one of the suggested methods but for a desk top I would always want to use solid wood or thick (2-3mm) veneer. I made my own desktop from 22mm oak but is only 1400mm by 800mm so not as large as yours but I;ve just replaced the tatty mfc worktop on our built-in bedroom furniture with solid 22mm maple and the longest section is around 2400mm long by 450mm wide. Before joining the 3 constituent boards were in the region of 155mm wide and it all went together with no significant problems although I did have to flatten it slightly after gluing.

HTH

David
 
PAC1":3ieo7tmm said:
OK 8' by 2' without a press is a challenge.
I do a lot of bag press veneering and 8' x 2' is a definite challenge, almost impossible I'd say. Even the industrial heated platten presses I used years ago would struggle iIrc with 8'! - Rob
 
Actually I think what has just been said is right, it wouldn’t look good especially not against all your other nicely made pieces, also that stuff isn’t cheap, I stopped using it when I realised I could do it for the same price in solid timber and hell of a lot quicker. Ian
 
Personally I’d use an edging plate with my router, works a treat

[youtube]zDgQ1_V1n3E[/youtube]

That said I agree I’d prefer solid to veneered.
 
Hmm. Not many solutions that are not rather spendy.

Whilst I agree that a commercial veneered MDF will have very thin veneer and be high risk, I would experiment on a test piece first doing my best to get the lipping close to flush.

When taking off edge banding with a block plane, the standard safety method is to hold the plane at a skew angle and have very little contact with the board. My experiment would be to get some high tack masking tape (available from Brewers decorator supplies) - the type with a very shiny top surface, and iron it on to get a good grip. Then take very fine skew cuts with the block plane, super sharp.

The other method I would try is to edge the board and then clamp a guide block about 1mm adrift of the edging and tight down on the board. Then run a super sharp block plane along.

My final suggestion (apart from below) is to make an edge scraper with a guide bearing that runs along the front edge of your banding. The scraper being exactly the same width as the banding. (Not hard to fabricate an adjustable tool with a simple wheel bearing).

Or forget MDF as a desk top and do a proper job out of solid wood. 8-)

Good luck with this. I am sure it can be done with hand tools and a bit of care.
 
Paisawood":2gymk398 said:
Can I ask why you want to use a veneered sheet? Thin veneer is not a very forgiving material for a desk top and odd scratches will be almost inevitable over the life of the desk......

Cabinetman":2gymk398 said:
Actually I think what has just been said is right, it wouldn’t look good especially not against all your other nicely made pieces, also that stuff isn’t cheap, I stopped using it when I realised I could do it for the same price in solid timber and hell of a lot quicker. Ian

PAC1":2gymk398 said:
I use a lot of oak veneered MDF and my experience is it damages easily so I would not use it as a desk surface or any work surface.......

OK, this is really interesting. As I said, I have no experience of using veneered boards, and just assumed that this is how most pros would build a workstation/ computer desk these days. Maybe I assumed wrong. I want this done in something of a hurry so that I can move my office into the study (rather than the chaos of the 4th bedroom) now that my wife has retired and has no need of the room any more. It isn't going to be a special piece of furniture, rather just a utilitarian work surface with some drawers below (albeit the design phase of these things often see them develop in complexity).

Half a sheet is the perfect size for this desk, but annoyingly, I buy oak in 2.2 or 2.8 metre lengths (too short, or wasting a bit). Flattening a 2 foot wide worktop would mean a bit of manual labour, but that's no big deal. If it's all going to be solid, maybe I'll have to find something to carve..... :)
 
Lipping MDF and getting a good joint is not difficult. I just think it will not look satisfactory in that setting
If you have to use veneer, the best method is using a jointing machine (d@%&*0 or biscuit jointer) and a sheet of paper or masking tape on the mdf that will align the face to within a couple of shavings with a sharp block plane. Alternatively make the edging oversize and router to within half a mm and then plane.
 

Attachments

  • D5A8392B-974E-4806-9835-F55D8FAEBCA2.jpeg
    D5A8392B-974E-4806-9835-F55D8FAEBCA2.jpeg
    82 KB · Views: 5,136
  • 8F28FBF8-16B7-4D0A-9948-026675339D75.jpeg
    8F28FBF8-16B7-4D0A-9948-026675339D75.jpeg
    71.5 KB · Views: 5,136
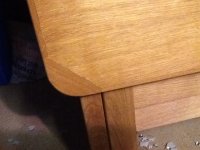
I guess it depends on how you look after the table as to how it stands up to use, I built this little table form an off cut of 26mm oak veneered MDF with solid lipping for the mother & father in law & it still looks as good over 5 years later

E7F01D0D-EE2C-4846-907D-69E448348C85.jpeg
 
Mike G":1tq27dij said:
OK, this is really interesting. As I said, I have no experience of using veneered boards, and just assumed that this is how most pros would build a workstation/ computer desk these days. Maybe I assumed wrong.

That's probably true, at least for a certain section of the market, but they'd probably be using edge banding more than solid lipping. I'd be approaching it as an odd-shaped table top, to be honest, where again most of the mass market would be veneered panel products but most people making their own would use solid wood.

As an aside, if it's a computer desk then I'd question whether 600 is enough depth - it's what I've got at the moment and I find it's not enough. As soon as I have the workshop bandwidth available I'll be replacing it with something 750 deep (which is what my previous cheap desk was, just not wide enough). Obviously disregard this if you've got your preferred setup on a 600 deep surface already, but it makes more of a difference than you might think.
 
Again, an interesting thought, Stephen. It's a really big room, and so I can easily afford the space. I'll take a closer look at the size when I start designing this thing.
 
My desk is 760 deep and by the time you get a computer, lamp, desk tidy and lever arch file on it you are looking to find somewhere to actually do some work. So 600 is narrow.
 
I have done this a couple of times, decades ago before we had the internet to expose us to lots of better options. In both cases, I just planed the oak lipping, with my plane resting on the veneered board, cutting out into space. Obviously I needed to be careful and not break off the unsupported edge.

But my point is that it worked, well enough, even though I wasn't as good at sharpening back then.

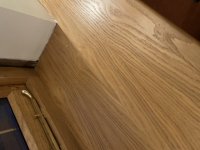
I don't have the kitchen units any more but I can provide some pics of the bookcase if it helps.

So I would say, don't overthink it, just plane it.
 
20210105_191820.jpg

Having suggested routers and the like i have to admit to do these oak edged plywood shelves for thing no. 2s room room with a block plane.
Set the camber right over and planed away. Only one of the retruns wasnt quite perfect,but good enough for me.
 
Back
Top