• Hi all and welcome to TheWoodHaven2 brought into the 21st Century, kicking and screaming! We all have Alasdair to thank for the vast bulk of the heavy lifting to get us here, no more so than me because he's taken away a huge burden of responsibility from my shoulders and brought us to this new shiny home, with all your previous content (hopefully) still intact! Please peruse and feed back. There is still plenty to do, like changing the colour scheme, adding the banner graphic, tweaking the odd setting here and there so I have added a new thread in the 'Technical Issues, Bugs and Feature Requests' forum for you to add any issues you find, any missing settings or just anything you'd like to see added/removed from the feature set that Xenforo offers. We will get to everything over the coming weeks so please be patient, but add anything at all to the thread I mention above and we promise to get to them over the next few days/weeks/months. In the meantime, please enjoy!

Cutter Box

Dr.Al

Old Oak
Joined
Dec 31, 2020
Messages
3,969
Reaction score
2,898
Location
Dursley, Gloucestershire
Name
Al
I'm sure there are lots of ways I could have made this more efficiently, but half the garage is currently occupied with boxes being oiled and I fancied a simple-ish job that wouldn't take too long.

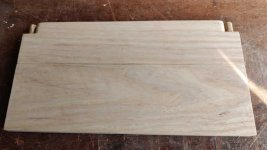
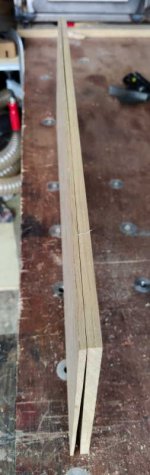
I started with a bit of oak, which my lovely new bandsaw made light work of ripping in half:
IMG_20220731_110439 - Copy.jpg

I then marked out the pattern I wanted on one half and used a block of wood and one of my dozukis that has some teeth on the rounded bit on the end of the blade to cut the outlines (the tape is there to get the depth about right):

IMG_20220731_112338 - Copy.jpg

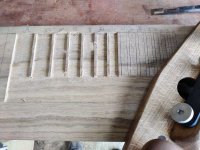
Next up, I took the Paul Sellers router plane for a spin. I got a bit careless in places and broke out some of the dividy bits, but the router plane worked very well. I chose the Sellers one as the cutter is a lot easier to resharpen than the Veritas one and I figured this was going to be quite hard on the cutter:
IMG_20220731_130029 - Copy.jpg

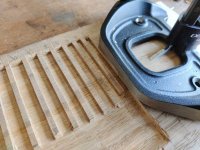
For the smaller slots, it had to be the Veritas one as I haven't made any cutters smaller than 10 mm for the Sellers one, whereas I have all the small metric sizes for the Veritas one:
IMG_20220731_132744 - Copy.jpg

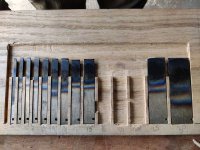
Once that was all done, I could do a trial fit (the gaps are sizes of plough plane cutter I haven't made yet but ones that seemed likely that I might):
IMG_20220731_133735 - Copy.jpg

I could then glue the two halves back together (too many clamps? :lol: ):

IMG_20220731_134613 - Copy.jpg

Then it was just a case of cutting it to size, splitting the two bits in half and planing the edges (sorry, getting fed up of uploading photos to this site, so I'm getting a bit less detailed now!)
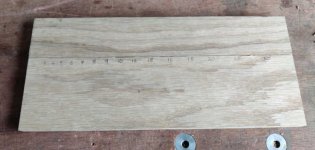
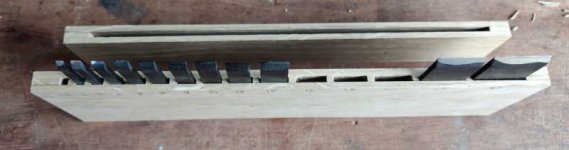
IMG_20220731_150613 - Copy.jpg

IMG_20220731_150602 - Copy.jpg

I haven't figured out what I'm going to do about a catch to hold the two halves together (or whether there's a neater way to label the slots than a pencil and my scrawly hand-writing), but it'll do for now and at least it protects my home-made cutters a bit better than just having them lying on the bench. It isn't going to win any awards, but it kept me amused for a few hours today while my other half is isolating up in the spare bedroom.
 
Nice! But I can see why the original boxes didn't have separate compartments for each size.

I have a similar, but old one, and keep it closed with a rubber band. Not just any old rubber band, but a superior one which used to be on a laptop cable, adjustable for size with a stud and holes. Works for me!
 
AndyT":2zpysu5y said:
Nice! But I can see why the original boxes didn't have separate compartments for each size.

Yes! It would have been much, much easier to do it as a single compartment, but I find the imperial cutters wander around when one is out and it irritates me having to shuffle them back into place to put them away. Not the biggest problem in the world I'll admit, but I thought it would be a fun experiment to try to do it better.

AndyT":2zpysu5y said:
I have a similar, but old one, and keep it closed with a rubber band. Not just any old rubber band, but a superior one which used to be on a laptop cable, adjustable for size with a stud and holes. Works for me!

Also a good plan, thank you

:eusa-think:
 
Neat idea.

Do you need to be careful of the oak rusting the cutters?
 
Lurker":34pc7nx6 said:
I would have thought a box like that would have suited your 3D printer gizmo, Al.

The thought crossed my mind: it would have been very easy to print it. However, I fancied trying to make it out of wood to see how it went.

Stuart":34pc7nx6 said:
Neat idea.

Do you need to be careful of the oak rusting the cutters?

Urmmm... maybe. I didn't think of that :oops:

Maybe it would be wise to oil the box. There was me thinking I could get away without more oiling to do :(
 
Having put all the effort into making the cutters, Stuart's comment about oak tannins got me worried so I ended up remaking the box. I couldn't face hollowing out the slots for each cutter again, so this time I did it a different way.

The new box is made of ash:

cutter_box_unfinished_800.jpg

The screws that hold the lid together are made from 10 mm brass bar, with a flat bottomed 7 mm hole cut in the bottom and an M4×30 mm cap screw epoxied into place. I'm not very happy with the knurl on one of the screws, so there's a new one currently curing in the lathe (with the tailstock holding the screw concentric while the glue cures).

cutter_box_unfinished_inside_800.jpg

To save me having to hollow out individual slots for each cutter, I 3D printed a holder for the cutters and set that into the box (which was made in the same way as before: sliced in half, hollowed out and then glued back together). I had a proper moron moment when I was gluing the two halves together: I put the box lid and base into place (with the lid raised by about 10 mm to give some cutting space) and glued the front piece onto the bit with the hollowed out section. It was only as I was taking the clamps off that I realised that in all the playing about and making sure that everything lined up, I'd put the cutters into the box and they were still there! That meant that separating the box from the lid involved some very careful cutting all the way round four sides rather than just chopping straight through :oops:

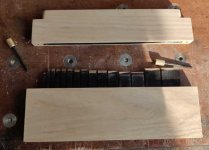
Anyway, this is what it looks like from above: if you look closely you can see the pockets for the cutters (in the bottom half only: the top half is one long opening).

cutter_box_open_view_800.jpg

You can also see the heat-set inserts I used for the M4 screws. Heat-set ones (designed for melting their way into plastic) are a lot smaller diameter than the screwed inserts I'd usually use for wood. The holes were made fairly tight, a disc of masking tape was put on the bottom of the insert (to stop epoxy going up the threaded hole) and then the insert was shoved in with a load of epoxy.

As you can also see in the photos above, I've now finished making all the cutters. They're all essentially the same, except for the 3 mm one (which I also made a spare of), which is a 4 mm body, reduced down to 3 mm near the tip. That gives a bit more "meat" for the adjuster area:

3mm_cutters_800.jpg

Although I managed a couple of hours of finishing up this morning, it was 26°C in the garage by 9 o'clock this morning, so I stopped and have pretty much given up achieving anything for the rest of the day :(

I haven't applied any oil or other finish yet; I'm still trying to figure out a good way of identifying the cutters. They're all stamped with their size in millimetres, but you have to pull them out of the box to be able to see the mark. I'd ideally like to have the size written next to each cutter on the front of the box, but my handwriting looks like a blind GP trying to write a prescription with his dominant hand tied behind his back, so ideally I need a method of making something a bit neater.

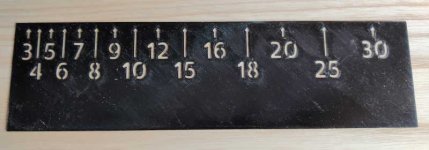
My first thought was a 3D printed stencil and a can of spray paint. This is the stencil I printed:

stencil_800.jpg

Being 3D printed, it was made with reference to the CAD model for the cutter box itself, so all the marks are guaranteed to line up perfectly. However, being 3D printed, the text had to be relatively big to get sufficient detail in the numbers, hence the two rows with arrows rather than just numbers directly underneath the cutters. I could possibly have made smaller text with a smaller nozzle, but that's a lot of hassle that I couldn't be bothered with!

The problem I've now got is how to use the stencil (or what to use instead of a stencil). I've done a few trials (on the old box as a convenient material source) using either 3M Spray Mount or 3M Re-Mount (remountable spray mount) and a can of (probably inappropriate!) black spray paint designed for metal. With the Re-Mount, the paint seeped under the stencil and left a god-awful mess when I took the stencil off. With the spray mount, the paint was nice and clear but the whole surface of the wood was left sticky. Trying to remove that stickiness is quite likely to remove the paint as well I guess, so it feels like I need a completely new plan, possibly ditching the stencil idea completely.

Any suggestions?
 
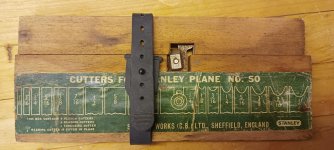
I'm guessing Stanley's cheap and easy approach might be a bit low tech for you? A printed paper label.

Also featuring high grade rubber closer!

IMG_20220814_095255167.jpg

Alternatively, could you delegate the handwriting to someone neater?

Or for stencilling use thick water paint eg from a child's box with a hand stencil brush. This is a fat round brush with short bristles, used vertically. You could cut down a paintbrush or use a toothbrush. Tape the stencil down with masking tape. Just a hinge on one edge if you want to check progress.
 
Historically wooden boxes have been used for all kinds of tools. I’m still not that keen on the idea though due to rust problems. I’ve seen this first hand with old measuring tools going rusty in their boxes. In fairness when these things were originally manufactured they would have been coated in oil and wrapped in rust proof paper. A loose leaf of something similar was often placed inside. I use this stuff in some of my storage boxes.

74-C9-E5-DC-861-F-4061-BAEC-CD4-FA0721-BDF.jpg
 
AndyT":369j90zx said:
I'm guessing Stanley's cheap and easy approach might be a bit low tech for you? A printed paper label.

I did wonder about that (and it would be nice and easy to do small text and get it to align right), but I was hoping for something a bit more robust.

AndyT":369j90zx said:
Alternatively, could you delegate the handwriting to someone neater?

That's definitely an option: my other half can write a lot more legibly than I can!

AndyT":369j90zx said:
Or for stencilling use thick water paint eg from a child's box with a hand stencil brush. This is a fat round brush with short bristles, used vertically. You could cut down a paintbrush or use a toothbrush. Tape the stencil down with masking tape. Just a hinge on one edge if you want to check progress.

Hmmm... I might see what I can find locally and have a go (on some scrap) with that.

Woodster":369j90zx said:
Historically wooden boxes have been used for all kinds of tools. I’m still not that keen on the idea though due to rust problems. I’ve seen this first hand with old measuring tools going rusty in their boxes. In fairness when these things were originally manufactured they would have been coated in oil and wrapped in rust proof paper. A loose leaf of something similar was often placed inside. I use this stuff in some of my storage boxes.

74-C9-E5-DC-861-F-4061-BAEC-CD4-FA0721-BDF.jpg

I've used that stuff a bit in the past, but for most things that aren't going to be used for a while, I wipe them in this stuff before putting them away.

I also have a dehumidifier in the workshop and, since I set that up, I haven't had any issues with rusting, even with stuff that hasn't been coated in the rust protection stuff.
 
Back
Top