• Hi all and welcome to TheWoodHaven2 brought into the 21st Century, kicking and screaming! We all have Alasdair to thank for the vast bulk of the heavy lifting to get us here, no more so than me because he's taken away a huge burden of responsibility from my shoulders and brought us to this new shiny home, with all your previous content (hopefully) still intact! Please peruse and feed back. There is still plenty to do, like changing the colour scheme, adding the banner graphic, tweaking the odd setting here and there so I have added a new thread in the 'Technical Issues, Bugs and Feature Requests' forum for you to add any issues you find, any missing settings or just anything you'd like to see added/removed from the feature set that Xenforo offers. We will get to everything over the coming weeks so please be patient, but add anything at all to the thread I mention above and we promise to get to them over the next few days/weeks/months. In the meantime, please enjoy!

Dans Shed - Large(ish) workshop construction...

Thanks very much Dan, very helpful indeed! Yes I wished I'd made the doors a bit more generous as I originally had the c.1m wide, but forgot to account for door hardware and jambs etc. You live and learn though :)

Your door is looking great though [emoji106]

David
 
Nice. I'm going to nick most of those tricks! But didn't you nick them from MikeG?!! :)
 
Hi Dan

Workshop is looking great. Can I ask where you got your Larch feather edge from?

Cheers
Hully
 
Hully,

http://www.uksleepers.co.uk/

This is one of the names of a group of companies that are all in fact the same company (if that makes sense). I have bought larch feather edge, 40 sleepers and some oak boards from them. I think they are very reasonable and I searched round for a competitive price and they were better than anything in the midlands.

Interestingly, in an effort to save costs I opted for the variable length option, as I had never done any feather edge before and I didn't realise the difference it would make. But they sent it in a batch of all 4.2m so in all it was very good value.

They are linked (part of the same group) to a sawmill at...http://www.brigstocksawmill.co.uk/

Would definitely use again.

Happy cladding ;)
 
Malc2098":3ocu6lvy said:
Nice. I'm going to nick most of those tricks! But didn't you nick them from MikeG?!! :)

Malc - I have unashamedly used ideas from Mike and also others on the forum. You cant argue with common sense and bearing in mind my level of knowledge before I started I can safely say that all I have learnt has come from this forum or YouTube. Surprising really isn't it!

If anyone doesn't want their work replicated I would'nt expect them to post.

The only responsibility I feel is that if something didn't go well to say so.

Only so that those that follow don't make the same errors!

:D
 
You're absolutely right and I wouldn't have been able to get my project off the ground, or rather onto the screen, without all these blokes' experience, knowledge and willingness to share.

Stuff's about to get exciting at Chez Malc with the groundworkers' promise to start on Monday morning!!
 
Dan0741":li9mnnuo said:
.......If anyone doesn't want their work replicated I would'nt expect them to post......

Exactly. The main reason I post is so that others can copy.

And to keep my family up to date with what's happening ;).
 
Dan0741":24b18lzq said:
Hully,

http://www.uksleepers.co.uk/

This is one of the names of a group of companies that are all in fact the same company (if that makes sense). I have bought larch feather edge, 40 sleepers and some oak boards from them. I think they are very reasonable and I searched round for a competitive price and they were better than anything in the midlands.

Interestingly, in an effort to save costs I opted for the variable length option, as I had never done any feather edge before and I didn't realise the difference it would make. But they sent it in a batch of all 4.2m so in all it was very good value.

They are linked (part of the same group) to a sawmill at...http://www.brigstocksawmill.co.uk/

Would definitely use again.

Happy cladding ;)

Great, cheers Dan.
 
So Gents just a quick one, Im getting round to the interior cladding. I have some old reclaimed pine T+G which I need to jet wash etc, but was wondering about the vapour barrier. The internal wall build looks like this...


...and I want to clad with the T+G. I have a couple of DPM sheets spare and wondered if I could use this effectively as a rather robust vapour barrier, or will it cause me problems? I was just planning to staple it to the wall and then apply cladding.

Any issues with this?

:D
 
Dan0741":qxixym7p said:
.......I have a couple of DPM sheets spare and wondered if I could use this effectively as a rather robust vapour barrier, or will it cause me problems? I was just planning to staple it to the wall and then apply cladding.......

None. You have to be careful of service penetrations, but in a workshop with surface mounted wiring and no plumbing this won't be a problem.
 
Gents - Perfect thank you, will be careful to ensure coverage so UV no issue and as you say electrics will be surface mounted. :D
 
So today I fitted a window - a new one for me and was surprised how straightforward it was. I have had a temporary one fitted for a while.

This is the jury rigged version...


this is the aperture...


And this is the finally fitted window.


I need to get some foam around it and silicone finish but overall for a first effort I'm quite pleased with it! :D
 
Guys - any thoughts on the internal reclaimed t+g - Its 120mm wide and the guidance is that if its over 100mm wide it requires two fixings per board, im not sure its necessary given its internal and wont have wind load moisture etc to deal with, ive tried both methods to test stability seems unaffected? Sorry about the poor photo quality the light isn't good - the screws have cup washers to assist the grip.

 
The internal cladding looks very dark in color and is it liable to shrink as its reclaimed .Personally i would go for something stable and paint it a light color as i need as much light in the shop as possible .Of course you could stabilize and paint both sides of the t&g if you have it to hand.
 
I know its dark, and wont reflect light well but I like it and plan to have decent lighting. The reclaimed boards are very damp at the mo as I power washed them, it will need to stand inside with dehumidifier/fan heater for a while before installation. Its under a tarp in the garden currently getting the worst of the water off with the wind...

I installed the ply boards that im having at the bottom of the walls today, and the vapour barrier. The dangling strings are so that I know where the studs are now they are hidden.


Ive thought about this interior cladding and boards combo and think I will quite like it, albeit I know not to everyones taste. Will have to see when the wall is complete. :?
 
Dan0741":3010h3wg said:
So today I fitted a window - a new one for me and was surprised how straightforward it was. I have had a temporary one fitted for a while.

this is the aperture...


And this is the finally fitted window.


I need to get some foam around it and silicone finish but overall for a first effort I'm quite pleased with it! :D

Great looking window Dan. The workshop is looking dangerously close to completion :eusa-dance:

I'm installing a similar window so looking at this with interest. Any lessons learnt you can impart? Is that some self-adhesive flashing I see on the base of the window framing?

Cheers
Hully
 
Hully - Not sure what stage you are at but it took me quite a bit of faffing to get these windows sorted.

They are all done now except the grey silicone on the outside , the end caps, and the wooden presentational inserts to finish of the framing on the inside.

The advice I would give, that I didn't follow myself...is to plan the finish so that the window is neat and the surrounds are in the right place. I am going to have to Mcguyver the finish but no great drama.

I decided I wanted painted wooden boards surrounding the windows, as I liked the visual effect, but only on the three sides.(Not bottom) so I measured up apertures taking off the thickness of the boards I wanted to install.

I then took off 10mm on each of the two dimensions - vertical and then horizontal so as to leave 5mm gap each side - this is where accurate framing helps!

What you need to clarify if you are ordering the windows is if the window sill dimensions are included or not. Mine came with separate sills but the measurements were catered for.

Im not sure if its the correct method but I screwed the window sill in first, the 'horns' or whatever they are called,took some jiggery pokery but just took my time to make sure it was neat, and all the cuts were within the tolerances that will be covered by sealant.

I used stainless steel 3 inch screws and made sure all the screw holes were dabbed with silicone so that when the screw was screwed home they were sealed.

I then popped the windows on top of the sills and ensured they were seated correctly, this is quite important so as to ensure that they all drain effectively.

I made sure that each screw location had packers between window and aperture so that when screw was pulled tight it didn't twist or bend the window frame. I put in two fixings per side, and the same top and bottom, so 8 in total each window.

Important obviously to ensure level and plumb...and its easy for this to change mid set up so keep checking.

Once installed I applied expanding foam around the window, (after cursing for having previously disposed of the very fine plastic nozzles...) I have since cut this foam neat and will be later be installing a wooden surround/framing to ensure the edges are all covered etc. Quite surprised how stiff the foam makes the window, so worth doing if you have enough gap.

Installing the glass afterwards was straightforward, but be aware that there is an inside and outside face, not exactly sure of the difference, but there must be differences as mine came with stickers all over saying which side was the inside.

Before you foam and install glass make sure the windows open if you have openings, as this is much easier to sort at this stage as you might have stressed the frame, and once the glass is in and they are surrounded by foam this will be a long job to resolve...

Happy window fitting Hully! :D

PS No Flashing - they come wrapped and they are now all stripped of their plastic.
 
So I have been asked to clarify the way I used the cross piece for the feather edge cladding. I must admit whilst I used the tactic as demonstrated from Mikes thread, I think I adjusted it a bit.

First, I started with two of them, (the crucifix's) one each end, but in the end reverted to one, so that all measurements were exact, and there was no requirement to swap ends. I found this easier, others may not.

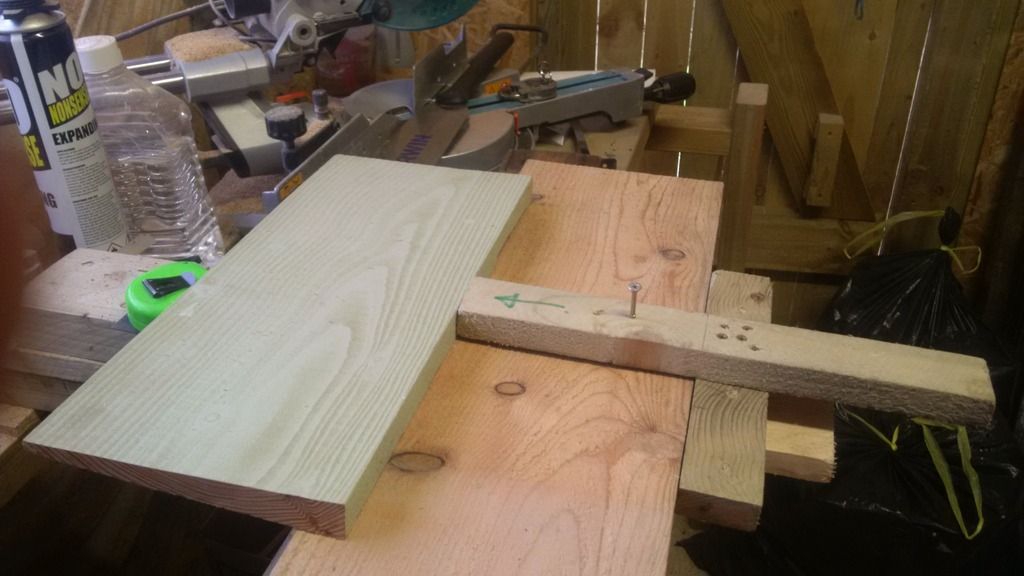
This is my crucifix, a few bits to note.
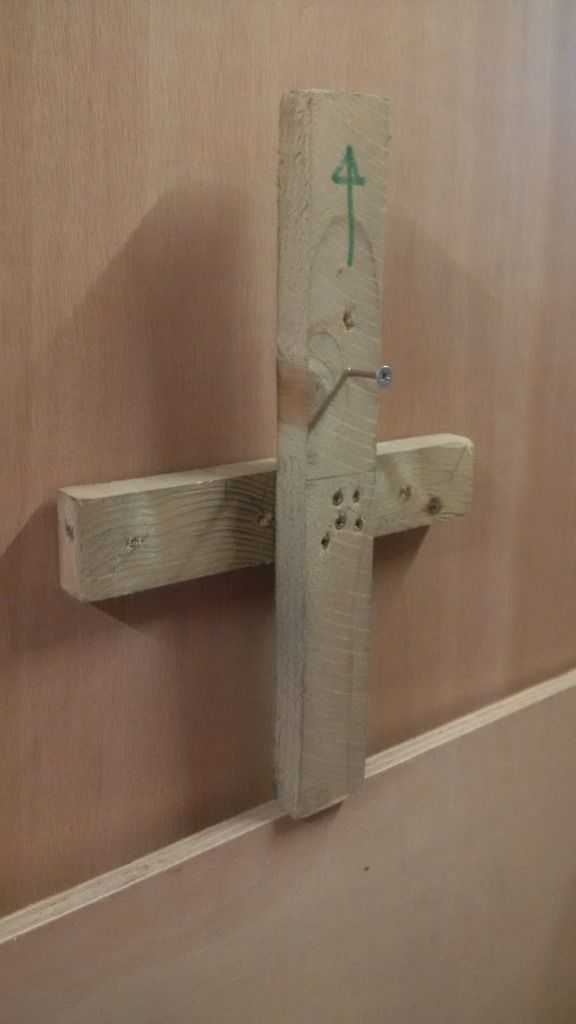


In a rush it's top can be confused so an arrow avoids that.

There is a screw strategically placed. This is in such a position as to place a punched mark on the feather edge board where the fixing needs to be placed.
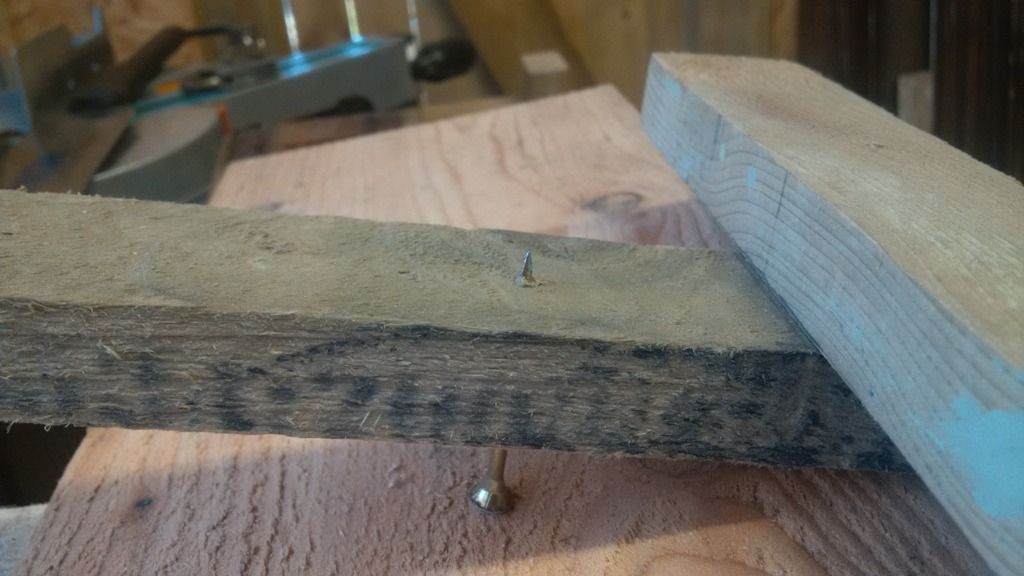


I will confess I followed the installation guidelines from Mike to the letter - one nail per board per batten. I did go one step further and pre drilled all the holes also. When you are measuring up and painting etc, and I did paint ends, bottom and top of each board, pre drilling doesn't really add any time and I feel it also reduces the chance of splitting. Especially if you are within 100mm of the board end. I drilled a larger hole than the nail by a couple of mm, and used stainless annular ring shank nails. Ive has no splits yet or nails moved.

When the crucifix is offered up to the board it immediately enables a couple of measurements. The first is the top of the crucifix which can be marked with a pencil if you wish, but also the next board can be balanced on the top. The screw also places a mark in the board where the fixing can be placed, This fixing needs to hold the board in place but avoid going through the board behind it. This point can be marked if you wish, and it makes it easier.
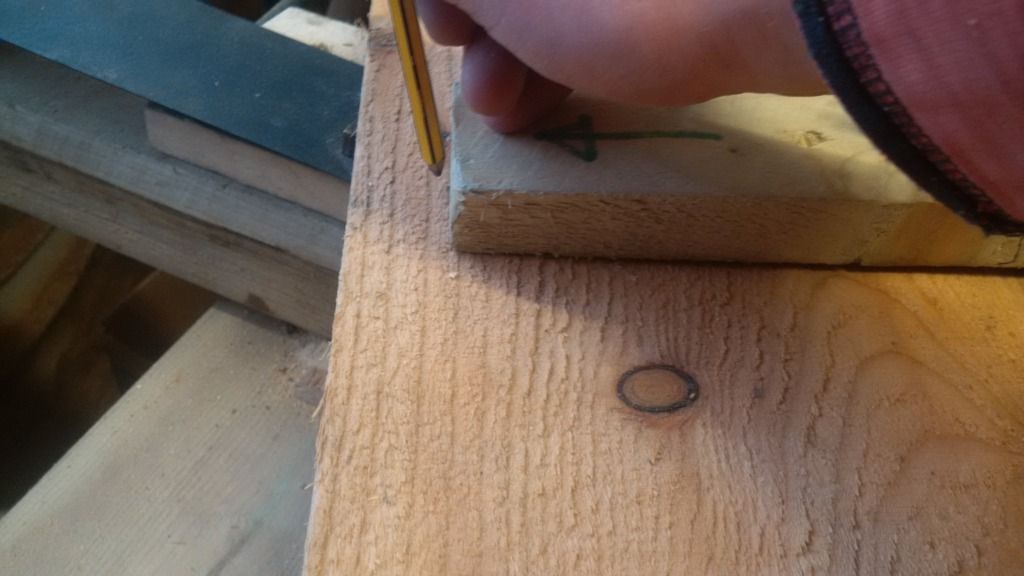
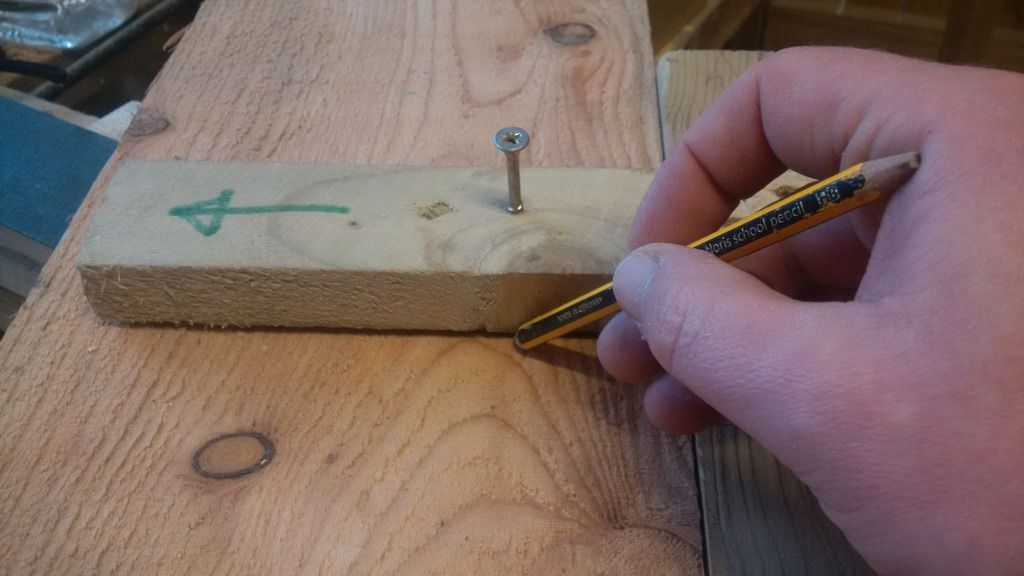


You will know the fixing spacing along the board because the battens placed at no more than 600mm spacings, are visible and in your eye line when you are making these marks with your crucifix.

So this is what your crucifix looks like when offered to board...


Leaving the marks looking like this..
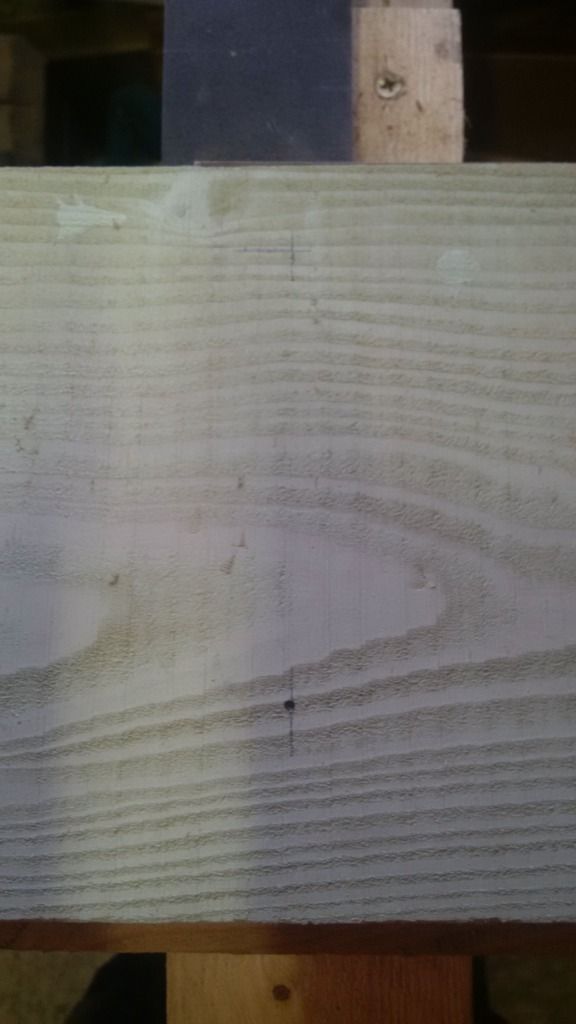


The bottom mark made by screw is where you put your fixing.

The mark above is the location of the bottom of the board above.

Clearly, the manufacture of the crucifix is critical, and is based on the size of the boards, what spacing (overlap) of boards you want, I think 25/30mm is recommended (?) and where you feel you want the fixings, and I would encourage a bit of a dry run with a few off cuts to refine this to ones liking.

Depending on the size of your shed some of these lengths will be quite long, and I would encourage you to knock up a quick bench with stops that keep the board level in relation to your saw so each piece can be sawn square quickly. You can also add stops if you are sawing more than one board the same length.
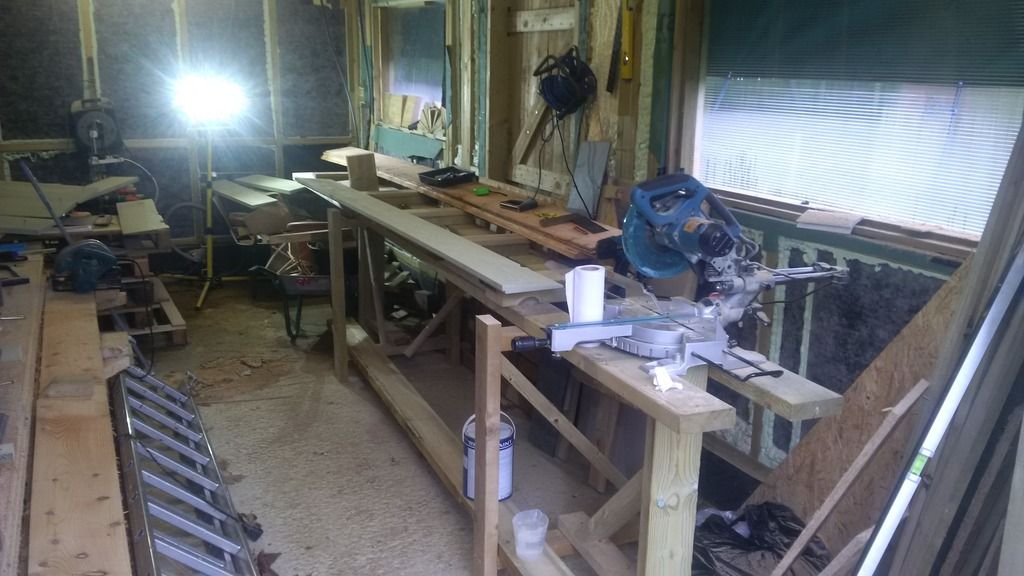


There are variations clearly on this, and I think the original process as per Mikes thread, has the screws being screwed into the board fixing the crucifix so as to provide a couple of 'stops' or supports for the board above. This would work equally well but i preferred my method having tried both.

:D
 
Thanks, Dan. I'll pin that up on the framing when I get to cladding mine!
 
Excellent work Dan, thanks very much putting that together. :text-bravo:
 
In relation to the breather membrane I have no technical knowledge and I accept that I do tend towards belt and braces but I wanted a heavier duty membrane that would be more forgiving of my inexpert handling. There is an inevitability re wind (no gags pls) and and application of membrane so it pays to have a heavier weight material in my view. And this was the first time I had used it was going to be running single handed.The one I used was the Powerlon ultra perm Max... (green) others are indeed available...

https://www.roofingsuperstore.co.uk/sea ... +ultraperm

and given that in places I have recently had to go back to the fitting and readjust - round openings etc... its very easy to remove the stainless staples I used and refix.

Its good for use with timber framing, both walls and rooves as the information sheet confirms and the price differential in relation to the overall build is negligible.

BTW - I found the roofing superstore very useful and helpful at a number of stages and and also competitive on price.

:D
 
Hi Dan. Just finished reading your posts from the beginning. Really nice build - you should be proud. I notice you used a roll of bug mesh with integral vents on your ridge - could you tell me who makes this please? I've been struggling to find this online and even came up with my own DIY version in desperation!

Cheers

Paul
 
Paul - Thank you, Im still finishing the faffing elements - door step, doors and electrics etc and im a bit behind posting. The ridge was:

https://www.roofingsuperstore.co.uk/pro ... -pack.html

You can get it in different lengths and different colours etc. I would have used a mortar bed but my skills aren't up to that yet. This was a doddle to fit matey. Good weather (warm) helps with the bonding.

Hope that helps,

Dan :D
 
Thanks Dan. A great help - and I just saw the link in your original post on the ridge! Sorry mate :eusa-doh:

That's a fine looking building you have there and yours and Mike G's processes have both been exceptionally helpful to me in the planning stage. Good luck with all the frilly bits and I hope you'll soon be using it rather than building it.

:obscene-drinkingcheers:

Paul
 
Dan0741":3qvy4zy8 said:
Then some wood arrived....


These are two pieces of 2x9, 7.2m long. One is my ridge beam, the second is a piece I'm going to cut into two 4x2 and use as my second level on the roof plate, to give the rigidity and options in respect of rafter placement.

One thing that crossed my mind the other day regarding the doubling up of wall plates, can I ask why you wanted the second wall plates in one continuous length?

Cheers
 
No worries Spearos - answer - because I thought it would be stronger, didn't want joins near rafter feet and had them delivering a long piece for the ridge beam so to tack another one on didn't increase delivery costs. :D

I started this project an abject amateur and whilst I have learnt a lot im still very much on a steep learning curve. If it helps I wouldn't do it that way again and neither would I use a continuous piece for the ridge. I would have a go at a scarf. There are lots of bits that I did that I wouldn't do again and when I think of the grief I caused myself in some parts I smile because with the benefit of hindsight one can often see a simpler solution and also a cheaper one! :oops:
 
Dan0741":1ycxtyxf said:
No worries Spearos - answer - because I thought it would be stronger, didn't want joins near rafter feet and had them delivering a long piece for the ridge beam so to tack another one on didn't increase delivery costs. :D

I started this project an abject amateur and whilst I have learnt a lot im still very much on a steep learning curve. If it helps I wouldn't do it that way again and neither would I use a continuous piece for the ridge. I would have a go at a scarf. There are lots of bits that I did that I wouldn't do again and when I think of the grief I caused myself in some parts I smile because with the benefit of hindsight one can often see a simpler solution and also a cheaper one! :oops:

Thanks for that Dan. Appreciated. I was n't on using 'one piece' wall plates however just wanted to make sure I wasn't missing something! As for the ridge, I think I'll find out the cost difference first!
 
So Gents - apologies for delays with these posts, but other commitments have frustrated my own posting. :oops:

I have built a fireplace - which in a wooden shed isnt easy....

Just a reminder - this is what i plan to install.


So a heat shield was required. I have started by removing the insulation and filling with offcuts.


Installed some hardiebacker board.


And because I am a belt and braces fella, installed another shield with a 40mm air gap. I used copper pipe with a steel screw to ensure full compliance with regs.


I have made the shield deeper, wider and taller than regs require so i have some wiggle room if required.

Basically the heat shield reduces the distance required by regs from combustibles by half.

I have put a surround around and a mantelpiece.


I need to do a hearth, but as far as im aware, and i've studied the regs in detail. I think this is compliant.

In other news I have built a few doors to replace the boarded up versions I have currently installed.


These were a bit tricky because I wanted a method that closed the doors securely, and was weatherproof, and in essence i have a lip on the outside of one door that holds the other door closed. They will always have to be opened in the same order, but thats no problem. I plan to install later in the summer and will put a hole in the concrete to accommodate a brass tube to slide a bolt into.

I made a step.....

I had to move some OSB that has been sitting on the ground preventing me sinking into mud. The top had dried out and was a bit rough...


I tried to video taking it out but on my own it became a bit of a chore, but my son still hasn't forgiven me.

So laid a concrete base to the required height then set a bit of timber to indicate radius. Then cut bricks to size and shape.


The brickwork was difficult and im not confident with bricks and mortar, but given this is my first stab at it, i think it came out ok. Its certainly fine on levels, the gaps should be 10mm and some are a bit big or small but generally i think it looks passable.

And finally someone gave me a wooden workbench which is substantially better than the frame i have been using!


Electrics is next, I have done the first fix, photos to come soon. :D
 
Nice step, Dan. Well done. The difficult thing with that brickwork is keeping the mortar off the face of the bricks, and we'll be able to see how well you've done that when you post a photo in the next day or two showing it "dry". ;)

I'm about to do a set of steps with 4 curved risers in bricks, with the difference being that there will be a stone tread, and so only the face of the riser will show. It won't need to be so neat behind.
 
Workshop, fireplace, mantelpiece. Really? :) This must be a first.
Excellently done and a lovely step too. All very posh.


The bit that frustrates me the most is I ran out of sand within about 3 bricks of the end and used some different stuff which was a slightly darker colour, so the inserts on the right have a lively purple mortar pointing which will make me curse under my breath every time I enter and leave. :D
 
Don't worry. All the grime, mud and moss will soon make the pointing universally muddy grey-brown.
 
Back
Top