• Hi all and welcome to TheWoodHaven2 brought into the 21st Century, kicking and screaming! We all have Alasdair to thank for the vast bulk of the heavy lifting to get us here, no more so than me because he's taken away a huge burden of responsibility from my shoulders and brought us to this new shiny home, with all your previous content (hopefully) still intact! Please peruse and feed back. There is still plenty to do, like changing the colour scheme, adding the banner graphic, tweaking the odd setting here and there so I have added a new thread in the 'Technical Issues, Bugs and Feature Requests' forum for you to add any issues you find, any missing settings or just anything you'd like to see added/removed from the feature set that Xenforo offers. We will get to everything over the coming weeks so please be patient, but add anything at all to the thread I mention above and we promise to get to them over the next few days/weeks/months. In the meantime, please enjoy!

David's Workshop Build

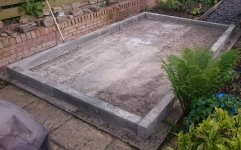
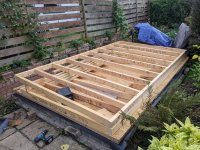
Just getting round to starting the base, I've placed some of the lintels for now.
base outline.JPG

I have a question about the lintels. They have a smooth and a rough side, and what looks like rebar through one side.
lintels.JPG
Since I am placing DPC on top of the lintels, I guess it would be best to place the lintels rough side down?
 
Sounds good, I'll put them smooth side up.

I have been faffing around all weekend and not gotten started on bedding the lintels on mortar, I think I've been putting it off as I've never done something like this before and got no one to keep me right here. I've been using the rain as an excuse not to get started yet. Looking out the window it's absolutely bucketing it down so it's probably just as well I didn't do it yet or the mortar would get washed away :D

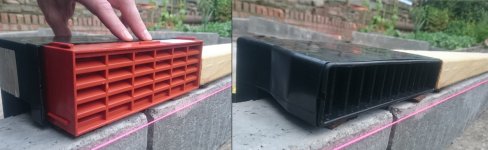
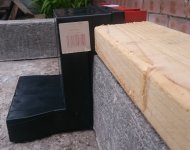
As I previously thought the telescopic vents (which I got from screwfix) are way too big, so I am just going to flip them upside down so I don't need to cut into my wall frame base plates.
Air vents.jpg

View attachment 1

Also the red air bricks that are slotted into the vents are loose and fiddly, so I may exclude them entirely and use them for another project.

Practicing my lines...

brick lines.JPG
 

Attachments

  • vent other side.JPG
    vent other side.JPG
    139.7 KB · Views: 12,242
Hi David
When I got to this point I set up my chop saw as a cutting station, I used the 150mm x 50mm for my ridge beam as the base for this between some cheap Lidl work benches. I could clamp stops to this easily for cutting.
I drew up a cutting list and cut most of the timber in one go using different coloured marker pens to identify where each piece went, my studs were all marked with blue I marked them as soon as they were cut it made life much easier for me.
 
Hi Michael

Thanks for the tip, I'll make use of that so I don't keep running up and down the garden!

I've bedded down my first 4 lintels this evening, got 6 more to go. Might need to take a break for a few days as I bashed my fingers with the rubber mallet on the third one! ouch
 
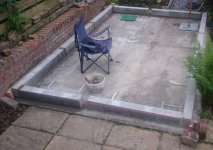
That's all the lintels bedded, I seem to have done a good job on getting them square, even if one of the lintels is a bit squint (see if you can spot it)! The two diagonals are 439cm and 439.5cm, and by my calculations an 8ftx12ft rectangle should have a diagonal of 439.6cm so happy with that!
base.JPG
Also I was initially quite worried that my mortar was no good... 24h later, small left-over pieces could easily be crushed to dust by hand. However, some days later it seemed that the mortar had all cured hard which is good.
crumbly mortar.png

Mike, for the next part do I:
- put mortar then DPC then mortar again before I put the sole plate down (as per your diagram)
or...
- is it just DPC then mortar (as per one of your previous posts)
 
I'm pretty sure that I've never put the DPC down directly on the brick. A slurry of mortar smooths out any irregularities, and ensures the DPC is undamaged by the pressure of the building on it.
 
Mike G":2t41tanb said:
I'm pretty sure that I've never put the DPC down directly on the brick. A slurry of mortar smooths out any irregularities, and ensures the DPC is undamaged by the pressure of the building on it.

Ok that makes sense. I've watched some videos as well to help me understand it a bit better.

Mike G":2t41tanb said:
I think the theory is that the rock hard pointing forms an impervious shelf every 3 inches up the wall, which water then sits on. That keeps the bottom edge of each brick damp. Wet bricks (and particularly differentially wet bricks) + a frost = possible spalling. Lime mortar allows the bricks to dry out more completely, and so the risk is much reduced.

Back to the topic of spalling I just came across this video that illustrates this phenomenon perfectly:
[youtubessl]3Omxc4OK9eE[/youtubessl]

This man's whole channel is quite interesting in terms of case studies of mis-diagnoised damp issues.
 
Hi everyone

It's been a whille, life got in the way a bit and the build was delayed, but I have resumed work now (finally). It's a race against time now, what with the weather turning.

Some progress pics:
Base plates.jpg
Floor joists.jpg
Back wall.jpg

Thos floor boards are not fixed yet, they're just so I have a surface to work from.

Who knew hammering such large nails was such hard work?

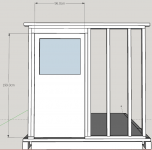
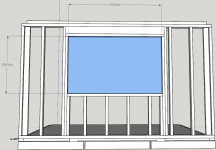
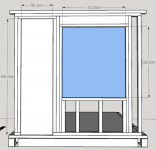
The other walls are a bit more complicated. I was wondering if I have the stud walling planned correctly in the following plans, with regards to doors and windows. Anyone see any glaring issues?

Left wall.PNG
front wall.PNG
Right wall.PNG

Thanks!
 
Looks ok to me as a fairly competent hammer chewer.

Check the dimension of your cladding sheets to see if they are metric or imperial ( there are even some that are metric on one axis and imperial on the other.)
Once you know what you have, then maybe adjust some of the stud positions to lie exactly halfway across the joins in the sheets. A bit of planning save unnecessary cutting/joints flapping in the breeze.

Bob
 
I somehow seemed to have totally missed this thread. I never tire of seeing these builds.
I especially like to see others mixing their measurement units.

Regex":1yo130rz said:
The two diagonals are 439cm and 439.5cm, and by my calculations an 8ftx12ft rectangle should have a diagonal of 439.6cm so happy with that!
base.JPG
 
9fingers":7vibjn7k said:
Looks ok to me as a fairly competent hammer chewer.

Check the dimension of your cladding sheets to see if they are metric or imperial ( there are even some that are metric on one axis and imperial on the other.)
Once you know what you have, then maybe adjust some of the stud positions to lie exactly halfway across the joins in the sheets. A bit of planning save unnecessary cutting/joints flapping in the breeze.

Bob

Thanks for having a look over it and the tips, I'll double check before I commit any nails to wood! I've gone and bought a big tarp as well to pretect from the autumn rains when when they're sure to come.

Andyp":7vibjn7k said:
I somehow seemed to have totally missed this thread. I never tire of seeing these builds.
I especially like to see others mixing their measurement units.

Haha yeah I'm coming round to working with feet/inches, but my brain needs the [preceived] precision of metric units! I'll try and keep it updated with interesting infos seeing as I have another reader.
 
Looks like I'm getting a window that's quite a bit taller (144cm + 3cm sill), still at 181cm width.

I'd like to raise the window up, how important is the filler wood on top of the jack studs, in the red circle in the picture below (can I remove it)?

front wall.PNG
 
Yes, so long as the cripple studs (they're not jack studs) are replaced to support the lintel.
 
I for one could do with a definitive simple guide to what things are called. Cripple stud, jack stud for example. Probably I should know these terms, especially as I have read a lot (and visited a lot) about ancient and modern timber framing, but cripple stud is not one a recall hearing.
 
Cripple is a term which only applies to modern softwood framing as far as I know, rather than traditional oak framing. As for a place where all these sort of terms are listed........well, I know of nothing on the internet, although Trada is the authority. There are books, though. Again, start with a Trada publication.

I've never heard of a jack stud, so it may well be an Americanism. Jack rafters are a thing, though.
 
In a similar vein, does anyone know of a source that lists American/UK woodworking terminology and each others equivalent ?
 
I don’t think there is a definitive description as terms are very localised, Ive certainly seen the studs Regex refer to as Jack studs called that & seen the studs above the header referred to as cripple studs, hardly surprising though particularly in Britain where we can’t agree how to pronounce scone :lol:


Edit
A quick google of “timber framing terminology uk, images” brings up interesting reading,
This image suggest studs under the sill plate are also referred to as cripple studs & what I know as Jack studs are trimmers :eusa-think:

http://www.pages.drexel.edu/~atf23/AE390/A3/wood.htm
 
Doug":3rilsu5j said:
........This image suggest studs under the sill plate are also referred to as cripple studs & what I know as Jack studs are trimmers :eusa-think:

http://www.pages.drexel.edu/~atf23/AE390/A3/wood.htm

That's most definitely American, Doug, not British. We don't have headers, for a start. We have lintels. And cill is spelt with a C here (and spelt is spelt spelled in the US :) ).
 
Doug":245186dl said:
A quick google of “timber framing terminology uk, images” brings up interesting reading,
This image suggest studs under the sill plate are also referred to as cripple studs & what I know as Jack studs are trimmers :eusa-think:

http://www.pages.drexel.edu/~atf23/AE390/A3/wood.htm

That's the understanding I had, mostly from watching american wood framing videos on youtube though.

Whatever they're called, they were all irreversibly nailed into my second wall on Sunday!
finished wall.jpg

I stacked the back wall ontop of the battens to create a slope for rain to run off.
stacked.jpg

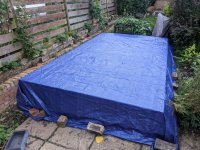
Tarped. It was just as well, as Sunday night had torrential rain and each of the studwall gaps was a swimming pool of water! Hopefully the rain lets off next weekend so I can continue.
covered.jpg
 
Another progress update. This past Thursday and Friday involved frantic building to get ahead of the weather during a brief respite from the rain. The roof is now mostly done, just need to glue the EPDM down and get some fascias on. So far I've had very little wastage in terms of OSB, 2x4 and 2x6, which I'm quite pleased about.

On to the picture updates.

15. Oct: Enforced breaks so I don't work too hard on a nice sunny day.
2021-10-15_1409.jpg

15. Oct: Walls finished. As I keep hearing on all the videos and tutorials, these frames are bloody heavy!
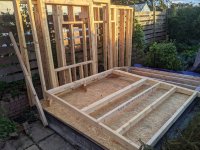
2021-10-15_1632.jpg

17. Oct: Rain rain rain... Temporary tent to [attempt] keep off the rain. It's been relentless this year.
If you live in a rainy area I recommend getting a large heavy duty tarp.

2021-10-17_0843.jpg

19. Oct: Walls have gone up, it's looking good so far. It's very sattisfying to step back and see it at this stage.
2021-10-19_1633.jpg

02. Nov: Roof joists up and outer breather membrane tacked on. Less and less water is getting in, which is great.
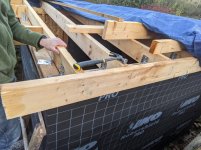
2021-11-02_0815.jpg

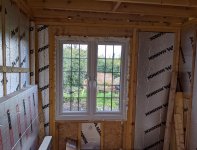
02. Nov: First look from the inside. This is going to be one massive window!
2021-11-02_0829.jpg

02. Nov: A wee tidy up. it's looking almost cosy now.
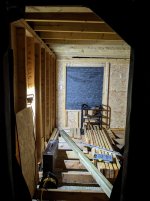
2021-11-02_1914.jpg

04. Nov: Don't be me and calculate the amount of OSB3 for your roof deck according to the building size... take the overhangs into account too!! Luckily it was enough, but it was a bit of jigsaw game with careful planning for my cuts
2021-11-04_1529.jpg

04. Nov: A local joiner kindly let me use his table saw to rip down some 2x6 offcuts to 100mm height for the perimeter around the insulation. I had just enough wood left from the floor/roof joists to do this which was lucky.
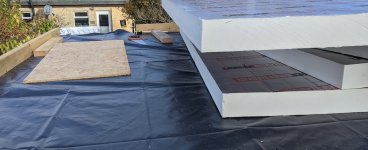
2021-11-05_1105.jpg

04. Nov: Insulation fitted nice and snug. It goes in quickly which is satisfying.
2021-11-05_1117.jpg
 
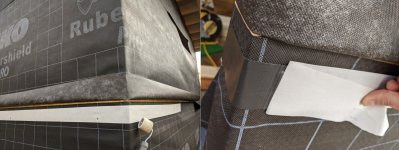
Added the jointing tape. This stuff sticks really well to itself and likes to lift off the breather membrane and stay stuck to the foil backing when you're trying to remove it, resulting in a chewing gum like mess.

For anybody else that is new to this as I was: After some trial and error I found the best way to apply it was to roll up the membrane, apply the jointing tape, roll it on firmly with a hard roller, then peel back the foil on itself in a slow, smooth and continuous motion. If you stop then continue the black stuff tends to get stuck to the backing foil and then lift from the breather membrane. After you've rolled the breather membrane down again, use the roller again to firmly bond the overlap to each other all along.
2021-11-15_jointing tape.jpg

Yet another first for me, as everything was in this project, was fitting windows. These are really heavy, and I only just about managed to lift this in place from outside without removing the window panes. My spray foam technique leaves a bit to be desired, and in my rush I forgot to use masking tape on the window frame.
2021-11-22_window.jpg

And here is a bonus progress update from the old to the new. I'm quite happy with how it's coming along. As you can see the EPDM has been glued on top already, still need to do the trim and some cap-over fascias.
2021-11-22_progress.jpg
 
23. Nov:
To fit the large window I had to take all the panes out. I was about to buy lots of specialised tools for the job, but then I realised a chisel and an old billhook I had lying about were more than adequate for this.

glazier tools.jpg

The removed panes made the window a lot easier to handle.

panes out.jpg

28. Nov
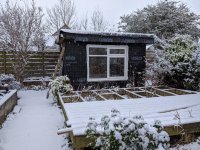
An outside view with the snow. Good thing the window was now in place.

snow.jpg

12. Dec
The door was bloody heavy. I used some strong velcro straps from a rolled up ikea mattress to lift it up onto some bricks, and finally into place.

door in.jpg

Now I need to plug the holes in the rafters to stop the birds taking up residence over winter!

I got all these UPVC pieces second hand from a company called UsedUPVC. They have a large variety of items and excellent customer service.

The first window I fitted has had spots appear on the lead work. Any idea what might be causing this?

spots on leaded window.jpg
 
It's been a while since my last update, I hope you're all doing well and had a nice festive period.

29th Jan 2022
Storm Malik huffed and he puffed, and my worshop was fine. Malik did however tip the old shed that I had moved (see this post), struck down in broad daylight, claiming my cherry tree in the process (RIP 2022). The shed is fine though, and has been lifted up again. I wil stake it down from now on and buy a new cherry sapling.
victim.jpg
30th Jan 2022
I have added the fascias all around, and the trims around the top edges on three sides. At the time I didn't have time to do the front gutter trim before it got dark (and was given my final warning by the other half to come down off the roof and inside because dinner was ready!). We've had heavy winds recently as you all well know, and so I had to put bricks up on the roof to prevent the rubber membrane flipping up too much and causing damage and water ingress into the roof.
fascias.jpg
10th Feb 2022
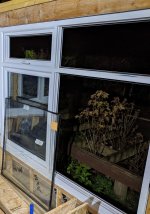
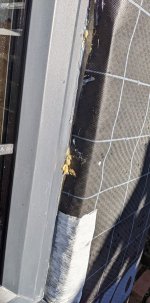
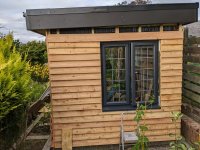
There was a leak inside the smaller window below (from the sideways rain), and I am considering whether I need to take the window out again to put Tyvek FlexWrap all around the frame. Not a task I'm looking forward to.

Would the cladding and window trim prevent this kind of leak in future?
leak_inside.jpg
window_outside.jpg

As an aside, the snowdrops are out and look lovely, a nice contrast to the overcast weather we've been having.
 

Attachments

  • snowdrops.jpg
    snowdrops.jpg
    266.2 KB · Views: 6,409
I'd have thought that provided you have a reasonable sized gap that frame sealant/silicone should do the trick followed by the cladding but it needs something to grab hold of. If you only have a capillary type gap that the water is wicking into then the only real answer is to have it out and refit with sealant.

Miserable time of year to be working outside. Good Luck

Bob
 
Thanks for your reply Bob! I will go ahead and strip out some of the silicone, glue the membrane down and apply fresh silicone before putting the cladding on. That should hopefully do the trick. I've not had any problems since that stormy period with sideways rain, but if it's happened once it can happen again, so best to be sure!

Some updates:

The electrician has visited a couple of times, and has installed a power and a cat6 cable for me so now I have power inside (Yay!!). Thought I'd future proof it with a good internet connection to the house too while I'm at it, and will later install a wifi access point for the end of the garden.
damp.jpg
It seems that water can seep through the mortar quite readily, and so I've taken extra steps to protect the ends of my joists with dpm.
joist protection.jpg

Over time it seemed that the birds had taken an interest in my workshop...
crumbs.jpg
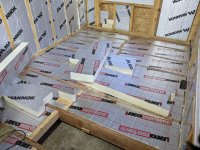
They got busy nesting and hollowing out my exposed insulation boards, so it was high time for me to plug the gapes in the rafters with more insulation!
nesting.jpg

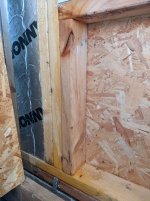
Most of my insulation has now been cut to size, and I have to say, it has been my least favourite part so far. The amount of mess and dust that's created, and the unwieldy bulky nature of them makes it very awkward. To anyone reading this thread, I recommend cutting as much as you can in as few sessions as possible, as you will make a massive mess, and they will keep getting in the way as you do other stuff.

It's paid off however, even without being properly fixed and sealed up. The workshop gets toasty warm just from a little bit of Spring sunlight throughout the day, I'm very much looking forward to using his space.
 

Attachments

  • insulation progress.jpg
    insulation progress.jpg
    405.4 KB · Views: 5,983
If anyone is still reading this, I have some more questions about the next steps in the floor :)

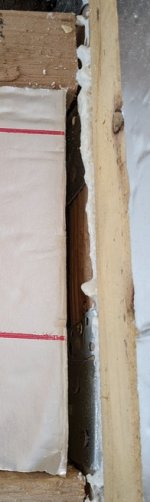
1) For the end bits, is it ok to just use spray foam to fill the gaps? (as you can see from the posts above, the lintels/mortar below can get slightly damp)
insulation end.jpg

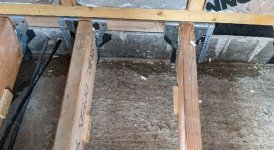
2) For the sides of the floor there is a 6cm gap between the joist and the wall. Am I ok to just bung in a long thin piece of insulation and spray foam it up?
floor end.jpg

Thanks in advance for your replies
 
You can certainly fill in the long gap between joist and wall with insulation and foam. I've never seen anyone foam between the end of a joist and a hanger, but I can't see why you couldn't. Far more importantly, though, you should be dealing with the source of the dampness. Where is it getting in?
 
I've gone ahead and filled all those gaps, and I've cut my t&g chipboard flooring to size too. Is the 10mm gap around the edges a hard requirement or can it vary and be less than that? ~5-10mm (My walls belly couple of mm.

Well I thought it was water soaking through the mortar from outside, but I poured two glasses of water there and I couldn't see it coming though. I also tried trickling it through the cables coming in there but it seemed to drip off before it got in.
 
It's not a hard requirement, but if you get much less than that be scrupulous with debris (sawdust etc) building up around the edges.
 
Thank you Mike, I have made sure to clean out all the sawdust/debris from the floor.

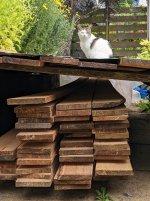
Battens are up and the cladding has arrived (square edge Scottish larch). I had to clear half a compost bag's worth of sawdust off these planks :D I have been advised that this needs no treatment or painting, so I will put them up as they are.
wood pile 1.jpg
wood pile 2.jpg

Barely had enough battens
battens.jpg

I made a jig on the decking to cut the angled battens, since I need about 30 of them.

Do they look the right size to you or are they too steep?

I saw this post here on Malcolm's build, but his seem to go over an Arris and are feather edge boards, so the situation seems slightly different.

jig.jpg
angle battens 1.jpg
angle battens 2.jpg
 
Looks nice.

So long as the the rain drips don't splash back close to the plinth of wick backwards into the bottom board. Perhaps a drip groove on the bottom one would encourage larger drips.
 
Do you mean like making a small groove along one end with a handheld router? I'm afraid I don't have one of those, might a 45°angled cut do the same?
bottom board.jpg
 
Regex":3sfjf1sz said:
Do you mean like making a small groove along one end with a handheld router? I'm afraid I don't have one of those, might a 45°angled cut do the same?

I reckon so.
 
So I took this past week off from work, and was making cracking progress on the cladding. Starting to look really good and almost finished 3 sides.
left.jpg
front.jpg
right.jpg

But then, disaster...

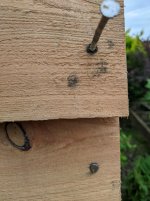
The nails were rusting within minutes of cont act with water!!
nail.jpg

The steel nails I'd bought were not stainless steel, but a chinese grade "q195". They would all rust and stain over time, so I had no choice but to remove all the planks again. I spent the last two days with a crow bar prizing them all lose again without doing too much damage. The new stainless steel nails will arrive tomorrow :obscene-drinkingcheers:

planks.jpg
 
On a side note, the nails seemed to be leaving a black residue, almost like a burn mark after only two days of being on the wall.
black marks.jpg
black marks 2.jpg

Does anyone know what might be causing this? It almost looks like charring, even inside the nail hole.

Some missed hammer blows also seemed to be distributing whatever was on the nails.
hammer marks.jpg
 
Back
Top