• Hi all and welcome to TheWoodHaven2 brought into the 21st Century, kicking and screaming! We all have Alasdair to thank for the vast bulk of the heavy lifting to get us here, no more so than me because he's taken away a huge burden of responsibility from my shoulders and brought us to this new shiny home, with all your previous content (hopefully) still intact! Please peruse and feed back. There is still plenty to do, like changing the colour scheme, adding the banner graphic, tweaking the odd setting here and there so I have added a new thread in the 'Technical Issues, Bugs and Feature Requests' forum for you to add any issues you find, any missing settings or just anything you'd like to see added/removed from the feature set that Xenforo offers. We will get to everything over the coming weeks so please be patient, but add anything at all to the thread I mention above and we promise to get to them over the next few days/weeks/months. In the meantime, please enjoy!

Dining Suite

PAC1

Nordic Pine
Joined
Nov 26, 2020
Messages
987
Reaction score
580
In 1997 I bought some American Black Walnut to make a 9’ dining table, chairs and sideboard. I think the wood has sufficiently dried for me to start. (I made the sideboard 20 years ago).
I have planed up the table top wood and will start gluing up next week. It is all 1.1m long by 250-330 wide and 21mm thick. I need to make 2 leaves 1070mm wide and a third 600mm wide. I cannot decide how to join it:
A. Butt
B. Plywood spline
C. Biscuits
D. Domino
E. Tapered glue joint.
I worry that B, C and D will telegraph as the wood is only 21mm thick. A. With good glue should be sufficient. E. Whilst strongest might show on the edge of the table when I apply a thumb nail to the edge. Decisions decisions. Which should I do?
I will put some photos up now it is getting interesting.
 
We have made a ding room table that size and a metre wide, and also a coffee table out of black limba. Training son so took a while. DT is about 44 mm thick finished from rough sawn but the coffee table is cut from the same planks but has two levels so each layer is about 21 -22 mm finished.

Method was very light angle butt joints and dominos. The light angle was achieved by cutting the lengths with Mafell track saw and new blade. Hand rubbed, then dominos. The big advantage of the dominos is they help with lining up and structural integrity whilst glueing and clamping. For the thick table we did double rows, rather than using the XL and bigger dominos. Titebond as glue. Rolled on in even layer.

Angle cut was to minimise risk of gapping. Dominos prefent slippage under clamping too.

We also followed the blacktail method of bolting C bar into router cut channels below. Special SS studs tapped in. This permits movement but helps to stop and cupping risk. The heavy bar was fabricated by my son with help from his gf's dad (who owns a metal fabricating factory) and enabled easy fitting of custom legs. (Table must be transported).

All worked perfectly. Quick and easy. Dominos have not telegraphed though at all.
 
A primary cause of things like biscuits and splines telegraphing through at edge joints is the use of water based adhesive and leaving insufficient time between glue up and levelling and prepping the assembled panel's surface for polishing. The water in the adhesive causes localised wood moisture gain and similarly localised swelling of the grain; it takes a few days for that localised moisture gain to reduce and match the surrounding wood, so it's always a good idea to leave a solid wood panel assembled with water based adhesive a week or so before final polish prepping.

As to long term telegraphing of reinforcement aids, assuming what's said above is observed, it's a very small risk. Slainte.
 
In my world I would rarely be ready to finish something within a month of starting, so I should be good with Dominoes or Biscuits. I will be lucky to be finishing the table in February so plenty of time to dry. I will probably glue the panels up and then leave them until I have made the pedestals and got the mechanism for the extender working well before flattening and scraping ready for finish.
I had already edged the boards perfectly square, so they will stay square
 
Of all of those methods, I'd be inclined to go for a plywood spline, a favourite method of jointing used be the late and very great Alan Peters. I've used them successfully for a number of years now as they're so easy to do, particularly if you have a decent router table. I try and use good quality, 6mm birch ply as well and if I can't find anything suitable, I've been known to laminate my own from mahogany veneer.
I've never had any sort of problem with 'telegraphing' either though that has happened when the dom, biscuit etc has been too close to the finished surface (say 1-2mm) - Rob
 
I made a hall table about 12 years ago out of oak about the same thickness as your table.

Plywood splines (from memory 9mm) were used to join the 3 pieces together and there’s never been any sign of any telegraphing and the splines were a major aid in pulling it all together.
 
Woodbloke":3jfjxmiu said:
Of all of those methods, I'd be inclined to go for a plywood spline, a favourite method of jointing used be the late and very great Alan Peters. I've used them successfully for a number of years now as they're so easy to do, particularly if you have a decent router table. I try and use good quality, 6mm birch ply as well and if I can't find anything suitable, I've been known to laminate my own from mahogany veneer.
I've never had any sort of problem with 'telegraphing' either though that has happened when the dom, biscuit etc has been too close to the finished surface (say 1-2mm) - Rob

Plywood splines would be the traditional approach for me. At least that was the approach of the workshop I served my apprenticeship in. I recently bought some beech plywood it was comparitively cheap. It is well made and stable so I might use that.
 
I can understand using alignment aids for something large, but I'm not sure why people go to the trouble for something as small as this table top. If you've got half a dozen cramps, then I'd just butt joint it in the normal way, and clamp some off-cuts across it to keep everything aligned as the sash cramps are tightened.

There, I saved you some work. :D
 
It is fairly large 2.7m by 1.1m. There will be two leaves 1.1 square and one 600mm by 1.1. The two big leaves will be made from four planks. The small one is only two.
Once glued up I want to be able to scrape it to a finish. Therefore I do not want four steps to flatten.
 
Richard":1ec2mftd said:
A primary cause of things like biscuits and splines telegraphing through at edge joints is the use of water based adhesive and leaving insufficient time between glue up and levelling and prepping the assembled panel's surface for polishing.
Perhaps I should illuminate further. If a panel is edge jointed, glued up with water based adhesive and within, say, twenty four hours it's levelled, prepped and polished that's when the position of biscuits, et al, can show up. The reason is that localised swelling of the wood occurs after slight adhesive wetting, small admittedly but shouldn't be ignored or discounted, and it needs a bit of time for excess moisture to equalise or work its way out of the wood and for the wood to shrink again.

If levelling prepping and polishing happen too soon after glue up the shrinkage continues after the polish is applied and the position of the biscuits, et al can be revealed. Biscuits, for example, may reveal themselves as slight oval depressions spanning the joint line, and the joint line itself may sink showing as a slight furrow.

Maybe everybody understood what I was getting at in my earlier post and all the above is redundant, but I decided I probably ought to explain a bit further, just in case. Slainte.
 
MattS":1u92hgra said:
I hadn't heard of telegraphic before, so the extra explanation is very useful thank you.

I new term for me too and led me to inspect an oak table I made 30 years ago for any tell tale signs. I used ramin dowel centered with dowel pins. 1 ¾ “ oak is a bit thicker than Peter's project though.

Also just checked the V&A table top, 1” thick oak jointed with biscuits, also no signs of telegraphing. Took about 3 months between jointing the top and applying any finish.
 
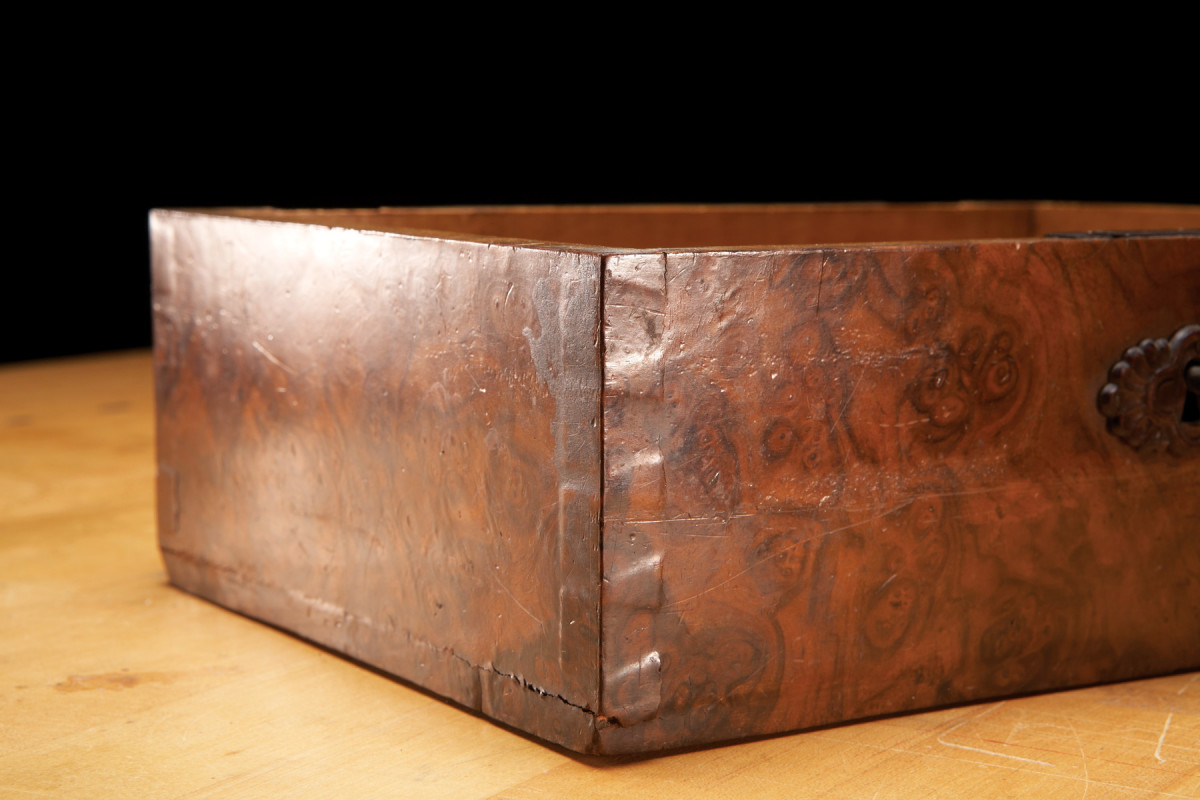
Through dovetails telegraphing their presence in an old (antique?) veneered box. I have no idea how many times I saw this in mostly 19th century brown cheaply made carcases and drawers when a large part of my job was restoring and repairing antiques. Slainte.

Image source: https://www.popularwoodworking.com/arti ... lry-box-2/

aw_15222_001.jpg
 
Interesting, thank you Richard it’s not something I had come across before, and you’re explanation was perfectly understandable, the dovetails on that box are something else though.
Ian
 
Cabinetman":3ag4p3ql said:
Interesting, thank you Richard it’s not something I had come across before, and you’re explanation was perfectly understandable, the dovetails on that box are something else though.
Ian

It seems highly likely, assuming the box was probably made in the nineteenth century, the prominence of the telegraphing was exacerbated as the the twentieth century progressed and the joinery and veneering was subjected to improved residential climate control, e.g., central heating, insulation and the like which would have played a role in reducing the RH conditions the box experienced in service.

Old houses experienced different temperature and RH (cooler and damper mostly) than do modern habitable buildings, or old buildings that have been modernised. Also, wood used to make furniture would most likely have been air dried so, in many cases, it might have dried to only somewhere north of 14 - 15% MC, and perhaps sometimes quite a long way north of that. It's not a surprise for antique furniture sitting in modern properties and made before about 1900 to show faults or failings caused by relatively large shrinkage in those warmer and drier conditions. Slainte.
 
I decided to use dominoes. I will start a project wip thread soon.
 
Back
Top