• Hi all and welcome to TheWoodHaven2 brought into the 21st Century, kicking and screaming! We all have Alasdair to thank for the vast bulk of the heavy lifting to get us here, no more so than me because he's taken away a huge burden of responsibility from my shoulders and brought us to this new shiny home, with all your previous content (hopefully) still intact! Please peruse and feed back. There is still plenty to do, like changing the colour scheme, adding the banner graphic, tweaking the odd setting here and there so I have added a new thread in the 'Technical Issues, Bugs and Feature Requests' forum for you to add any issues you find, any missing settings or just anything you'd like to see added/removed from the feature set that Xenforo offers. We will get to everything over the coming weeks so please be patient, but add anything at all to the thread I mention above and we promise to get to them over the next few days/weeks/months. In the meantime, please enjoy!

Dining Table

I'm following along alternating between, "yes, that's how I would have done it," and "wow, what a great idea!"

I love WIPs/build threads. So interesting to see work habits, shops, tools, and problem solving all in one.
 
I continued with the apron this week
 

Attachments

  • IMG_2126.jpeg
    IMG_2126.jpeg
    327.9 KB · Views: 529
  • IMG_2124.jpeg
    IMG_2124.jpeg
    368.5 KB · Views: 529
  • IMG_2117.jpeg
    IMG_2117.jpeg
    225 KB · Views: 529
I have put the structural frame together and finished the pedestals.
The sliding mechanism works brilliantly. It slides very smoothly without much effort. I was pleasantly surprised how easily the frame and two pedestals went together. I worried as it would not have needed to be much out of alignment on the pedestal to cause problems when extended to 9'
I am onto the sanding and sanding and sanding then apply the finish. It is slow progress but cannot be rushed.
 

Attachments

  • ee3c8ade-6bf3-415f-841e-edd500fc9ffc.jpeg
    ee3c8ade-6bf3-415f-841e-edd500fc9ffc.jpeg
    433.6 KB · Views: 382
  • c535d7ff-40bc-444b-8fd6-1b29d8621cfb.jpeg
    c535d7ff-40bc-444b-8fd6-1b29d8621cfb.jpeg
    441.3 KB · Views: 382
Those pedestals look magnificent, my only concern is, and I think I’m right in saying that they need turning round a bit so that a single foot is between a persons feet when they sit at the end of the table.
Can’t wait to see it all together, glad the mechanism works so well.
Edit, it may of course depend on the size of the top and placement of people around the table avoiding the feet.
Ian
 
I'm sure it's going to look grand, which is just as well, because whoever made that sideboard set a high standard for the room... ;)
 
AndyT":3kf59kdo said:
I'm sure it's going to look grand, which is just as well, because whoever made that sideboard set a high standard for the room... ;)
A much younger version of me, although I had it professionally french polished which has set the finishing bar very high. I think I have a finish that will work, at least we have the colour.
 
Cabinetman":29uusrnv said:
Those pedestals look magnificent, my only concern is, and I think I’m right in saying that they need turning round a bit so that a single foot is between a persons feet when they sit at the end of the table.
Can’t wait to see it all together, glad the mechanism works so well.
Edit, it may of course depend on the size of the top and placement of people around the table avoiding the feet.
Ian
Ian after much research and given the width of the table, the orientation is hopefully to be best. However they are bolted in and can be unbolted and rotated if practice proves you are correct. The problem is that the other way around would foul the seating of the first person on each side. I hope that the person sat at the end can sit without noticing the feet. I will know in 2-3 weeks time and definitely at Easter.
 
Lovely table in a very interesting house by the looks of that room.
Can we see an image of the table closed up.
 
Andyp":1iawx7t5 said:
........Can we see an image of the table closed up.

But we haven't even got an image of it open. All we've seen is the sub-frame.
 
More photos will follow soon. I need to finish the top then I can put it all together.
Andy the picture of the frame is in the closed position. I will take some extended before I fit the top and then again after
 
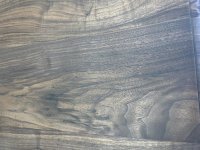
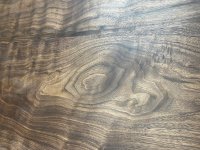
I continued with the finishing process today. I applied some Danish Oil and then some grain filler. I have never used grain filler before. It was a lot of work but I think it is worth it. The photos do not do it justice
 

Attachments

  • IMG_2173.jpeg
    IMG_2173.jpeg
    574.9 KB · Views: 528
  • IMG_2170.jpeg
    IMG_2170.jpeg
    582.6 KB · Views: 528
  • IMG_2168.jpeg
    IMG_2168.jpeg
    591.8 KB · Views: 527
  • IMG_2166.jpeg
    IMG_2166.jpeg
    630.2 KB · Views: 529
  • IMG_2174.jpeg
    IMG_2174.jpeg
    511.4 KB · Views: 528
  • IMG_2157.jpeg
    IMG_2157.jpeg
    421.7 KB · Views: 528
Yes stunning, what did you use to fill the grain please, I tried to find Whiting 20 years ago, in the end I used putty rubbed into the grain then French polish, worked through and still looking good.
Just noticed, Jenkins grain filler. Strange that I couldn’t find any products back then.
 
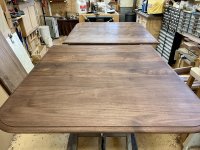
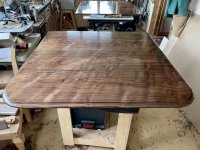
Getting closer to the finish line. The two main leaves are now varnished. The apron will be attached and ironmongery fitted. Then the table top will be fitted onto the frame. That will leave the extension leaf to be varnished.
 

Attachments

  • IMG_2198.jpeg
    IMG_2198.jpeg
    507.6 KB · Views: 412
  • IMG_2197.jpeg
    IMG_2197.jpeg
    473.9 KB · Views: 412
Looking good. Must investigate that grain filler as we have a table in progress (awaiting return of offspring).
 
That looks fantastic, Peter. I wish I could get a finish like that on my furniture.
BTW. Are you familiar with ABC Ironmongery? They are just north of Derby, which I think is not too far from you. They have lots of trad stuff, both new and original. They might have what you need for your table.
 
Steve, the finish is General Finishes High Gloss water based varnish, but without doubt the star of the show was the grain filler. I cursed about spending all day cleaning and sanding after applying it, but today I can stand back and think it was worth the effort.
Thanks for the heads up on ABC Ironmongery, I did not know they were in Darley Abbey. Next time I go I will allow an extra hour.
 
It's looking fantastic, Peter. I've never used grain filler........but then again, I've never had need of a mirror finish like yours. Your's looks like city work, whereas much of mine looks like country work! :)
 
Mike G":ket947s2 said:
It's looking fantastic, Peter. I've never used grain filler........but then again, I've never had need of a mirror finish like yours. Your's looks like city work, whereas much of mine looks like country work! :)
Same here Mike, most of my work has been joinery, stairs, windows, kitchens, conservatories etc and a bit of timber framing. I have made furniture before but never had to achieve a mirror finish myself. I read and watched Youtube of grain filling (mostly french polishing where grain filling is essential). It was very hard to take a piece to what would normally be nearly finished, 240 grit on the sander then cover it in thick glupe that dries like mud and then start sanding again.
Thanks
 
Very nice woork indeed and all looks professionally done too! There is alot of detaild cabinet work done to a very high standard :text-bravo:

Walnut is one of my favourite woods but not one that I ever get the chance to use. Most of my work is in construction: housing carpentry and historic or dated buildings offices etc and walnut does not get used in these types of projects in suffolk/Norfolk where I work.

You mention: " that you have made stairs windows conservatories etc" is woodwork your profession or passion?
 
meccarroll":32h6akt7 said:
Very nice woork indeed and all looks professionally done too! There is alot of detaild cabinet work done to a very high standard :text-bravo:

Walnut is one of my favourite woods but not one that I ever get the chance to use. Most of my work is in construction: housing carpentry and historic or dated buildings offices etc and walnut does not get used in these types of projects in suffolk/Norfolk where I work.

You mention: " that you have made stairs windows conservatories etc" is woodwork your profession or passion?
I served an apprenticeship as a bench joiner 45 years ago. The day job moved into construction, but I have always had a workshop and make a full range of joinery and try to do cabinet making when time allows.
 
PAC1":3npxt9im said:
I served an apprenticeship as a bench joiner 45 years ago. The day job moved into construction, but I have always had a workshop and make a full range of joinery and try to do cabinet making when time allows.

Construction coveres a very wide that range from Labourer to say Architect. Are you still on your woodwork tools or what now?

I have City & Guilds in both Carpentry & Joinery, my apprenticeship was in both but I am mainly practiced in carpentry, my main area of work over the years has been in carpentry but I do joinery work occasionally. A bench joiner makes joinery items for fitting in construction works so when you say construction I'm still wondering what area of construction it might be could it be management?
 
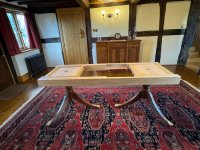
Finished! … well except for the extension panel
 

Attachments

  • f61d9bbd-f82d-4cbc-a66c-6e5d219c14f1.jpeg
    f61d9bbd-f82d-4cbc-a66c-6e5d219c14f1.jpeg
    465.3 KB · Views: 161
Stunning, Peter. You must be so pleased. I hope we're going to see a photo of the apron in situ. I think we've only seen it on your bench.

Is this for you, or for a client?
 
Mike G":8q0zav00 said:
Stunning, Peter. You must be so pleased. I hope we're going to see a photo of the apron in situ. I think we've only seen it on your bench.

Is this for you, or for a client?
It is for me and yes very pleased with it.
I will take more photos but it may be a while as I have too much going on for the next two weeks.
 
Back
Top