• Hi all and welcome to TheWoodHaven2 brought into the 21st Century, kicking and screaming! We all have Alasdair to thank for the vast bulk of the heavy lifting to get us here, no more so than me because he's taken away a huge burden of responsibility from my shoulders and brought us to this new shiny home, with all your previous content (hopefully) still intact! Please peruse and feed back. There is still plenty to do, like changing the colour scheme, adding the banner graphic, tweaking the odd setting here and there so I have added a new thread in the 'Technical Issues, Bugs and Feature Requests' forum for you to add any issues you find, any missing settings or just anything you'd like to see added/removed from the feature set that Xenforo offers. We will get to everything over the coming weeks so please be patient, but add anything at all to the thread I mention above and we promise to get to them over the next few days/weeks/months. In the meantime, please enjoy!

Display Unit WIP - DUN

Woodbloke

Sequoia
Joined
Jul 22, 2014
Messages
7,505
Reaction score
1,601
Location
Salisbury, UK
I don't normally do WIP's 'cos I'm a miserable bug$er but because it's Christmas and I'm feeling generous (like Malc :D ) and 'cos AJB Temple was bewailing the notion on another thread about the lack of WIP's, herewith is a small offering, which I'll attempt to update as an when (Christmas cheer and mince pies notwithstanding)...if anyone's got the slightest interest!

SWIMBO has a small collection of rather pleasant coffee mugs and a couple of milk pourers made by Julia Smith (https://juliasmithceramics.com/) and this little wall mounted display unit is loosely based on one of JK's projects:

b (117).jpg

...so it'll have two large shelves on the lhs, a door and two smaller shelves on the rhs. I went a bit haywire at Yandles a while ago and foolishly bought a 'nice' :eusa-whistle: board of quarter sawn Buginga which is wonderful stuff except when it's quarter sawn! The stuff underneath is Paduk which is a totally different kettle of worms.

IMG_0325.jpeg

It's a complete and utter nightmare to plane, even with a low angle jack and a 47deg cutter, so the effective cutting angle was 59deg :shock: After struggling with it for a couple of hours, it got booted into touch and will probably end being cremated on my neighbours log burner.

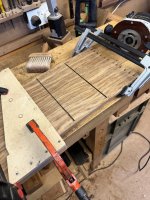
Yesterday afternoon then, I had a rummage through the GWS (Good Wood Store) and found a single bit of air dried Brown Oak with some 'tiger' in it and with some very careful cutting and a lot of prior thought, I managed to get out all the bits needed, including enough for the veneered back panel:

675BC074-3C7D-497C-B0ED-CC05777F7BD1.jpg

IMG_0319.jpeg

The top and bottom are only 12mm thick owing to a large crack in the board, so I had to cut it and machine it to get the thickest boards I could. This will give me a problem later as it's a bit too thin for the hinge screws...however, I have a 'cunning plan' in the best traditions of Alan Peters (if the FUF's visited, make a feature of it :D )

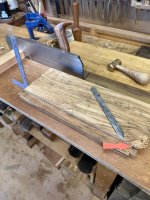
This afternoon, I've finished planing all the bits to size (skimming them with the LA jack) and have shot in the carcass pieces on the shooting board. Marking out the shovetails next - Rob
 
Cabinetman":3cvchx57 said:
Ooh goody! Some "interesting " grain in that brown Oak, suppose you could file the points off the screws when they come through and make a feature of the gold dots, not serious lol.
I was going to have a Bog Oak handle and then add two more small bits of BO on the under and topside where the screws emerge. So in other words, the door will have three points of interest; top, middle and underside. It should :eusa-pray: hopefully work - Rob
 
That’s some very nice looking timber Rob.

Very interested to see how it all goes together.
 
I fully appreciate that everybody has their own pet way of marking out and cutting dovetails; this is how I do mine. Firstly, use some spotty dots to indicate the corners, placing them some distance in. Next set the gauge(s) to the required shoulder line thickness using a gauge block (you'll see why later on) In this instance there's going to be an overhang (aka Pekovich) on one piece, so the gauges are set to 12 and 17mm. The 'set' is marked on the stem and won't be altered until after the job's a gud'n:

IMG_0328.jpeg

I only make a very, very light, barely perceptible line; a heavy line isn't needed (all will be revealed later :D )

IMG_0329.jpeg

On this particular job, I'm going to use different width tails but equal width pins and the easiest way to work out the spacings is to do it firstly on paper:

IMG_0330.jpeg

It's subtle but looks effective when done.

The next thing to do is to transfer the markings onto one side. I now use a very fine line, black gel pen thingie recommended by Alf a while back and they do work exceptionally well. Once one end has been marked out, I put two pieces into the vice, scribe across the end grain:

IMG_0332.jpeg

...on both pieces. The furthest piece in the pic is removed and the tails marked out from the end grain lines:

IMG_0333.jpeg

The process is then repeated for the other two corners - Rob
:
 
Once all the four sets of tails have been marked out, they need to be cut. There are two ways to do it, firstly by hand and secondly to use a bandsaw, which is super quick and über accurate and it ain't cheating either; if it was good enough for the late David Charlesworth, 'tis good enough for me. I always put a strip of masking tape along the very feint shoulder line so I know where to stop the saw cut, it's essential though to have plenty of light to illuminate the cutting area; I have severial of these little clippy-on lights from IKEA and they're really good and really cheap :D :

IMG_0340.jpeg

With the tails cut (ten mins) on the saw, the corners are sawn out, firstly going over the feint shoulder line. I never cut to the shoulder line but leave a scant half mm or so to chisel:

IMG_0341.jpeg

Then remove the waste pins with a fret saw or similar:

IMG_0342.jpeg

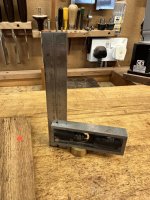
Next I set the adjustable try square to 12mm using the gauge blocks:

IMG_0345.jpeg

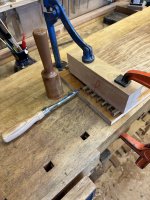
I then place a gash chiseling board on the bench onto which goes the piece to be chiseled and another bit to act as a support block. On top of the wood is a dead square beech chiseling block which is clamped at one end by the Holdfast and at t'other with heavy duty carver clamp. The square is offered up to the beech chiseling block and lightly tapped into position so the end of the blade just touches at each end; this is why you don't need a heavily knifed shoulder line:

IMG_0346.jpeg

Next use my Japanese dovetail chisels to cut to the shoulder line, upon which the chiseling block is clamped. I always chisel from the face or 'show' side as if there's a discrepancy (and it does happen) in chiseling, it'll be on the inside rather than the outside.

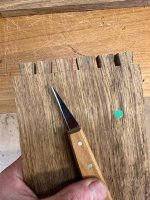
I find a very fine, very sharp carving knife is very, very handy for cleaning up any wiffly bits from the corners:

IMG_0349.jpeg

These knives are made my Pfeil and are available from CHT

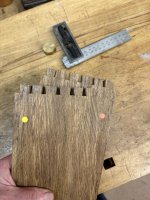
Once all the knife work has been done I've ended up with fours sets of accurate, square tails:

IMG_0351.jpeg

Marking out and cutting the other half of the joints next - Rob
 
All v good thanks, why is it that you use a guage block and not the wood to be joined to plus a fraction? And presumably you use the big block to keep your chisel at 90 degrees? Questions questions lol.
 
Cabinetman":p8rxefrl said:
All v good thanks, why is it that you use a guage block and not the wood to be joined to plus a fraction? And presumably you use the big block to keep your chisel at 90 degrees? Questions questions lol.
The gauge block is absolutely exact so no such thing required as a 'fraction'. The big beech chisel block does indeed keep the chisel at exactly 90deg; this is a trick I pinched off Rob Ingham who pared his dovetails horizontally using a block.

Malc2098":p8rxefrl said:
Wot, co copyright? :lol: - Rob
 
The FUF hasn't exactly called this morning, but Pekovich pin extensions have been scrapped and you'll see why later in this post. This morning then, I started to mark out and cut the tails, using the aforementioned Pekovich dovetail transfer jig, of which I've made three:

IMG_0356.jpeg

IMG_0357.jpeg

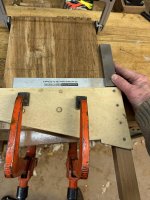
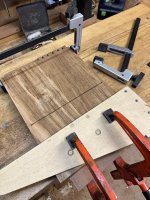
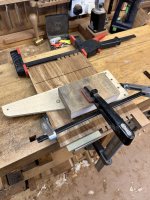
In my very 'umble opinion, these are the simplest and easiest dovetail jigs that I've ever come across and if you're cutting these joints, I can't recommend them highly enough. The tail board is offered up to the jig using the adjustable square which has been gauge block set to 12mm and everything is then clamped righty tighty with a couple of strong spring clamps. It's then positioned on top of the pin board, the obligatory blue tape having already been applied:

IMG_0353.jpeg

IMG_0352.jpeg

IMG_0354.jpeg

I find that light and lots of it is absolutely essential for accurate sawing; moreover the area where the saw cut takes place should be shadow free, so this is the set up:

IMG_0359.jpeg

The two big Ax lights bathe the area very brightly from the rear whilst the little clippie-on IKEA spot can be moved in really closely from the front and moved from side to side as the vertical saw cuts progress. I always saw the tiniest fraction away from the blue tape on the waste side which is relatively easy to do if that little IKEA light is shining directly where I want it to shine.

In the next pic I had the genius idea of making a chamfer on the pins at this stage rather than later, so proceeded merrily to mark out a 2mm gauge line (very light) all the way round and plane on the chamfer. Only later did I realise that a 2mm chamfer was going to be far too big for smallish pins; 1mm would have been much better:

IMG_0365.jpeg

As well as the defunct chamfer which'll get planed off after glue up, the waste from the tails is being removed. The kerf from my Japanese saw is so fine that the Pegas blades won't fit so it's a two stage sawing job to remove each bit of waste; cut down the centre and swing to the left and then remove the last remaining section.

Once that's done, the exciting bit is seeing if the joint fits:

IMG_0367.jpeg

This was done prior to cutting the chamfer and the tail board is shown supported horizontally with no additional support, so it's going to be a respectable joint and I'm pretty confident that it'll tap all the way to the bottom of the socket; this is the only time the joint will be fitted as shovetails only fit once (as I was told decades ago) Three more to go - Rob
 
Blackswanwood":xk7htbid said:
:text-+1: for the dovetail jig - simple but effective.

Agreed; it's amazing just how good the transfer jig is; a complete revelation compared to the Ingham design I was using for a few years.

The remaining pics of the shovetail build for this job show the tail sockets being chiseled:

IMG_0369.jpeg

The set up is the same as before, but now I use a Narex chisel and small Yew tapometer to remove the waste. I find that the Yew doesn't damage the end of the chisel handle whereas a much harder timber, over time, would 'mushroom' the end. The final bit it to clean up all the wiffly bits in the corners:

IMG_0372.jpeg

...with the knife. The next thing I have to do is to get my head round how I'm going to cut the jointing for the vertical dividers and the shelves. What makes it slightly complex is that the dividers and the shelves are different thicknesses - Rob
 
The construction of the interior of this little unit will be with my normal method for this sort of job and that's plywood inserts, a technique favoured by the late Alan Peters. Firstly, both the vertical sections framing the door needed to be marked out and shot in 'exactemundo' to the length between the shoulder lines on the tail boards:

IMG_0373.jpeg

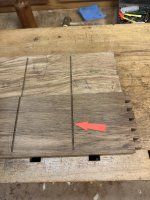
I put a Veritas square on the shoulder line one one tail board, placed a vertical piece on top and used a 'V' pointed Japanese marking knife to make a sharp cut (red arrow) which was then turned into a knife line and the waste removed on the bandsaw. It was then shot in dead square onto said line. The second vertical piece was roughly marked to the same length and the waste sawn off:

IMG_0374.jpeg

It was then shot to length, a couple of shavings at a time, testing the overhang (red arrow) with my fingers until there both ends were dead level. Once they were level, the top bit was now identical to the lower bit, so they were then offered up to the carcass:

IMG_0375.jpeg

I was a little bit concerned 'cos they were a mite sloppy but when I put a straight edge on the top and bottom, there was a slight bow which will pull straight when they're glued.

The next job was to clamp both the top and bottom together, using the shoulder lines as a ref so the backs were together; spotty red dots mark the fronts:

IMG_0376.jpeg

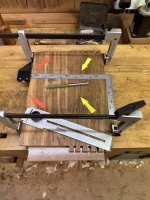
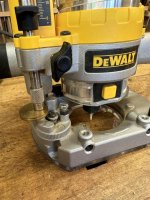
I then had a look at the drawing and measured out two pairs of pencil lines, each pair being 9mm apart (thickness of the vertical divider) These were then drawn across both the top and bottom using a large Veritas square; one set is shown 'twixt the red arrows. At the same time, the limits of the housing were inked in on each board (yellow arrows) The next job was to set up the router for the first housing:

IMG_0377.jpeg

The ply fence was made many years ago and is dead true. With the 4mm cutter set to a 5mm doc and positioned exactly in the middle of the pencil lines, all I needed to do was to plunge the router and run it up and down the fence, starting and stopping at the points indicated by the yellow arrows above. The first cut was done successfully, even if it was a bit of an 'ask' for a small, bluntish cutter. Fortunately, there were no calamities and it didn't snap :eusa-dance:

IMG_0378.jpeg

...as was the second by re-jigging the fence and clamps:

IMG_0379.jpeg

This essentially is how all the housings are made, but as the shelves are thinner, I will probably have to make shallower housings with a 3mm cutter instead of a 4mm - Rob
 
Woodbloke":3bc0mrkw said:
I'm pretty confident that it'll tap all the way to the bottom of the socket; this is the only time the joint will be fitted as shovetails only fit once (as I was told decades ago) Three more to go - Rob
Interesting Rob, - I was fortunate a number of years ago to spend some time with a Parnham trained man who insisted the only way you could tell that dovetails would fit precisely was to push them all the way home as many times as necessary!

Great write up by the way, thanks for taking the time to do it.
 
Stuart":21acjwm1 said:
Interesting Rob, - I was fortunate a number of years ago to spend some time with a Parnham trained man who insisted the only way you could tell that dovetails would fit precisely was to push them all the way home as many times as necessary!

Great write up by the way, thanks for taking the time to do it.
Thanks Stuart. Difficult to argue with a Parnham bloke, (I could quite easily take umbridge with Linley though) but I was told opposite by a lecturer at Shoreditch College in the 70's who was Barnsley trained. To my way of thinking, the more times you push them all the way to the bottom, the sloppier the joint gets until you need clamps to keep them in place at the glue up. With these ones, there'll be a minimum of glue (as the joints fit) and no clamps.
Provided you can see that tail sockets have been cut true and straight, the tails, in theory :eusa-whistle: will go right to the bottom. If there's a slight discrepancy in sawing it's easy enough to clean up the sockets with a sharp chisel, taking off the barest minimum- Rob
 
Personally I wouldn’t risk putting glue anywhere near them until I tried them – you must be super confident! Also I’m of the opinion that joints need to be cramped for the glue to do its job properly, no factual basis for this btw.
 
Cabinetman":22y281mc said:
Personally I wouldn’t risk putting glue anywhere near them until I tried them – you must be super confident! Also I’m of the opinion that joints need to be cramped for the glue to do its job properly, no factual basis for this btw.
I've always done dovetail like this, that is push them dry, no further than a quarter the way in. Clamping them only serves to squish the tail into the bottom of the socket but if the joint fits, you don't need to; it'll stay put without budging til the glue sets. I do use a sash clamp and block to draw the joint together when gluing, ( a hammer is useless) but once the tails are seated at the bottom of the sockets, there's no need for the clamp any more - Rob
 
Our school woodwork teacher in the 1970s also taught us that dovetails only fit once. He said that tightness comes from very slight compression of the wood fibres which is not really reversible.
We were working on softwood, but I reckon Rob knows how to cut to the tighter tolerance his hardwood needs!
 
AndyT":3h1gb0sr said:
Our school woodwork teacher in the 1970s also taught us that dovetails only fit once. He said that tightness comes from very slight compression of the wood fibres which is not really reversible.
We were working on softwood, but I reckon Rob knows how to cut to the tighter tolerance his hardwood needs!
The same with Oak as you know Andy, but it's not quite so 'squishable' so the leeway for error is a bit less. I can usually tell how the joint is going to go together by the first couple of light taps with a maul.

That said, Her Ladyship the FUF has paid me a visit today, but her evil intentions have been thwarted with a cunning fix :D Details to follow - Rob
 
Very nice WIP and high quality work. I must spend a bit of time to understand the transfer jig. Looks like a good idea, as does the vertical chopping block.

And I agree about dovetails - only fully fit when they are glued: I was taught exactly the same, ie don't do a full test fit as they should be tight.

Cutting on the bandsaw in sets is a good idea. I've always done it by hand, super carefully, hence rather slow.
 
With the grooves machined into the top and bottom, the next item was to make the housings for the long shelves; the issue here was that the end is 15mm thick and the vertical divider is 9mm:

IMG_0381.jpeg

I packed out the difference in thickness with some 6mm green mdf and marked out the centre lines at the same time marking the limits of the grooves (red and yellow arrows) I decided to machine these grooves individually on the router table and in order to make the 'set up' easier I made a mock up in pine, marking out one of the centre lines:

IMG_0382.jpeg

This can then be offered up to the router fence and the line positioned directly over the top of the cutter; the fence stop is then snugged up against the end of the bit of pine:

IMG_0383.jpeg

...and a test groove machined. (The wide groove in the pine is from another test job; it's of no importance here)

IMG_0384.jpeg

With the fence and stop correctly positioned, one of the grooves can be machined by dropping it onto the cutter, making sure that the start point corresponds to the ink line made earlier (bit of guestimation required here, but it's not crucial). The wood is then flipped round for the second cut, but this time a stop needs to be clamped at one end of the table to stop the cutter at the ink line (arrowed):

IMG_0385.jpeg

With the vertical divider machined, the 15mm thick end also requires identical grooves, but the shoulder line is longer by the length of the dovetails (12mm), so the stop was moved by 12mm using a gauge block (arrowed):

IMG_0386.jpeg

It was at this point that Her Grace, the FUF stuck as I didn't hold the wood quite tight enough against the fence, with the result that the cutter went slightly 'walkabout' :lol:

IMG_0387.jpeg

You need to hold the wood against the fence with a grip of iron to prevent this from happening and it's almost impossible to stop with bigger cutters. I always keep all my offcuts for setbacks like this, so I simply hacked off a suitable bit, glued it in place and went indoors to join SWIMBO for a mandatory bacon butty and a slice of panettone:

IMG_0388.jpeg

Once the glue had set, the infill was cleaned up and the groove re-machined. The remainder of the infill (arrowed) will be very hard to spot when finished unless you know it's there and know what it is :lol:

IMG_0389.jpeg

There's also a slight 'step' or mismatch in the grooves but this shouldn't be an issue when the shelves slide into place as their length is 305mm. Corresponding grooves in the divider end grain next- Rob
 
A good quick recovery there!

Don't get me wrong, I have great respect for your methods, which produce stunning results. But it's problems like that wayward cut that put me off using the electric router. (And yes, I do have one.)
In the somewhat idiosyncratic way I go about things, I prefer a method where I can see where I am cutting. And I really enjoy the process of cutting housings, getting crisp sides and an even, level bottom, even though it will all be invisible when assembled.

Fascinating wip though, because of seeing into your chosen methods.

Plenty of ways to skin a cat!
 
AndyT":3rwo74p8 said:
A good quick recovery there!

Don't get me wrong, I have great respect for your methods, which produce stunning results. But it's problems like that wayward cut that put me off using the electric router. (And yes, I do have one.)
In the somewhat idiosyncratic way I go about things, I prefer a method where I can see where I am cutting. And I really enjoy the process of cutting housings, getting crisp sides and an even, level bottom, even though it will all be invisible when assembled.

Fascinating wip though, because of seeing into your chosen methods.

Plenty of ways to skin a cat!
As ever Andy, horses for dooberies. That said, the slight deviation in that cut from the 'straight and narrow' will be almost entirely hidden by the shoulder on the shelve; also bear in mind that the next set of shelf grooves will be with a 3mm cutter rather than 4 and a 3mm wide groove would be taxing to say the least to do handraulicaly...and then how would you do it in the end grain? (as in the following post :eusa-whistle: )

When I was making stuff for Linners, there were all sorts of goofs where Her Ladyship had touched somebody's shoulder; all were repaired and were invisible when completed. In fact, if memory serves, in your recent and very excellent bed build thread, I recollect that she landed on your shoulders and you needed to do a cunning 'fix'.

The long and the short of it is that goofs, mistakes (whatever you care to call them) happen, whether produced by hand or machine tools and it's because we're hooman beans; it's not the mistake that matters, but how you fix it.

I rest my case m'lud :D HNY Andy to you and yours - Rob..who's about to open some bubbles :D
 
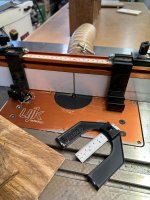
On the face of it, this sort of malarky sounds difficult but it's very, very easy. The 4mm cutter has been set up in the UJK router table to around a 4mm doc (not crucial) to make a central cut:

IMG_0399.jpeg

You'll note that I have two stops on the router fence; the lh one has been cunningly altered so the bolt is on the other side. All I need to do is to set the limits of the cut with a pen (as before), keep the face side at all times on the fence, drop the divider (or shelf) onto the cutter and shuttle 'twixt the two stops, stopping the cutter before lifting it off:

IMG_0393.jpeg

These are the vertical dividers:

IMG_0394.jpeg

The shelves are treated slightly differently, but essentially the same. They're offered into the unit from the front after glue up, so have been shot a fraction longer (yellow arrows) in order for exact fitting later.

IMG_0395.jpeg

As a consequence, the grooves have been made deeper (two passes on the router table) to allow for shooting the shelves to fit.

The small shelves on the rhs have been done in exactly the same way, but using a 3mm cutter as they're a mere 7mm wide and may get eventually planed even thinner when cleaned up:

IMG_0408.jpeg

The 3mm housings in the vertical side/end can also be seen; how it was done is in the next post - Rob
 
Rob,
You are way out of my league, so whilst I have not contributed to this WIP I have found it interesting.
 
Lurker":hrijbzj0 said:
Rob,
You are way out of my league, so whilst I have not contributed to this WIP I have found it interesting.

Lurker":hrijbzj0 said:
Delightful (patent pending)
Dr.Al":hrijbzj0 said:
Lurker":hrijbzj0 said:
Delightful (patent pending)

Oi! :lol: :eusa-clap:

Thanks chaps, appreciated. I did think for half a heartbeat that the overtly gratuitous post of the Cliffie block plane might have earned me a bit of grief :lol: - Rob
 
Woodbloke":2jsqjk52 said:
I did think for half a heartbeat that the overtly gratuitous post of the Cliffie block plane might have earned me a bit of grief :lol: - Rob

I think the expression is “a drive by” :D
 
As "Delightful" has been taken by a certain thieving cretin :D ...

Marvellous™

I was tempted by "Great, Super!", but I thought it might risk coming across as sarcastic...

[youtubessl]aGX0YFiUGbI[/youtubessl]
 
Rob, I have enjoyed the WIP.

As it would appear that 'some' people are grabbing and patenting words, I will use a local one for very nice.

It is called "Lekker" 8-)

So, now lodged with Adams & Adams Patent & Copyright/Copywrite attorneys :lol:
 
The small shelves have now had their 3mm housings machined and this time I did both pieces of wood (vertical door divider and the end) at the same time. They were different thicknesses, so the discrepancy was taken up with a green 6mm mdf packing peice.
First n'foremost, the housings were marked out:

IMG_0401.jpeg

...shown with yellow arrows and the end points with red arrows. The doc of 3.5mm was set using the trusty gauge blocks:

IMG_0404.jpeg

...and then once the router had been positioned on the line and the fence lightly clamped, it was checked for true with a large square:

IMG_0403.jpeg

The clamps were then tightened, the fence was checked again and the first pair of housings machined:

IMG_0405.jpeg

What made these housings slightly awkward is that the wood is quite small so a bit a 'blue sky thinking' was required to re-jiggle the clamps to machine the second pair of housings. What's crucial is that both bits of wood are continuously clamped and are never separated until the machining has been done. Once I'd given it some thought, it was easy enough to organise the clamps for the second pair of housings:

IMG_0406.jpeg

The actual machining was easy and only took a few seconds; it was setting up to do the cut(s) that took some time. SWIMBO hasn't yet ordered the hinges from CHT so although I've marked out where they go, it's madness to attempt to rout the correct depth of the leaves without first setting the exact depth on a bit of scrap wood, so I've been busy with veneering the back panel, the gory details of which will follow shortly - Rob
 
When you started on about gauge blocks a few months ago, I dismissed it as a gewgaw, but this WIP has convinced me otherwise.
I must have a rootle through my metal stash and make a set.
 
Nice little Clifton block plane. I have a few Clifton planes (rebaters - all bought second hand before prices went mad) and they are lovely. Fully agree re mistakes. They are almost inevitable. I frequently think when I am making things that I could have done this or that better. It brings that "non-ikea" quality I feel!

Phil. Lekker is surely just Dutch? My ex used it a lot and my son's g'f does too.
 
Lurker":20vqqier said:
When you started on about gauge blocks a few months ago, I dismissed it as a gewgaw, but this WIP has convinced me otherwise.
I must have a rootle through my metal stash and make a set.

Ditto. I've got a set of gauge blocks, but they're of the Jo blocks type, so rather more accurate than is needed for woodwork (sub-150 nanometre tolerance is probably overkill for a lump of ash!). Making some brass ones in coarser steps sounds like a good plan.
 
Back
Top