• Hi all and welcome to TheWoodHaven2 brought into the 21st Century, kicking and screaming! We all have Alasdair to thank for the vast bulk of the heavy lifting to get us here, no more so than me because he's taken away a huge burden of responsibility from my shoulders and brought us to this new shiny home, with all your previous content (hopefully) still intact! Please peruse and feed back. There is still plenty to do, like changing the colour scheme, adding the banner graphic, tweaking the odd setting here and there so I have added a new thread in the 'Technical Issues, Bugs and Feature Requests' forum for you to add any issues you find, any missing settings or just anything you'd like to see added/removed from the feature set that Xenforo offers. We will get to everything over the coming weeks so please be patient, but add anything at all to the thread I mention above and we promise to get to them over the next few days/weeks/months. In the meantime, please enjoy!

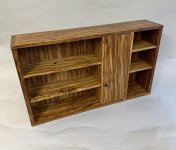
Display Unit WIP - DUN

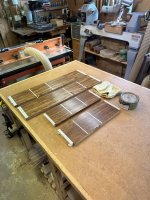
Each of the main sides has had four thin coats of polish and been allowed to harden off for 24 hours, after which they're cut back with wax and 0000 grade wire wool. The wax also forms a 'resist' so there's no need to panic to remove squeeze out as it'll just lift off:
IMG_0584.jpeg

The glue up gear was then assembled; Everbuild D4, a little tray for the glue, a tiny paint brush for applying the stuff, a sash cramp, blocks for it's bar and a couple of 'squishing sticks':

IMG_0585.jpeg

I try never to put on too much glue as I'm aiming to keep the squeeze out to an absolute minimum, so it's applied very sparingly to just the upper sections of the pins and tails; squeezing the joint together will carry enough to the bottom of the sockets:
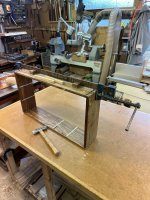
IMG_0586.jpeg

Once the four bits have been lightly tapped together, the joints are pulled up with the sash cramp until the 'squishing sticks' are needed to force each tail into the bottom of it's socket so that the joints then go up 'righty tighty':
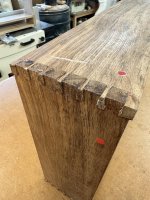
IMG_0588.jpeg

...and there's hardly any 'squeeze out':

IMG_0587.jpeg

The 'squishing sticks' after pulling the dovetails together indicated:

IMG_0593.jpeg

...that they might have been a fraction on the tight side :shock: :D

Having checked for square (about .75mm out...good enough) I was dismayed to see that Her Grace, the FU fairy had once again paid me a visit! The plan was to leave a 2mm step at the front edge along the top and bottom and it can bee seen clearly at the yellow arrow:

IMG_0589.jpeg

IMG_0590.jpeg

...but for some unknown reason know only to Her Grace, it had disappeared at the red arrow, only to show up on the reverse of the cabinet!

IMG_0591.jpeg

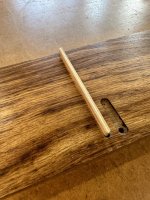
I was completely flumoxed and went into a slightly mild panic; unless there was a way to initiate a 'fix' Her Grace would have had me over a barrel, finito. This wood is so unique that I wasn't sure if I'd kept any offcuts but after a swift rootle through the pile I came across a couple of long bits :eusa-dance: that had been previously cut off during the timber prep stage:

IMG_0592.jpeg

The plan is to glue a slitherino onto the front edge and then plane it down to 2mm at the red arrow end and taper it to zero at the yellow arrow end; with any luck and a following wind, the 'fix' ought to be well nigh invisible - Rob

Her Grace the FU Fairy 0, WB - 1 :lol:
 
Having roughly cleaned up the red dot joint, they appear to have gone together quite well:

IMG_0594.jpeg

The final clean up is some way off and shoulder lines are still apparent; they'll eventually be planed off - Rob
 
Looking good - and a great reminder of the wisdom of not clearing out any offcuts before a project is safely finished.
 
The slitherino has been glued on:

IMG_0595.jpeg

...and left to set for a couple of hours and after some very careful planing, scraping and sanding there's now:

IMG_0596.jpeg

...a 2mm step at each of the arrowed ends. The interior surface will need to be de-waxwd with white spirit and then re-polished and once done, it'll be very difficult to see the 'fix'. The step at the corresponding corner (that shouldn't have been there) has also been planed away so the back is now parallel. The next job is to rout out the rebate for the back panel - Rob
 
Andyp":2lfpmtbz said:
Next job Rob? Is it not easier to rout the back panel rebate before glue up?

The joys and benefits of a big router Andy :D

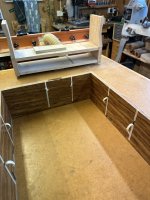
The first job is to plug all the grooves with little bits of wood which stops the cutter bearing from creating a 'dimple' in the side of the rebate:

IMG_0597.jpeg

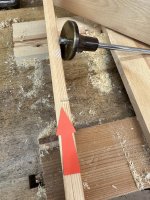
A large extension fence is bolted onto the underside of the router and I then did a mandatory test cut, having first set the doc to .5mm more than the panel and making a deep line with a wheel gauge; this prevents any 'break out' from happening on the actual job. I use a wheel gauge for this is as it can get virtually right into an interior corner which an ordinary gauge won't do:

IMG_0600.jpeg

IMG_0601.jpeg

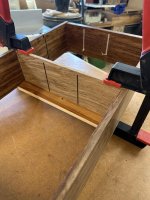
The job was then secured to the assembly table, such that it was impossible for it to skid around during the machining:

IMG_0602.jpeg

I did the routing in a couple of passes:

IMG_0603.jpeg

...which took no longer than about a minute. The 'set up' however took at least 45mins. Once the rebate had been created, I used a couple of Japanese gauges mark out the corners:

IMG_0604.jpeg

...and then it was a bit more nifty chisel work to square them out:

IMG_0605.jpeg

The hanging bracket mortices have of necessity been partly machined away during this process. Once the back is glued in place, they'll be carefully re-cut by hand - Rob
 
Rapidly loosing the will to live with this WIP, but I'l persevere and only post the basic process without all the niff naff and trivia. The internal components are fitted next and they're all the same. This shows the first 'dry run' for one of the dividers, so the 4mm splines are tapped in place, top and bottom:

IMG_0610.jpeg

...after which the divider (shot to exactly the right width) is gently positioned with the aid of a soft maul into it's final position:

IMG_0611.jpeg

It's pulled up square against the rebate using a gash bit of pine and a couple of clamps. Knowing that it fits, the procedure is to clean up and sand, mask off the shelf housings, polish with four thin coats of MMM (using a polishing rubber), wax and glue in place. Rinse and repeat another five times - Rob
 
Woodbloke":oe53j8ha said:
Rapidly loosing the will to live with this WIP

Don't, please. They're such a useful resource. I know how much time they take to do, but people do learn from each other, and we all do things differently. Besides, it gives us all something woodwork-related to talk about. (Oh, and "losing" ;) )

so the 4mm splines are tapped in place, top and bottom:

View attachment 1

I've done this now and then. It's my get-out-of-gaol method if there are contrasting finishes involved, for instance. It's a useful technique, but I worry that although it's fine for shelf and divider support and location, it'd be pretty ineffective in resisting movement in the carcase, so I use it with caution. If the circumstances allow a sliding dovetail, then I'd generally do at least one shelf/ divider that way, to hold everything together.
 
Mike G":2efkovzm said:
I've done this now and then. It's my get-out-of-gaol method if there are contrasting finishes involved, for instance. It's a useful technique, but I worry that although it's fine for shelf and divider support and location, it'd be pretty ineffective in resisting movement in the carcase, so I use it with caution. If the circumstances allow a sliding dovetail, then I'd generally do at least one shelf/ divider that way, to hold everything together.
Agreed, yes, but in this small cabinet, the shelves and dividers are just a smidge over 110mm wide so movement in the carcase is going to be negligible. I hope :eusa-pray:
This one:

IMG_0612.jpeg

...where the sides are 180mm wide was done from the same timber and with the same method of construction. It's been in a warm kitchen and was made a couple of years ago; thus far it's resisted movement. I think quite a lot depends on the initial MC of the timber used which is why I like to keep the stuff for a while before use and I generally always check it with a moisture meter - Rob
 
All sorts of niff-naffy, trivial things went slightly 'off piste' with this job and I decided to press on and get the damn thing finished rather than spend ages narrating the numerous and varied 'fixes'. It's finally finished using severial coats of sloooooooow curing MMM cut back with copious amounts of decent wax paste applied with 0000grade wire wool:

IMG_0713.jpeg

The shovetails didn't turn out too shabbily either:

IMG_0714.jpeg

....but it was really the door that was the most irritating thing about this project as I didn't fit it quite as well as I intended. That said it looks 'reasonable':

IMG_0716.jpeg

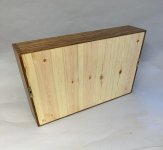
The back has been veneered with a pine backer; glued and pinned in place onto the shelves. You can just make out the nail 'oles:

IMG_0719.jpeg

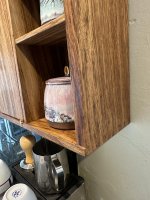
This little cabinet was made specifically to hold SWIMBO's modest collection of Julia Smith coffee mugs and milk pourers (plus a jam pot with a ABW spoon):

IMG_0720.jpeg

IMG_0722.jpeg

Looks better that I thought it might with the coffee mugs etc on the shelves - Rob
 
Woodbloke":2m8gk98p said:
........This little cabinet was made specifically to hold SWIMBO's modest collection of Julia Smith coffee mugs and milk pourers......

:shock: I hope it's fixed well to the wall. At £28 per mug any unexpected vibration could be quite costly.
 
Mike G":2terrxh4 said:
Woodbloke":2terrxh4 said:
........This little cabinet was made specifically to hold SWIMBO's modest collection of Julia Smith coffee mugs and milk pourers......

:shock: I hope it's fixed well to the wall. At £28 per mug any unexpected vibration could be quite costly.
Indeed Mike; I handle the damn things with both hands, very carefully, when I make the coffee - Rob
 
Looks really nice Rob. Thank you for doing the WIP.

Oh, - if you trial fit the dovetails you’ll know that they fit come glue up! :D :D :D
 
Stuart":3ori9qty said:
Looks really nice Rob. Thank you for doing the WIP.

Oh, - if you trial fit the dovetails you’ll know that they fit come glue up! :D :D :D

I did, but they only got tapped in a third of the way :D and not to the bottom of the socket, so there was no need to cramp them at glue up time - Rob
 
Back
Top