• Hi all and welcome to TheWoodHaven2 brought into the 21st Century, kicking and screaming! We all have Alasdair to thank for the vast bulk of the heavy lifting to get us here, no more so than me because he's taken away a huge burden of responsibility from my shoulders and brought us to this new shiny home, with all your previous content (hopefully) still intact! Please peruse and feed back. There is still plenty to do, like changing the colour scheme, adding the banner graphic, tweaking the odd setting here and there so I have added a new thread in the 'Technical Issues, Bugs and Feature Requests' forum for you to add any issues you find, any missing settings or just anything you'd like to see added/removed from the feature set that Xenforo offers. We will get to everything over the coming weeks so please be patient, but add anything at all to the thread I mention above and we promise to get to them over the next few days/weeks/months. In the meantime, please enjoy!

Enlarging a hole in plasterboard

Steve Maskery

Old Oak
Joined
Jul 27, 2014
Messages
2,374
Reaction score
1,329
Location
87290 Laplagne, France
I have some ceiling spotlights to replace. They are quite small and not very bright. I have a boxload of new spots, but they require a bigger hole. I have an idea of how I can enlarge them (glue in a bridge in the topside and redrill - once the holesaw is established it should be fine), but that means gluing in a piece and waiting for the glue to set. It will work but be slow.
Anyone got any better ideas?
S
 
Last edited:
With regards to a glue method, drops of supper glue on top of plasterboard then spray accelerant on wood . Should bond very fast. Mitre Bond.
 
Or, I have seen hacks using a hole saw kit. Say existing hole is 3 inch and you need 4 inch , screw the 4 inch onto abour and if enough thread showing screw the 3 inch on. Never done it, just a thought.
 
Great thread Steve. We have to deal with same problem shortly and my thought was I would just have to enlarge by hand with a keyhole saw as plasterboard is easy to cut and you avoid any risk to existing wiring. I've got 18 to do and not sure I can be bothered to glue a locator in but would be interested in any easy solutions.
 
Not as much fun and harder, would be to cut a hole of the desired size in a bit of ply and use it to draw onto the ceiling, then use one of those pointy plasterboard saws, sounds hard but it would only take a minute to cut each one.
Ian
 
Thank you gentlemen, all good.
I have just 6 to replace, so hand-sawing is not out of the question But I have recently got my lathe set up again, so I might try the tall block approach. Mind you, by the time I've turned a block I could probably have done them by hand.
TVM
 
A padsaw is your answer. Just mark out the hole and saw it. Quick and easy, but just be careful of the dust going in your eyes.
 
How about using a hole saw cut a hole the size you want in a piece of ply as a template, now hold the template on the ceiling and use it as a guide for your drill to stop it wandering? If it's only plasterboard I'm sure once the cut is established you could put the template down and carry on freehand?
 
Morning Steve

As a refinement to Robert's suggestion above, you could try this.

Turn a disk about an inch thick with a diameter that fits loosely inside the bigger hole cutter.

Turn a half inch rebate on the circumference of the disk which fits inside the existing hole.

Drill a hole in the middle to take the drill bit on the arbor. Put the disk on the drill bit with the 'tenon' in the hole.

I'm not an expert turner, but I'd probably make one of these in less time than it would take to find my padsaw. :)

Cheers

Dave
 
Morning Steve

As a refinement to Robert's suggestion above, you could try this.

Turn a disk about an inch thick with a diameter that fits loosely inside the bigger hole cutter.

Turn a half inch rebate on the circumference of the disk which fits inside the existing hole.

Drill a hole in the middle to take the drill bit on the arbor. Put the disk on the drill bit with the 'tenon' in the hole.

I'm not an expert turner, but I'd probably make one of these in less time than it would take to find my padsaw. :)

Cheers

Dave
I think this is a great idea, except that I can't see what advantage it has over a non-stepped cylinder to fit the existing hole.
 
:D This is all starting to look like an exercise in making a simple job as complicated as possible.......
 
I think Doug's idea is practical and quick. I will use that myself as I want neat holes.
 
How about using a hole saw cut a hole the size you want in a piece of ply as a template, now hold the template on the ceiling and use it as a guide for your drill to stop it wandering? If it's only plasterboard I'm sure once the cut is established you could put the template down and carry on freehand?
I did this when I had 50 to do in my house. 1" thick piece of ply with hole drilled in it to the new size, held that in position over the existing hole, wedged in place with reversed clamp and broom handle, holesaw through the hole. Took about 30 seconds per hole to set up and stops the saw wandering.

Everyone suggesting a padsaw, the issue with that is breaking out bits around the hole which with Sod's law are ALWAYS bigger than the light bezel will cover. The extra time to make a template for the holesaw means you don't get that breakout.
 
Ooh, I like Mark's idea, especially as I have some ceiling clamps that would hold it in place.
However I do it, I do have to be careful about plaster dust. PD and plastic contact lenses are not good bedfellows.
S
 
I think this is a great idea, except that I can't see what advantage it has over a non-stepped cylinder to fit the existing hole.
Morning John

It just stops the disk from going through the hole.

Fair comment Mike, but I still haven't found my padsaw :)

Cheers

Dave
 
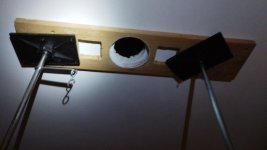
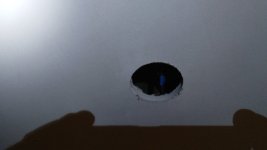
I meant to get my Powercap charged up and I forgot. But all was good (well, nearly all. I tried the first one with an offcut of plasterboard. Not a good idea. The cutter snagged and the whole lot shifted. A bit of a scar. Not terminal, but I do need to mix up a bit of filler.
IMG_20240416_113115.jpg
IMG_20240416_113232.jpg
So if anyone wants to try this, just make sure that the template is very firmly clamped and that the cutter is up to speed before it makes contact with the plasterboard. I had it touching the plasterboard and then tried to start it...

But all in all a successful upgrade, and the room is so much brighter now. Thanks for your input everyone.
S
 
A padsaw is your answer. Just mark out the hole and saw it. Quick and easy, but just be careful of the dust going in your eyes.
Agreed; simple and it works. I have ceiling spots in all the rooms in our house and that's the way I made the 'oles in the ceiling - Rob
 
Back
Top