

Dr.Al
Old Oak
I decided it was time to make a box. I didn't have any particular contents in mind, nor did I really care what it looked like: I mostly wanted to practice a few techniques (getting mitres right, using my home-made grooving planes, planing stuff to be flat and square etc). Hence I didn't spend any time thinking about design but just made it up as I went along out of material I had.
I haven't made a lid yet (I decided to make it separately rather than make the box in one piece and cut the lid off): I'll have a think about that tomorrow. I also haven't thought about finish yet.
The original plan had been to make it purely using hand tools. I've come pretty close to that, but when it came to getting the walnut insert pieces down to a consistent 2 mm thickness, I quickly decided that there was a good reason I bought a thicknesser recently and I used that. So far that's the only use of a power tool in this project.
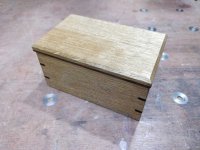
Here's what it looks like so far:
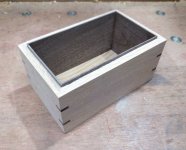
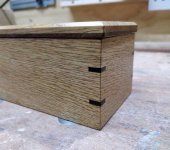
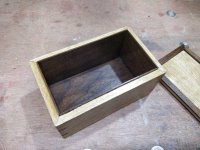
Another view: I was really pleased with three of the mitres: I can't see a gap at all. The fourth one has a very slight gap at the top: I guess I wasn't careful enough when shooting it.
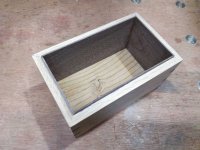
I made a bit of a mistake in the base build: I shot the mitres and then got the grooving plane out and made the grooves for the base. I then checked the mitres and realised they weren't quite right (probably hadn't been pressing down hard enough on the piece when they were on the shooting board), so had to go back to the shooting board. Unfortunately, one of the base bits suffered a bit going back to the shooting board (the groove left it too weak). Live and learn I guess. You can see this in the back-left of this photo of the underside:

Some in-progress pictures just because I took them while I was making it...
One of the sides getting its groove:

I've never had a go at splined mitres before. My approach to doing this was to use two layers of masking tape and some superglue to temporarily attach a saw to a block of wood that seemed to be about the right thickness. I also marked the limits of the splines with masking tape on the box (making sure the tape didn't protrude beyond the top or bottom of the box).
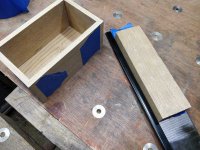
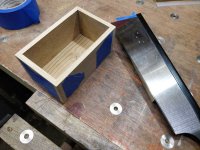
I then pushed the box down onto the bench and also pushed the saw down onto the bench while cutting into the corners. I repeated on all corners and with the box "right way up" and upside down.
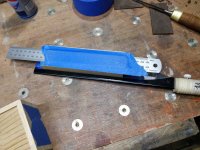
I then (having done some test cuts on a bit of scrap) masking taped a couple of steel rulers to the bottom of the wooden block and added more layers of masking tape until the resulting width of the two saw kerfs was right for the splines (3 mm thick as that's the smallest chisel I have):
Then it was just a case of digging out the gaps with a chisel:
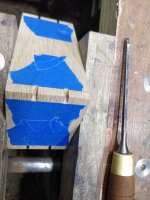
I'd planed the walnut for the splines down to 3.2 mm, thinking I could tweak the thickness down to 3 mm with some sandpaper or whatever. I figured it was better that they were too thick rather than too thin. Having chiselled out the gaps, I did a quick test and they fitted with only fairly gentle persuasion from the hitting stick so in the end I didn't sand them down at all and just fitted them as is.
Tomorrow I'll try to decide what material to make the lid out of (probably oak, but maybe walnut) and then try to decide how to make it a slightly more interesting shape than just a flat top!
I haven't made a lid yet (I decided to make it separately rather than make the box in one piece and cut the lid off): I'll have a think about that tomorrow. I also haven't thought about finish yet.
The original plan had been to make it purely using hand tools. I've come pretty close to that, but when it came to getting the walnut insert pieces down to a consistent 2 mm thickness, I quickly decided that there was a good reason I bought a thicknesser recently and I used that. So far that's the only use of a power tool in this project.
Here's what it looks like so far:
Another view: I was really pleased with three of the mitres: I can't see a gap at all. The fourth one has a very slight gap at the top: I guess I wasn't careful enough when shooting it.
I made a bit of a mistake in the base build: I shot the mitres and then got the grooving plane out and made the grooves for the base. I then checked the mitres and realised they weren't quite right (probably hadn't been pressing down hard enough on the piece when they were on the shooting board), so had to go back to the shooting board. Unfortunately, one of the base bits suffered a bit going back to the shooting board (the groove left it too weak). Live and learn I guess. You can see this in the back-left of this photo of the underside:
Some in-progress pictures just because I took them while I was making it...
One of the sides getting its groove:
I've never had a go at splined mitres before. My approach to doing this was to use two layers of masking tape and some superglue to temporarily attach a saw to a block of wood that seemed to be about the right thickness. I also marked the limits of the splines with masking tape on the box (making sure the tape didn't protrude beyond the top or bottom of the box).
I then pushed the box down onto the bench and also pushed the saw down onto the bench while cutting into the corners. I repeated on all corners and with the box "right way up" and upside down.
I then (having done some test cuts on a bit of scrap) masking taped a couple of steel rulers to the bottom of the wooden block and added more layers of masking tape until the resulting width of the two saw kerfs was right for the splines (3 mm thick as that's the smallest chisel I have):
Then it was just a case of digging out the gaps with a chisel:
I'd planed the walnut for the splines down to 3.2 mm, thinking I could tweak the thickness down to 3 mm with some sandpaper or whatever. I figured it was better that they were too thick rather than too thin. Having chiselled out the gaps, I did a quick test and they fitted with only fairly gentle persuasion from the hitting stick so in the end I didn't sand them down at all and just fitted them as is.
Tomorrow I'll try to decide what material to make the lid out of (probably oak, but maybe walnut) and then try to decide how to make it a slightly more interesting shape than just a flat top!




 - Rob
- Rob

